Configuring Procurement Workflows
Note: This article covers how to build and configure procurement approval workflows within Spend Programs. If you're looking for general information about creating and managing Spend Programs, see Get started with Procurement.
Overview
Procurement workflows let you define what happens when an employee submits a spend request — who needs to approve it, what information is collected, and which external tools are involved. Each workflow is attached to a Spend Program and runs automatically from the moment a request is submitted until the card or purchase order (PO) is approved.
You build workflows using the Workflow Builder, a visual drag-and-drop canvas. Each step in your workflow is a node on the canvas, and you connect them to define the order of execution. No code required.
How it works
Step 1: Open the workflow builder
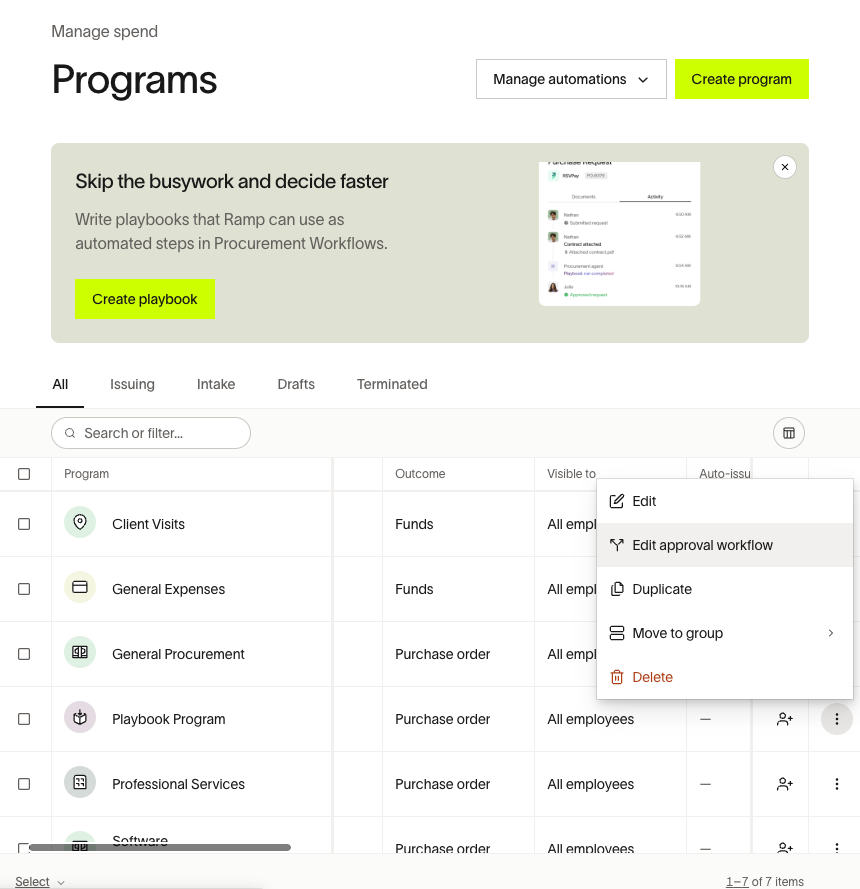
- Go to Manage Spend Programs
- Create a new Spend Program or select an existing one.
- If creating a new program, select Purchase order intake or Approvals only intake.
- If editing an existing program, select the three dots in the table - "Edit approval workflow".
Step 2: Understand the canvas
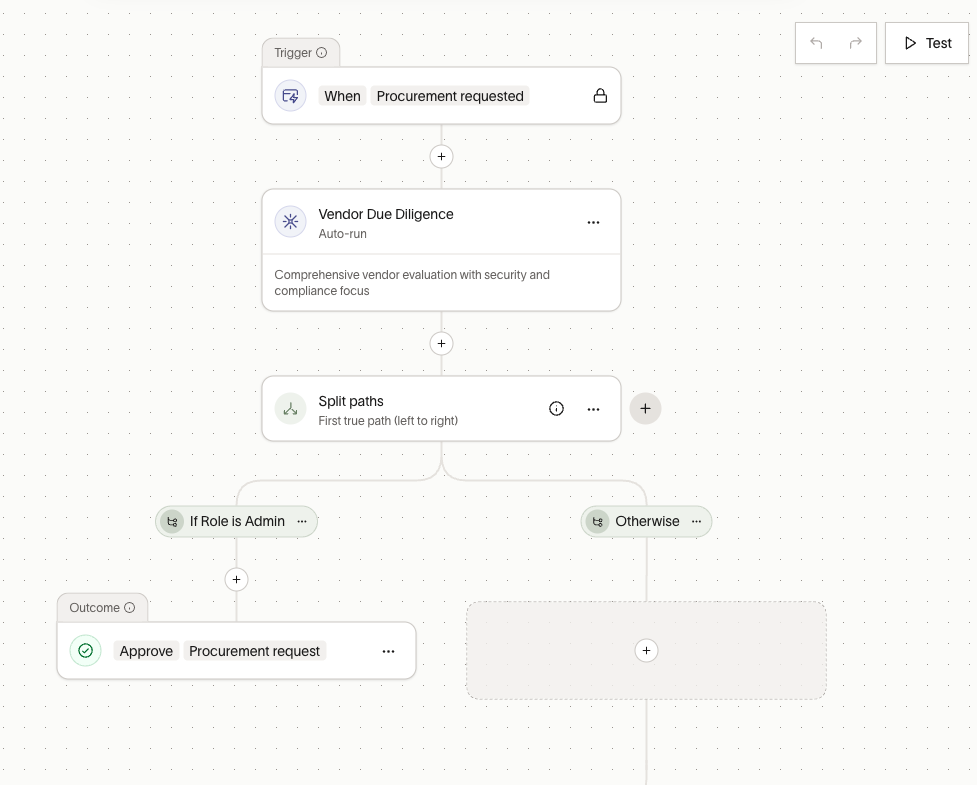
The builder opens as a full-screen canvas with two nodes already in place:
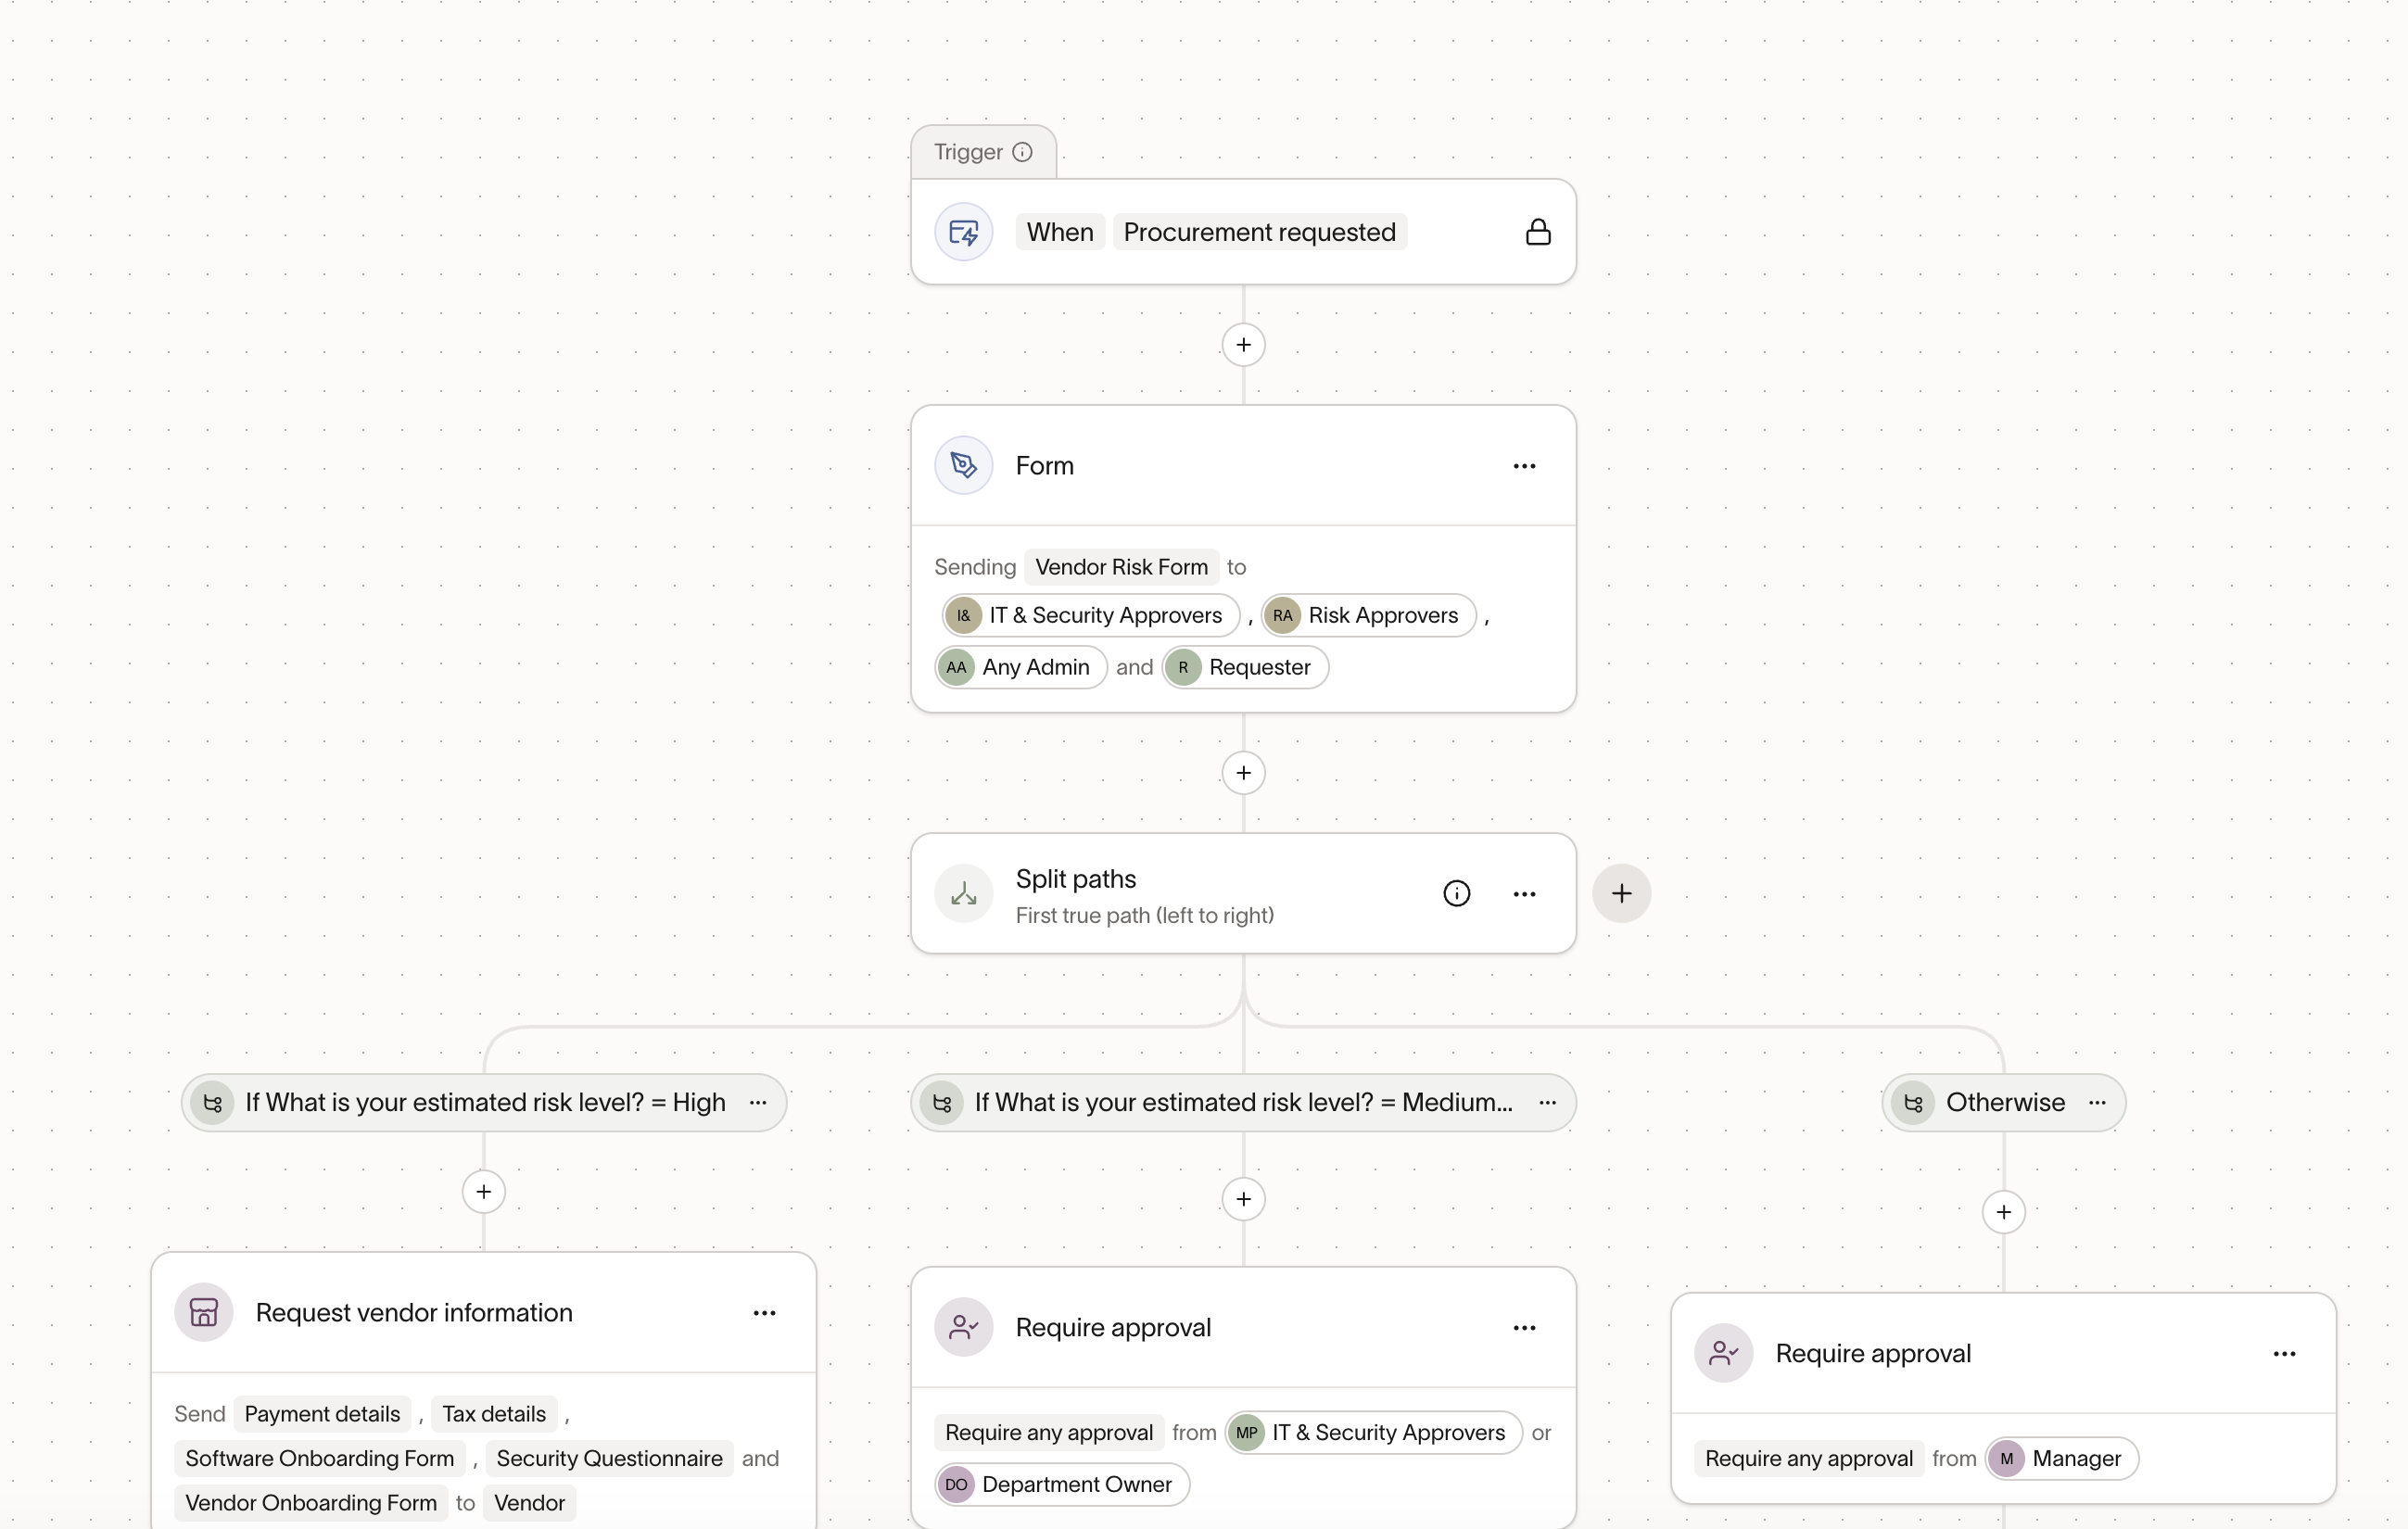
- Trigger — The event that starts the workflow (for example, "Procurement requested"). Ramp sets this automatically based on the workflow type, and you cannot edit it.
- Outcome — The final step that approves the card or PO once all preceding steps are complete.
You add steps between these two nodes to build your approval process.
Step 3: Add steps
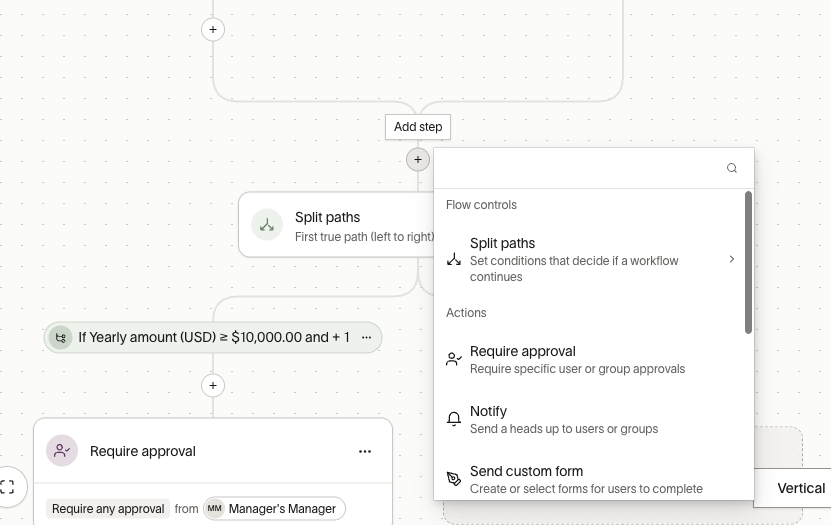
Click the + icon between any two nodes to insert a step. For the full list of available steps, see Available step types.
Step 4: Configure each step
Click any step to open its configuration panel on the right side of the screen. Each step type has its own options. See Configuring steps for details on the most common configurations.
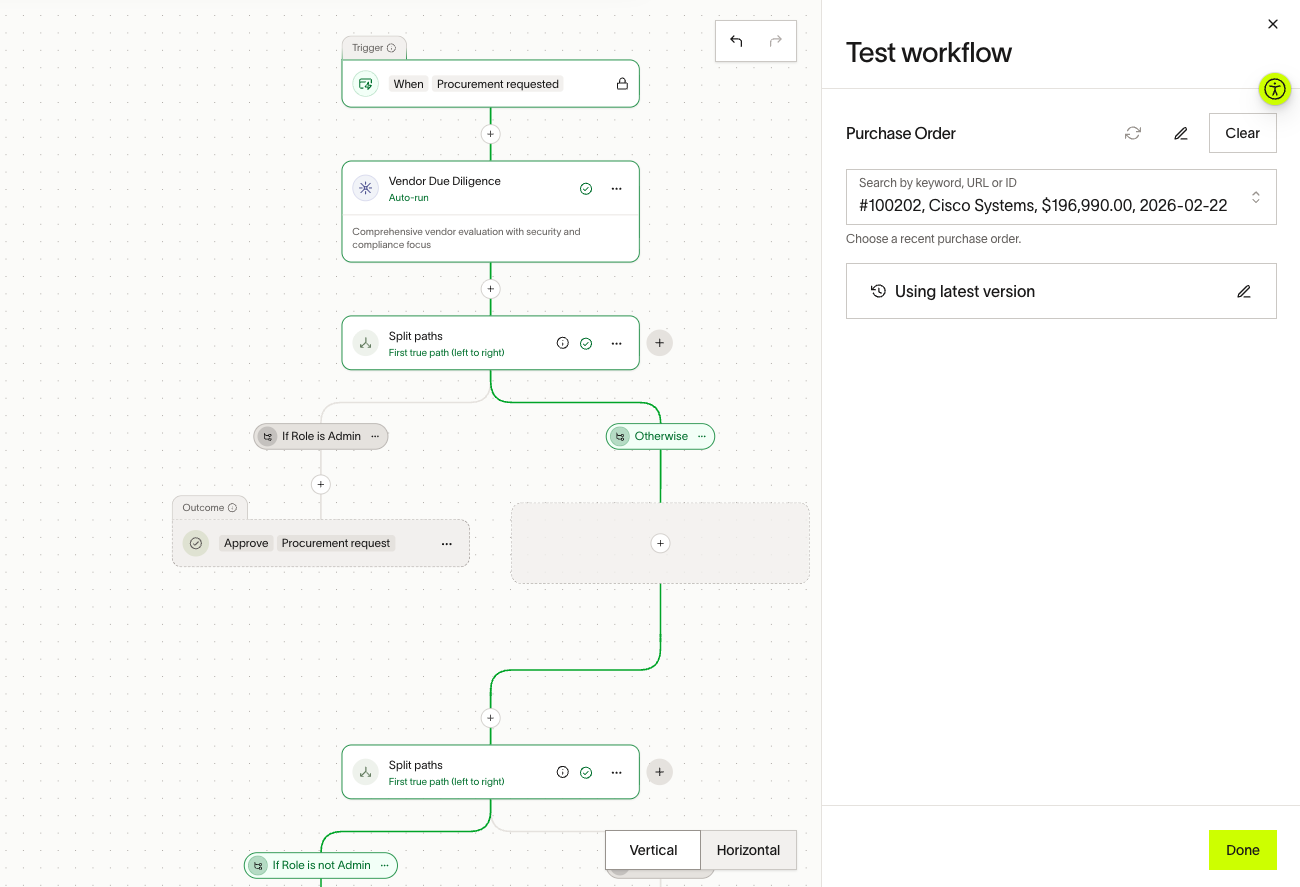
Step 5: Test your workflow
Click Test in the right hand upper corner to test your workflow before publishing. You can select a recent PO or enter sample data to see which path a request takes, which steps execute, and the estimated approval time. If your workflow uses workflow blocks, they expand automatically during simulation so you can trace the full path.
Step 6: Save and publish
Click Save to save your workflow.
New requests follow the updated workflow. Requests already in progress continue using the version that was active at the time of submission.
Ramp keeps a history of published versions so you can review how your workflow has changed over time.
Available step types
When you click + to add a step, you can choose from the following categories.
Approvals and notifications
| Step | Description |
|---|---|
| Require approval | Require specific users or groups to approve the request before the workflow continues. |
| Notify | Send a notification to users or groups without blocking the workflow. |
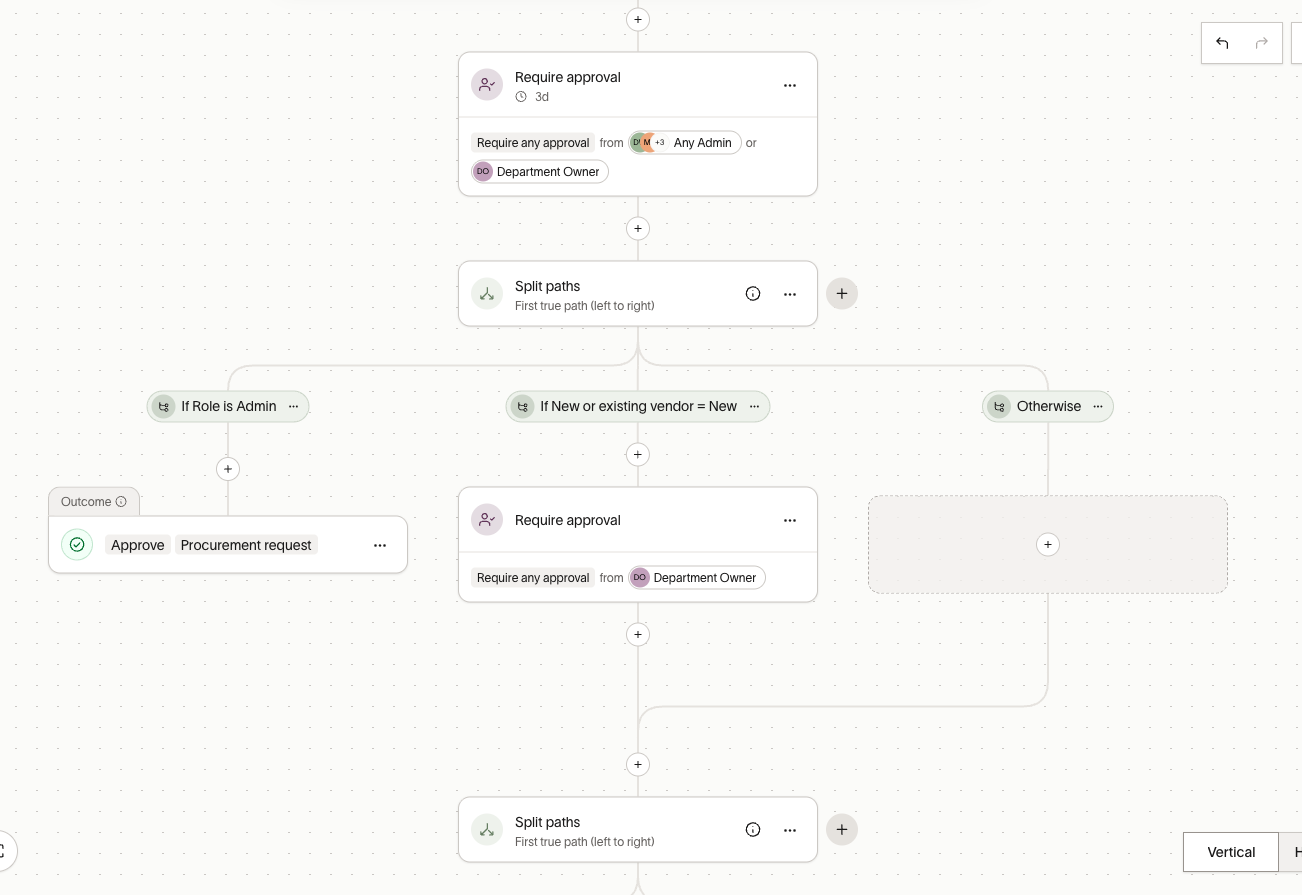
Conditional logic
| Step | Description |
|---|---|
| Split paths | Create branching logic so your workflow adapts based on the details of a request. Supports two execution types: First true path (runs only the first matching branch, like if/else) and All true paths (runs every matching branch in parallel). |
Data collection
| Step | Description |
|---|---|
| Send custom form | Send a form to users or groups to collect additional information mid-workflow. You can reference responses in downstream Split paths conditions. |
| Request vendor information | Collect payment details, tax forms (W-9), and business verification from vendors as part of the procurement process. |
Workflow management
| Step | Description |
|---|---|
| Assign request coordinator | Designate someone to manage and oversee the request through the rest of the workflow. |
| Workflow blocks | Insert a reusable set of workflow steps that you can share across multiple Spend Programs. Define a standard process once and embed it anywhere — edits to the source block update everywhere it's used. |
Integrations
| Step | Description |
|---|---|
| Ironclad | Automatically launch an Ironclad contract workflow. Map Ramp form fields to Ironclad attributes. Ironclad integration guide |
| SpotDraft | Launch, review, and store contracts in SpotDraft. |
| LinkSquares | Launch, review, and store contracts in LinkSquares. |
| DocuSign | Send documents for signature. Configure signers, signing order (sequential or parallel), and envelope details. DocuSign integration guide |
| Dropbox Sign | Launch signature requests through Dropbox Sign. Dropbox Sign integration guide |
| Jira | Create, assign, and track Jira issues. Map Ramp fields to Jira fields, and optionally block the workflow until the ticket reaches a specific status. Jira integration guide |
| Asana | Create, assign, and track Asana tasks. Asana integration guide |
| Linear | Create, assign, and track Linear issues. Linear integration guide |
| Vanta | Conduct automated vendor security reviews in Vanta. Vanta integration guide |
| OneTrust | Launch vendor risk assessments in OneTrust. OneTrust integration guide |
| LogicGate | Launch LogicGate records for risk and compliance workflows. |
| Drata | Conduct automated vendor security reviews in Drata. Ramp creates the vendor and starts the review; results sync back to advance or stop the workflow. |
| Lema AI | Automate vendor assessments and third-party risk management. |
| Custom API workflow | Build custom integration steps using Ramp's API for scenarios not covered by built-in integrations. Custom API workflow documentation |
Note: Integration steps become available after you enable the corresponding integration in your Ramp account. Navigate to Automations > Integrations to add, search for, or see all integrations.
AI-powered steps (agents)
See Get started with Ramp Procurement agents.
| Step | Description |
|---|---|
| Agent review | A structured AI review that evaluates request data against custom criteria you define. Can approve requests automatically or escalate to a human reviewer. You can reference results in downstream Split paths conditions. |
Configuring steps
Click any step to open its configuration panel. Below are the key options for the most commonly configured step types.
Require approval
- Approval type:
- Require any — At least one person from the selected approvers must approve.
- Require all — Every selected approver must approve.
- Approvers — Select specific users, fixed groups (for example, "Finance Team"), or relative groups (for example, "Department Manager" or "Location Manager").
- Deadline (SLA) — Set a service-level agreement (SLA) due date for the approval (for example, "Due in 3 business days"). This can override the program's default SLA.
- Instructions — Add instructions displayed to the approver (up to 1,000 characters).
- Tasks (checklist) — Add a checklist of items the approver must complete (for example, "Verify contract terms"). You can mark items as required. Up to 20 items.
- Separation of duties — Control whether requesters can approve their own requests.

Split paths
- Execution type:
- First true path — Evaluates conditions left to right and runs only the first matching branch.
- All true paths — Runs every branch that evaluates to true in parallel.
- Conditions — Each branch has one or more conditions grouped with AND / OR logic.
- Operators: is, is not, is greater than, is less than, is greater than or equal to, is less than or equal to, is between, is set, is not set.
- Available condition fields:
- Request data: amount, vendor type (new or existing), request type (new, renewal, expansion), department, location, business entity.
- User data: requester's role (Admin, Manager, Employee, Finance admin, and others), department, custom user fields.
- Accounting data: tracking category selections.
- Upstream data: responses from custom forms or AI agent reviews earlier in the workflow.
- Fallback: Add an "Otherwise" path that runs when no other conditions match.
- Limits: Up to 30 paths per split node and up to 10 nested conditions per path.
Send custom form
- Select an existing workflow form or create a new one.
- Assign specific users or groups to fill out the form.
- Available field types: text, paragraph, number, date, email, link, file upload, address, monetary amount, yes/no, vendor selector, department selector, contact selector, merchant, and merchant category.
- You can map form questions to core system fields (for example, mapping a "Net Terms" question directly to a vendor's payment terms).
For more information see Send follow-up forms in procurement workflows.
Request vendor information
- Welcome message — Add instructions or a welcome message for the vendor.
- Payment details — Request bank account information, with an option to require bank account confirmation.
- Tax details — Request W-9 or other tax documentation.
- Business verification — Run a screening on the vendor's business.
- Custom forms — Create additional forms for the vendor to complete.
- Require completion — Block the workflow from continuing until the vendor completes all selected forms.
Workflow blocks
- Select from existing workflow blocks or create new ones.
- You can expand blocks on the canvas to view their internal steps, or collapse them into a single node for a cleaner view.
- Editing the source workflow block automatically updates every workflow that references it.
- You cannot place integration nodes or nested workflow blocks inside a workflow block.
Workflow triggers
The trigger is the first node in your workflow and fires automatically based on the workflow type. You cannot edit triggers.
| Trigger | When it fires |
|---|---|
| Procurement requested | A new card or PO request is submitted. |
| Change order requested | A modification is made to an existing PO (for example, increasing the budget). |
| Approval requested | Used for "Approval Only" workflows that don't create a card or PO. |
| RFX requested | A new request for proposal (RFP), request for quote (RFQ), or request for information (RFI) is created. |
| Sourcing event requested | A sourcing or bid management event is initiated. |
Workflow progress tracking
Once a procurement request is submitted, both submitters and reviewers can track its progress:
- Visual workflow diagram — Shows the current status, including which step is pending and who needs to act.
- Time tracking per step — Shows how long each step is taking so you can identify bottlenecks.
- Completed and upcoming steps — View which approvals and actions are complete and what's next in the workflow.
Use cases and examples
- Scenario: “Team software and small tools under $500”
- A company wants employees to move quickly on everyday tools, while still keeping spend visible to the budget owner.
- Trigger: A requester submits a purchase request for a non-catalog item.
- Condition: If the request total is under $500 (or whatever threshold fits your policy).
- Approvals: Route to one approver (often the requester’s direct manager or cost center owner).
- Outcome: Once approved, the request can move straight to PO creation or purchasing.
- Real-world example:
- A Marketing Coordinator needs a $240 one-year subscription for a design plugin. They submit a request coded to “Marketing – Tools.” Because it is under $500, it goes only to the Marketing Manager for approval. The manager approves the same day, and the purchase proceeds without Finance or Procurement getting pulled in.
- Scenario: “New SaaS vendor, $50k annually, requires security sign-off”
- A company wants to ensure high-value purchases and new vendors are reviewed by the right teams, without turning it into a slow, fully sequential chain.
- Trigger: A requester submits a high-value purchase request for a new vendor .
- Conditions:
- Amount is over $25,000 (example threshold)
- Vendor is new (not already onboarded / not an approved vendor)
- Approvals (in parallel):
- Finance (budget and terms)
- Department leader (business justification)
- Security/IT (security questionnaire, SSO requirements, data handling)
- Procurement/Vendor onboarding (W-9, banking/payment method, compliance checks)
- Outcome: The request only moves forward once all parallel approvers have signed off, then Procurement can finalize onboarding and purchasing.
- Real-world example:
- Data Science requests a new analytics platform for $60k per year. The tool will store customer data, so Security must review. As soon as the request is submitted, the approvals fan out:
- Finance confirms budget availability and pushes for annual prepay discount terms.
- Security sends a standard security questionnaire and confirms SOC 2 coverage.
- Procurement starts onboarding (tax form, payment details, vendor record setup).
- Because these happen in parallel, Procurement is not waiting for Finance to finish before starting onboarding, which can save multiple days.
Best practices and tips
- Name your steps clearly — Clear names help you track workflow progress and make the canvas easier to understand at a glance.
- Include instructions for approvers — Add context so reviewers know exactly what to look for.
- Use parallel paths to reduce approval time — When multiple departments need to review simultaneously, use All true paths in a Split paths node.
- Standardize with workflow blocks — Reuse common processes (like security reviews or legal approvals) across Spend Programs to keep them in sync.
- Test before publishing — Use the Simulate feature to catch logic errors before your workflow goes live.
- Set deadlines — Add SLAs to approval steps to keep requests moving and create accountability.
- Reference upstream data in conditions — Route requests based on responses from earlier custom forms or AI agent reviews.
Frequently asked questions
Can I have multiple workflows for different Spend Programs?
Yes. Each Spend Program has its own workflow. You can configure different approval logic, integrations, and conditions for each program.
What happens to in-flight requests when I publish a new workflow version?
Requests already in progress continue following the workflow version that was active when they were submitted. Only new requests use the updated workflow.
Can I reuse workflow logic across programs?
Yes. Use Workflow blocks to define reusable sets of steps shared across multiple Spend Programs. Changes to a workflow block automatically propagate everywhere it's used.
Can workflows branch into multiple parallel paths?
Yes. Use the Split paths step with the All true paths execution type. Every branch whose condition evaluates to true runs in parallel.
What integrations are supported?
Ramp supports Ironclad, SpotDraft, LinkSquares, DocuSign, Dropbox Sign, Jira, Asana, Linear, Vanta, OneTrust, LogicGate, Drata, Lema AI, Slack, and custom API workflows. You must enable the corresponding integration in your Ramp account before it appears in the Workflow Builder.
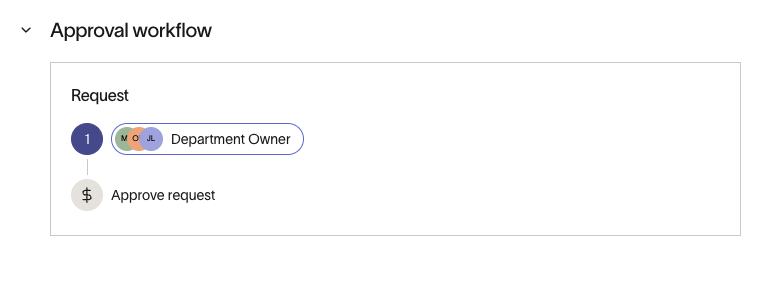
How do Policies work?
Policies can automatically do the upfront research in an approval workflow, like pulling in relevant context, checking policy, and summarizing risk so approvers do not have to start from scratch. Based on the policy’s outcomes, you can conditionally route the request to the right next approvers, and show downstream approvers the policy’s results so the decision trail is consistent and transparent.
Can I test my workflow before publishing?
Yes. Use the Test feature to test your workflow with a real PO or sample data. The simulator shows exactly which path a request takes and provides an estimated approval time.
What triggers are available?
Procurement workflows support these triggers: Procurement requested, Change order requested, Approval requested, RFX requested, and Sourcing event requested. Ramp sets triggers automatically based on the workflow type, and you cannot edit them.
Is there a limit to how complex my workflow can be?
You can add up to 30 paths per split node and up to 10 nested conditions per path. You cannot place integration nodes or nested workflow blocks inside a workflow block.