Microsoft Entra integration: Set up role assignments
Overview
This document will walk through setting up a roles attribute on the Ramp user profile in Microsoft Entra that will sync over to Ramp user roles via your existing SCIM integration. For help with initial SCIM setup, visit this article.
Tip: Looking to assign multiple roles or Custom Roles via SCIM? See Assign roles by Ramp Role ID in Microsoft Entra (Early Access).
Note: Role assignments from Entra are currently only supported for businesses with access to the full Ramp suite, including card issuing. Other Entra SCIM features are still fully available.
Assign one system role in Microsoft Entra with legacy enum values
Navigate to App registrations in the far left sidebar.
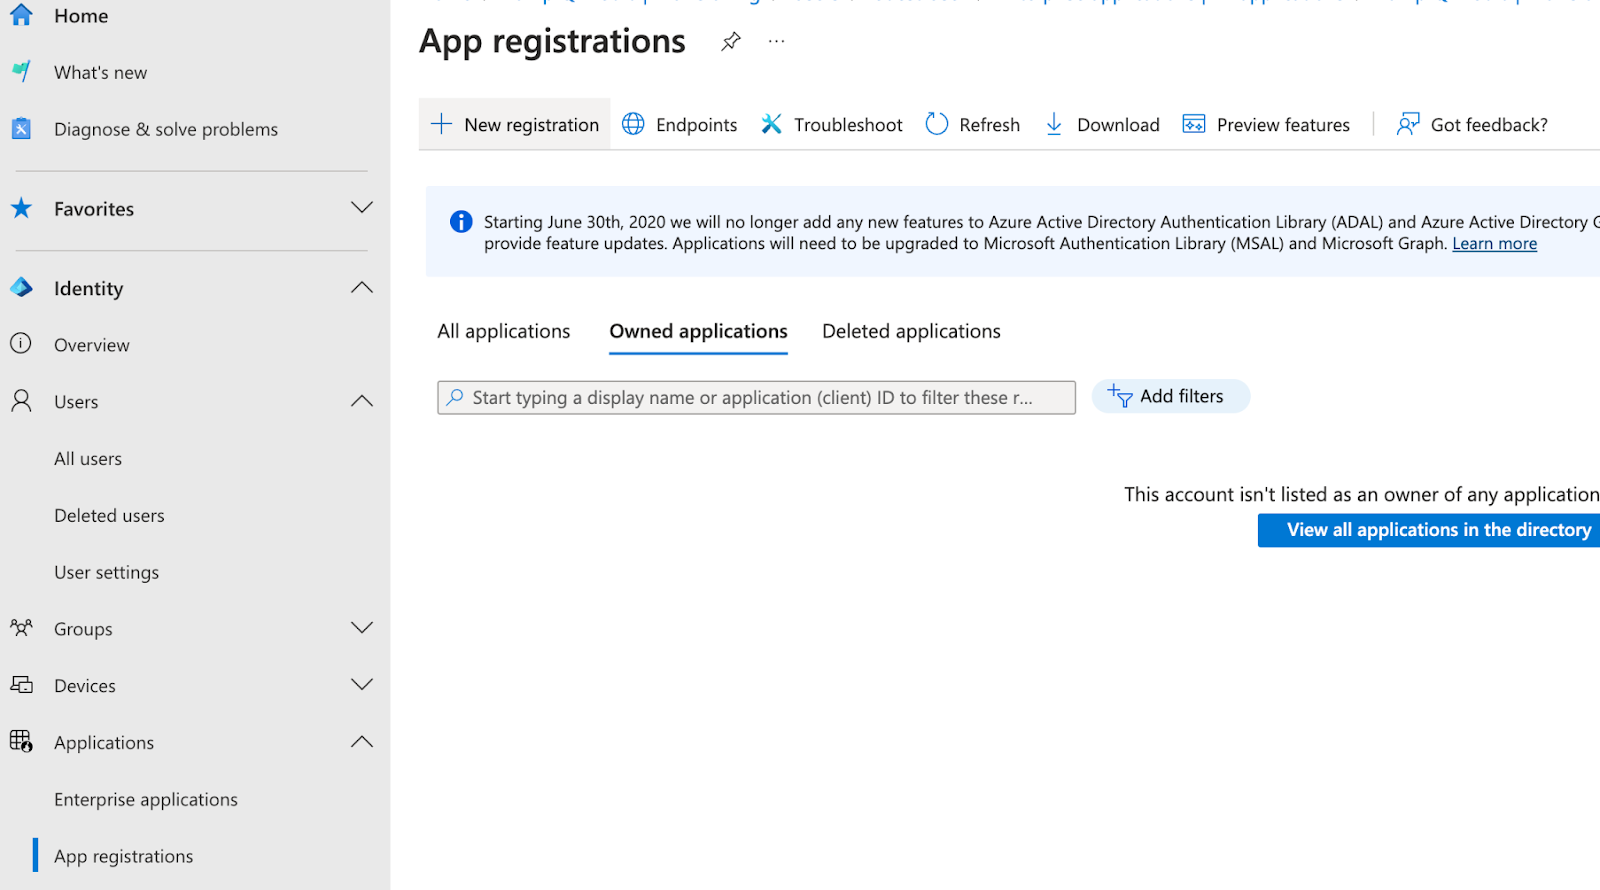
Under the All applications tab, select your Ramp integration. This will take you to the application's registration overview page.
From here, navigate to App roles in the sidebar.
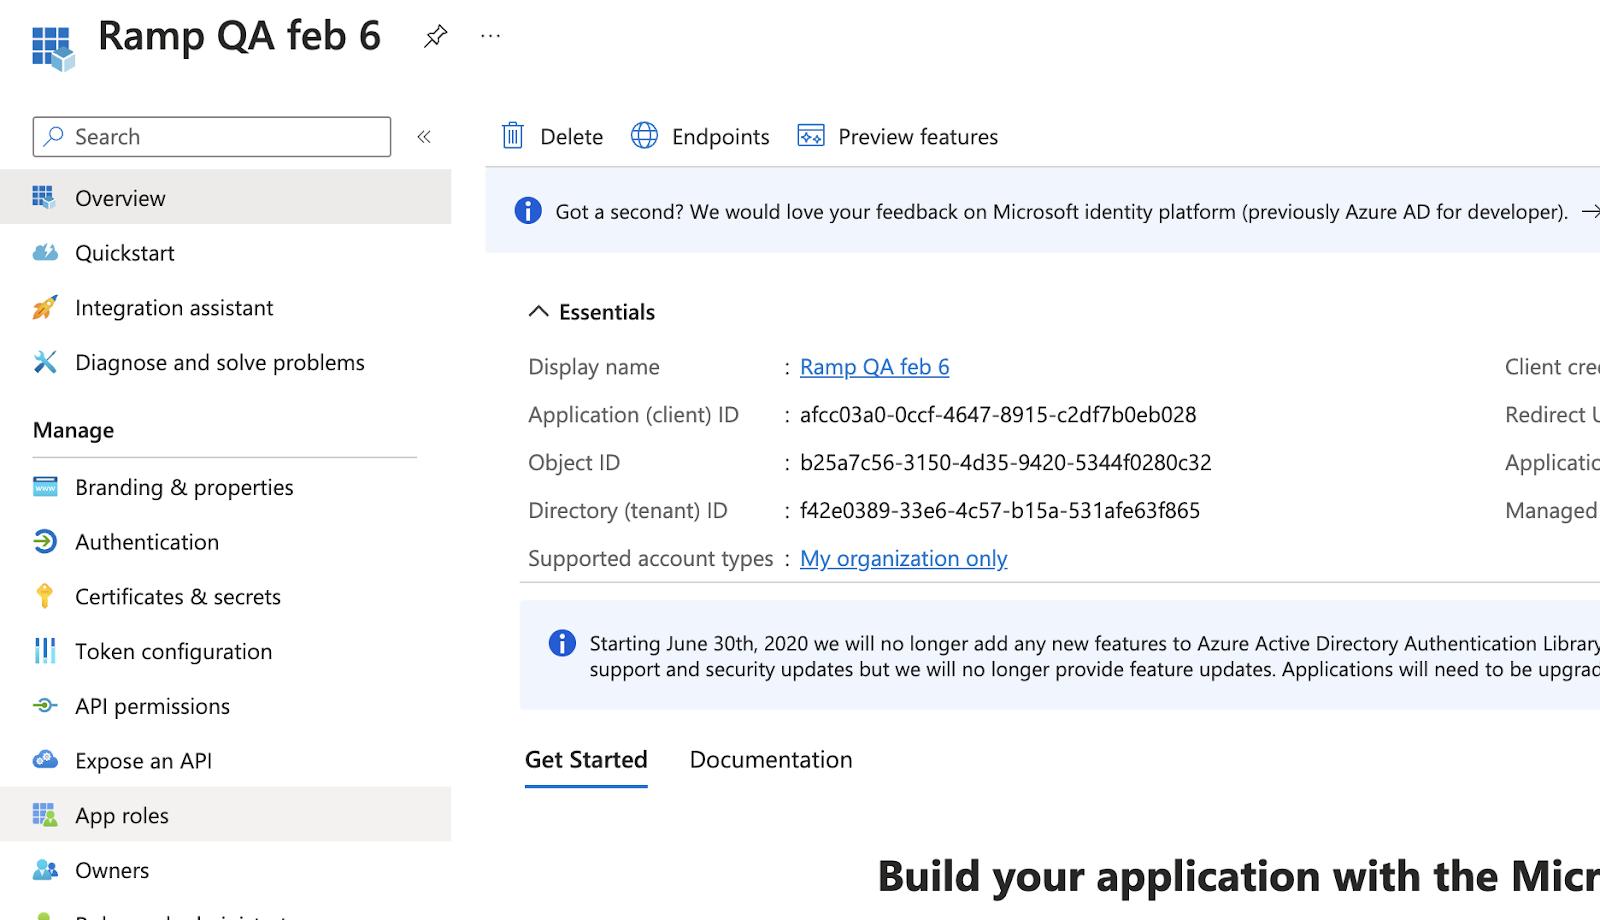
Create roles matching the desired Ramp roles by clicking Create app role and inputting information on each role you’re creating. Supported roles include:
| Display name | Value |
|---|---|
| Admin | BUSINESS_ADMIN |
| Cardholder | BUSINESS_USER |
| Accounting | BUSINESS_BOOKKEEPER |
| Guest | GUEST_USER |
| IT Admin | IT_ADMIN |
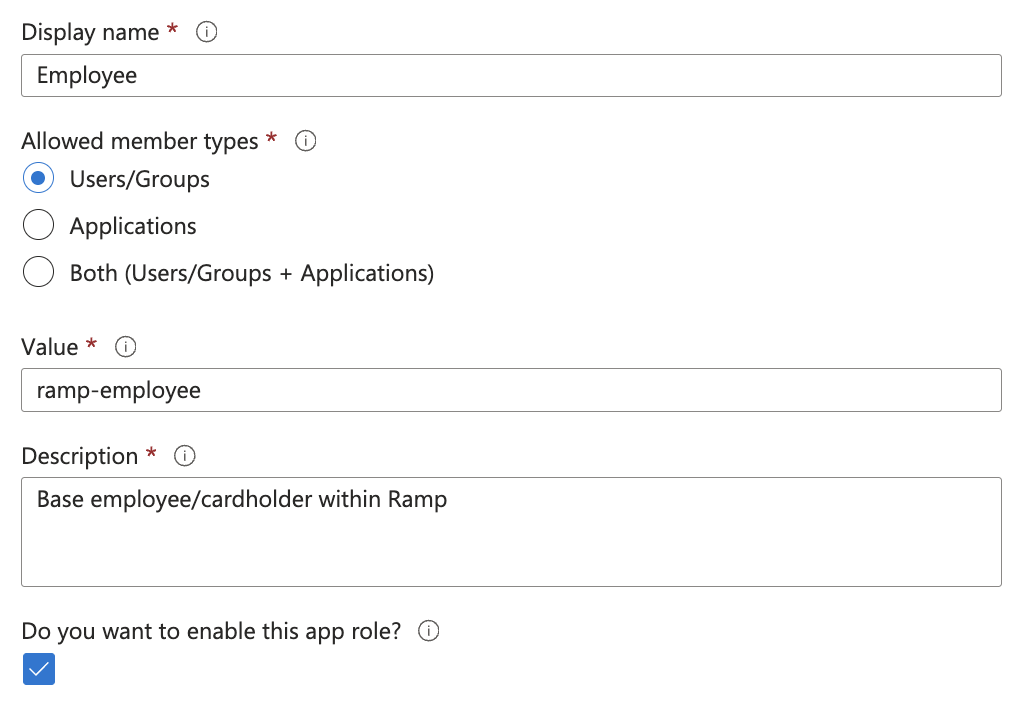
The completed setup for each role should mirror the image below. The description can be any desired description.
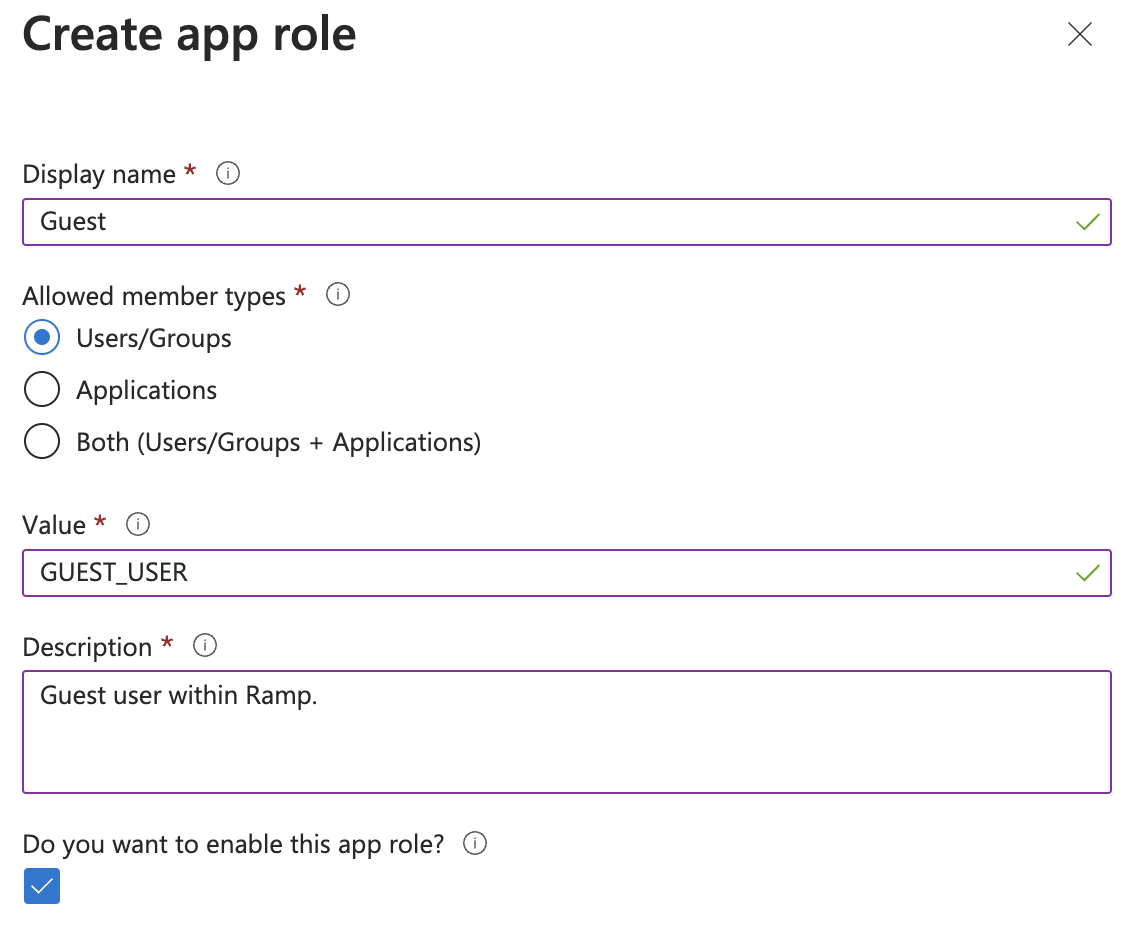
Other default roles can be removed from the application. Ramp will not recognize these other roles.
To apply these roles to users in the Ramp application, navigate Enterprise applications in the left sidebar and then click into your Ramp enterprise application.
In your Ramp application, click Provisioning, then Attribute mapping (Preview), then Provision Microsoft Entra ID Users to reach the mappings for your application:
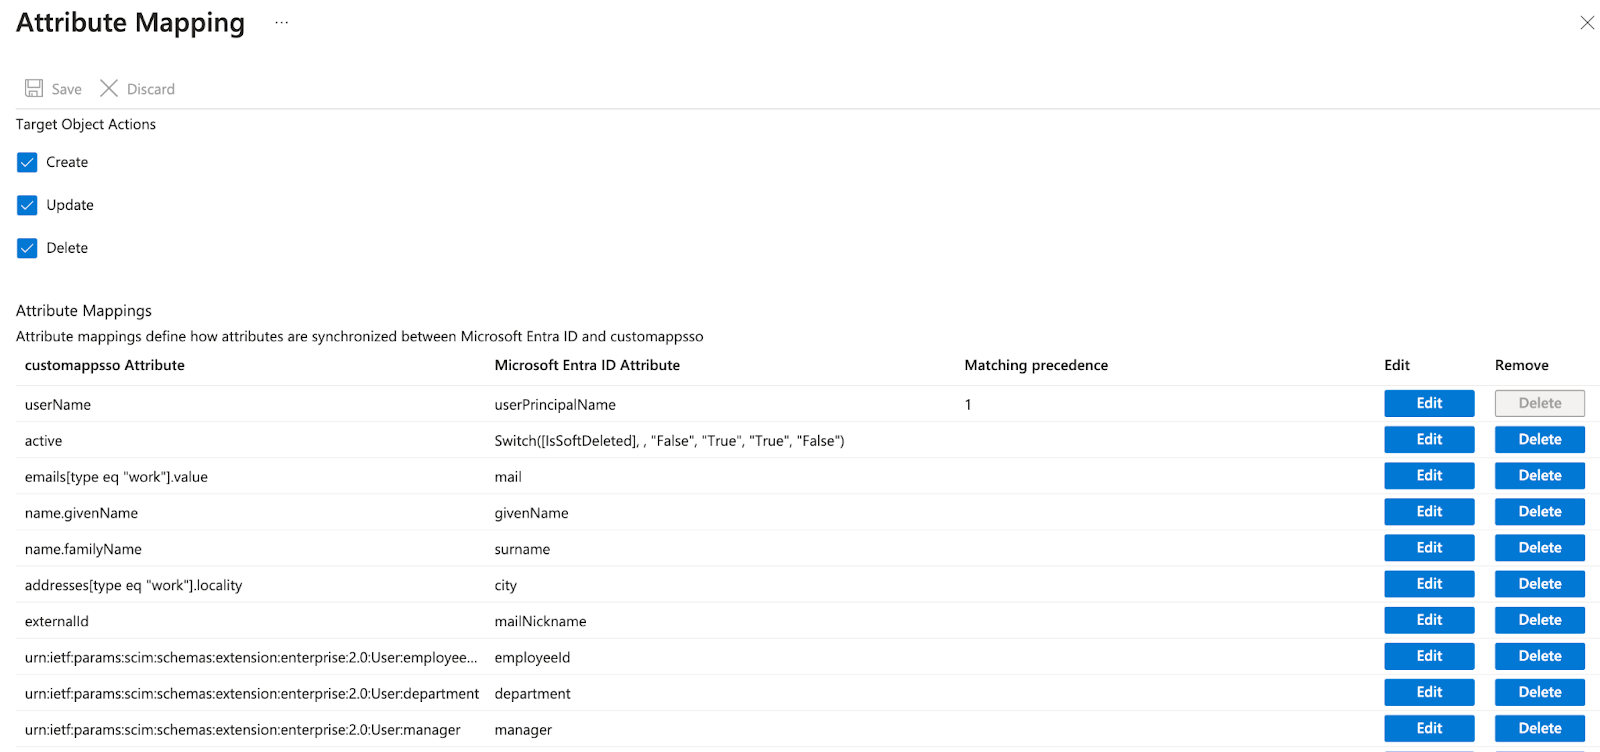
At the bottom of the screen, click Show advanced options and then Edit attribute list for customappsso.
Here, add “roles” as a new attribute with the “String” type. Leave the other columns unchecked.
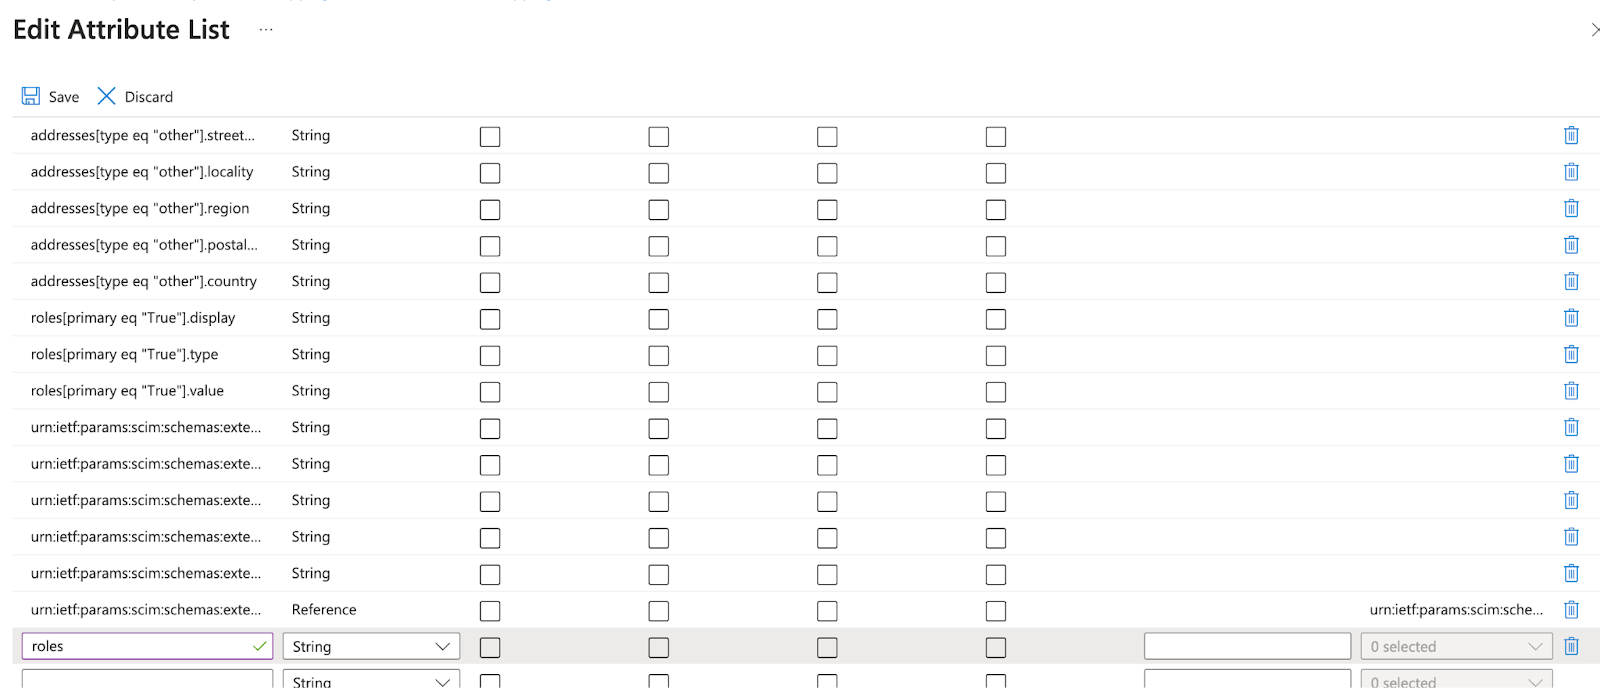
Save this configuration at the top of the screen, and then navigate back to the Attribute mapping page using the link at the top of the page.
Now, click Add New Mapping below the table of existing attribute mappings:
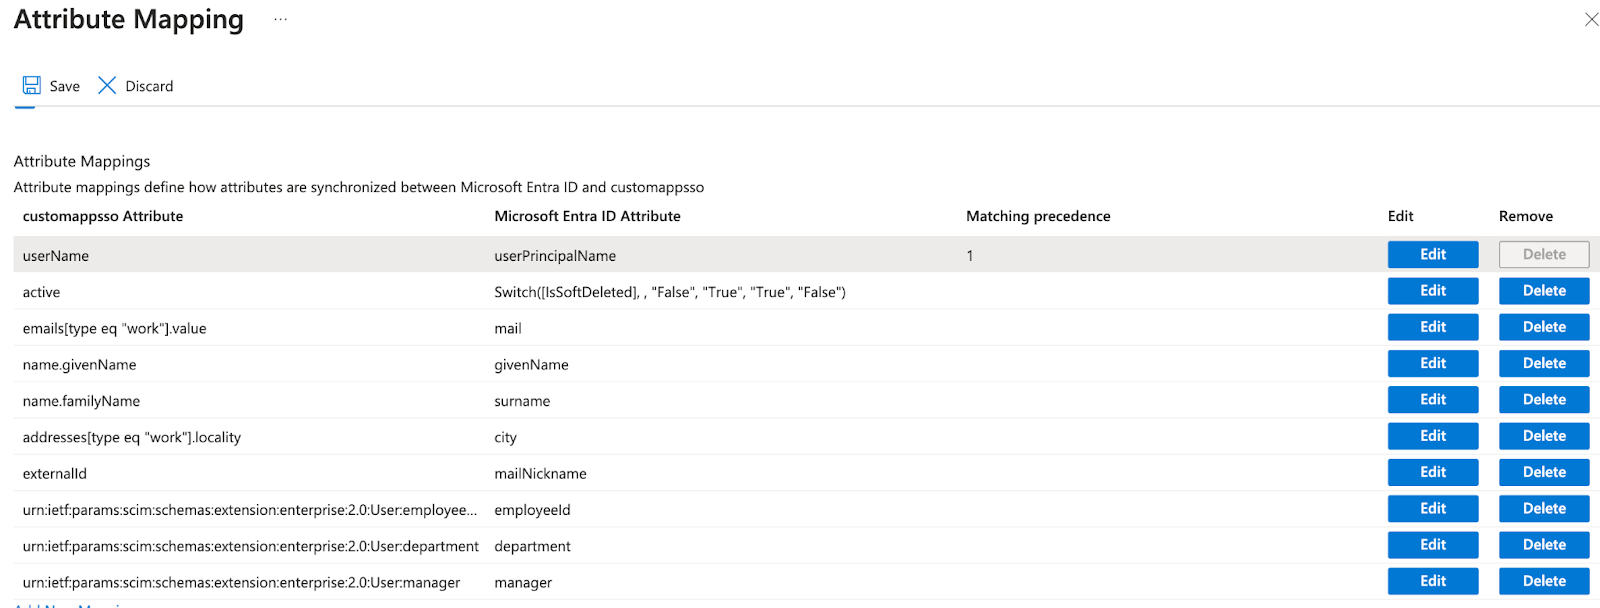
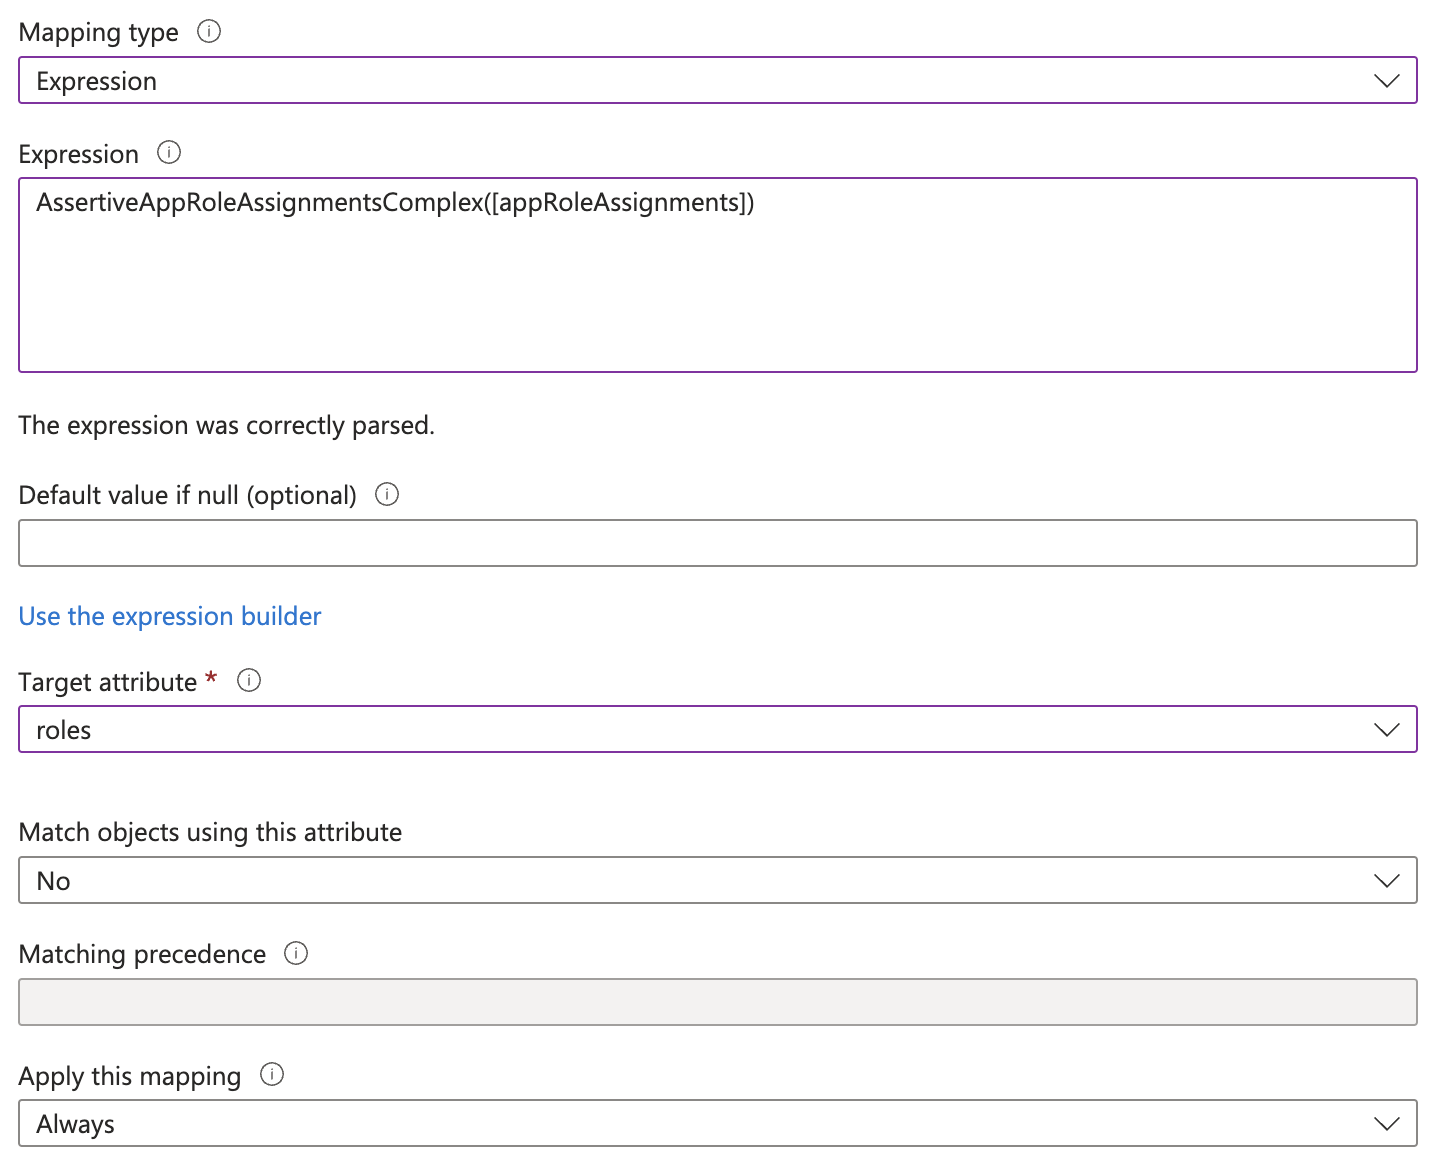
Enter the following configuration for role assignments:
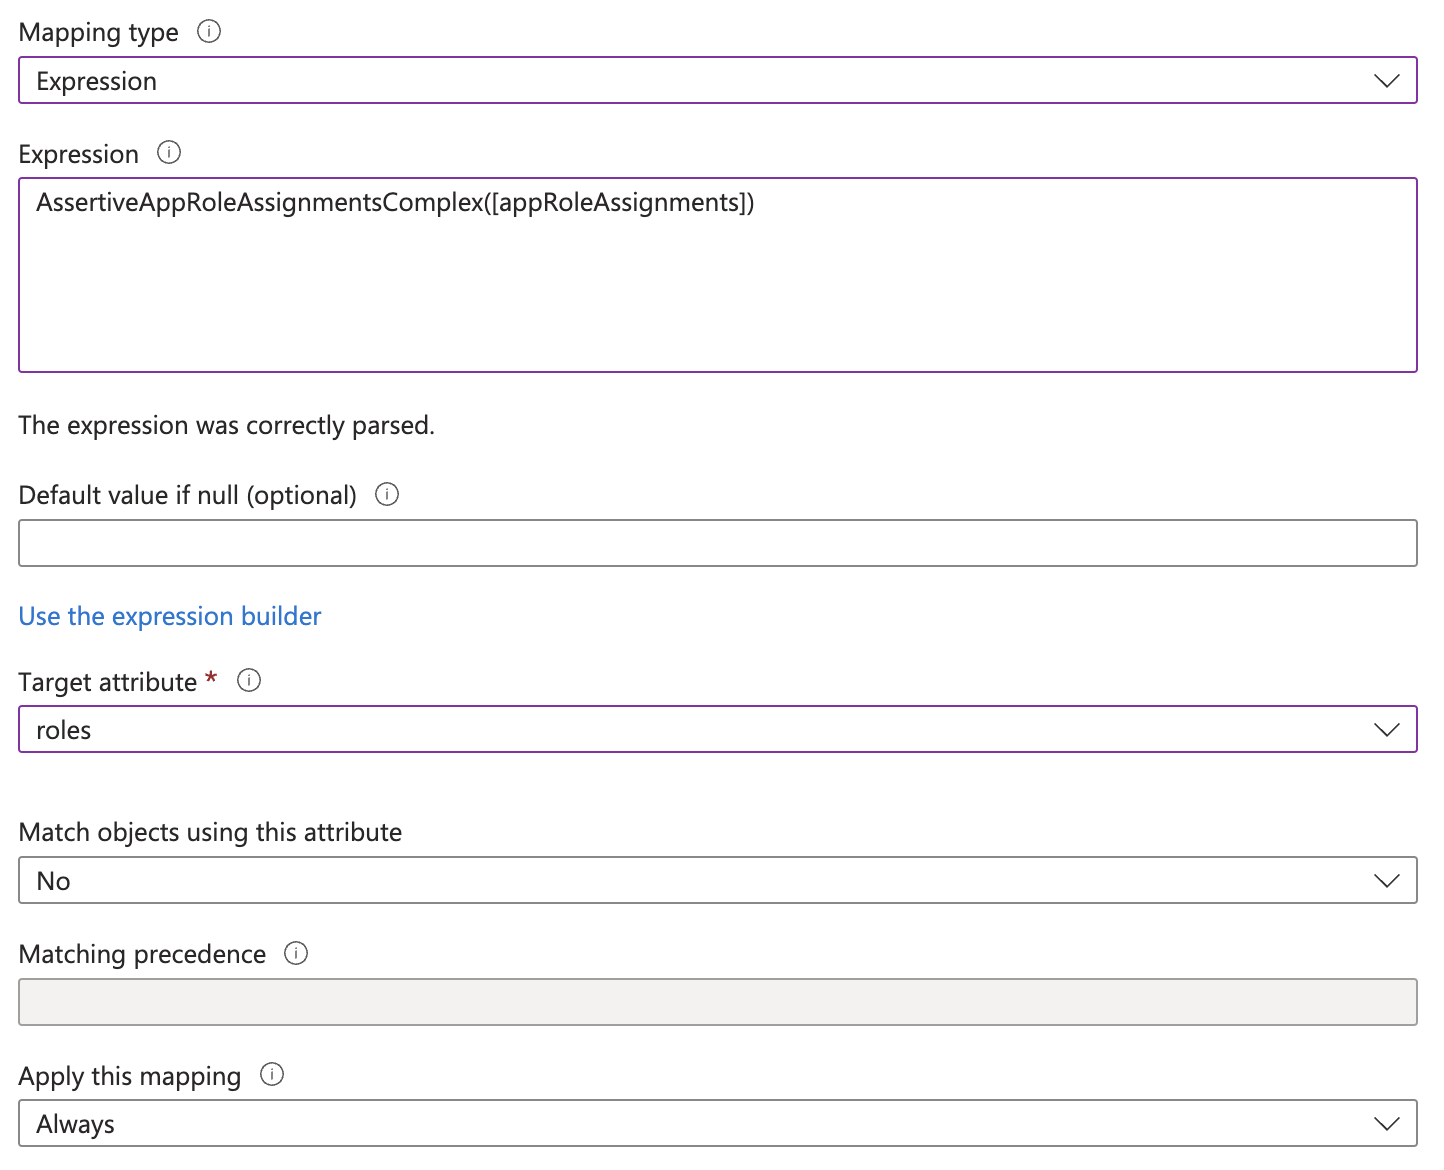
Ensure that the Expression value is correct:
AssertiveAppRoleAssignmentsComplex([appRoleAssignments])
Finish adding the mapping and save the new mapping in the attribute mapping menu.
Entra is now set to provision user roles to Ramp. Adding roles to new or existing users will result in those roles being applied in Ramp.
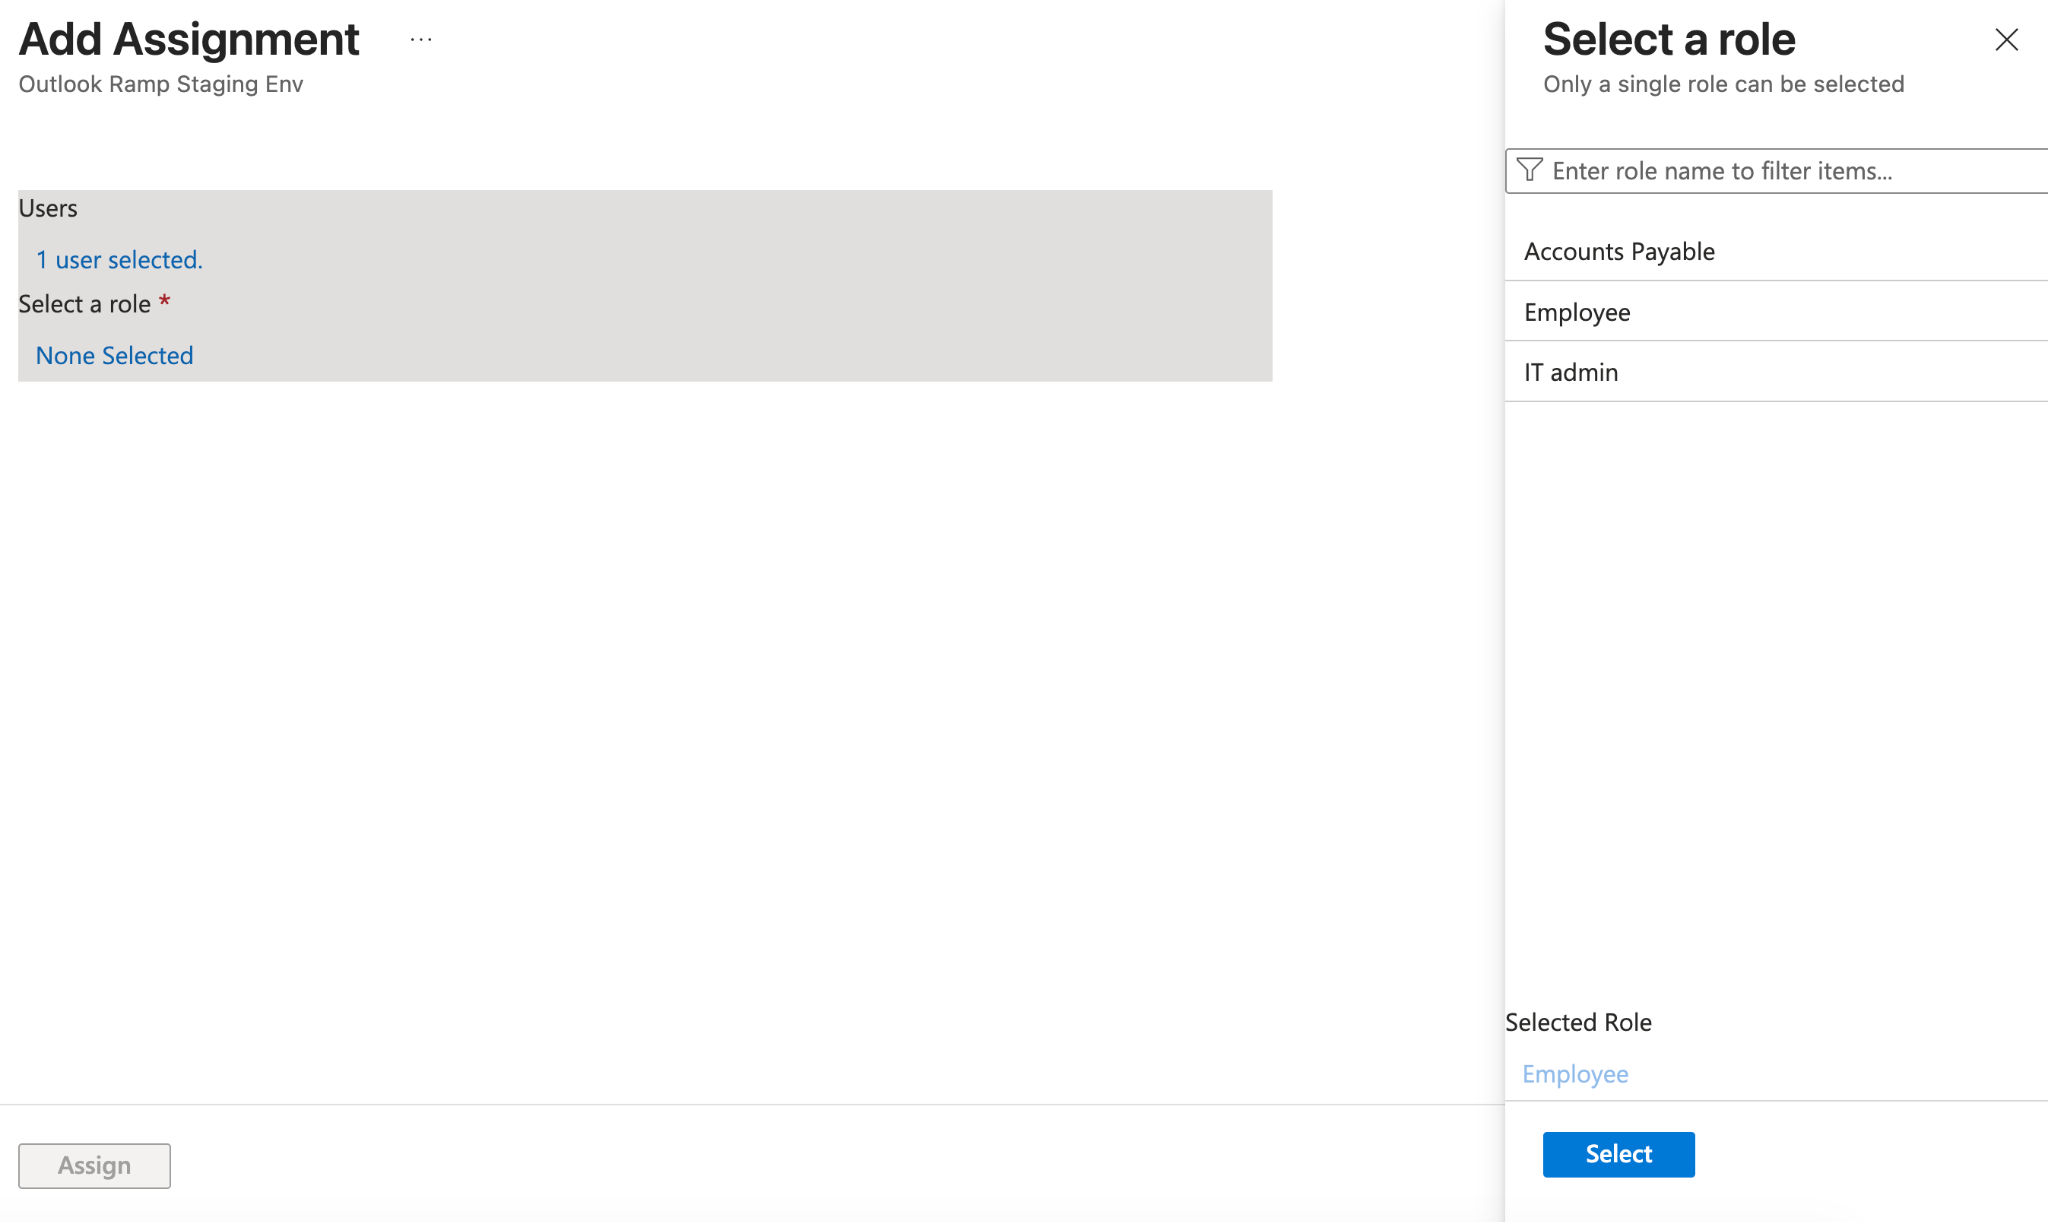
There are multiple ways to apply roles to users. When adding a user/group in the Users and groups menu under provisioning, you can select a role to assign to the newly-assigned users:
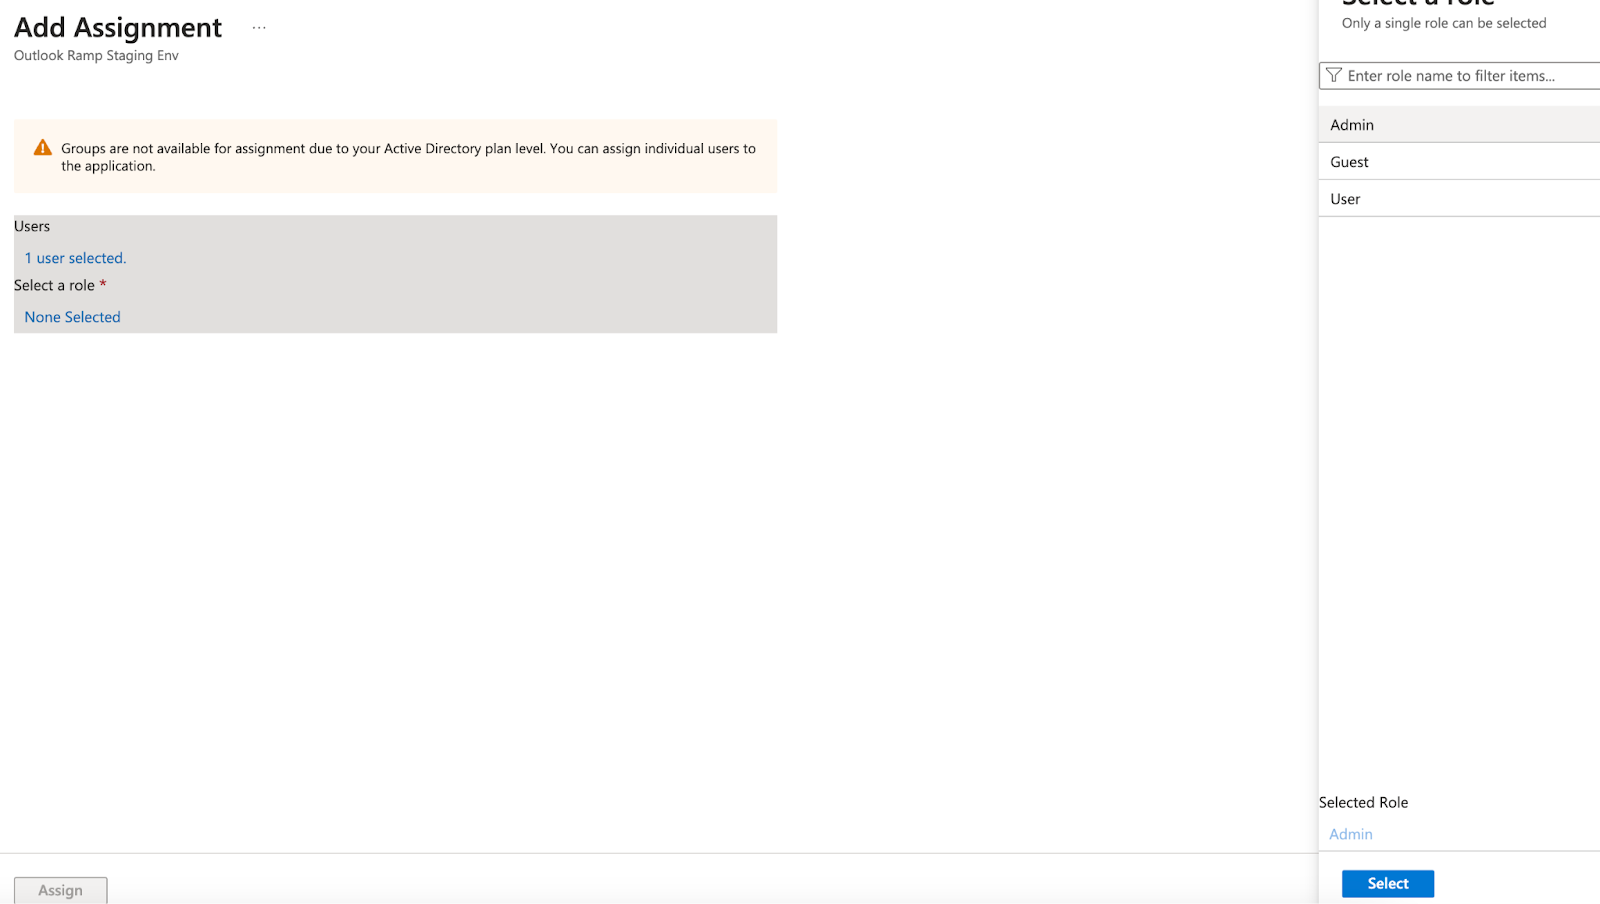
Similarly, existing users can have their roles updated by checking them and clicking Edit assignment, which will lead to the same menu.
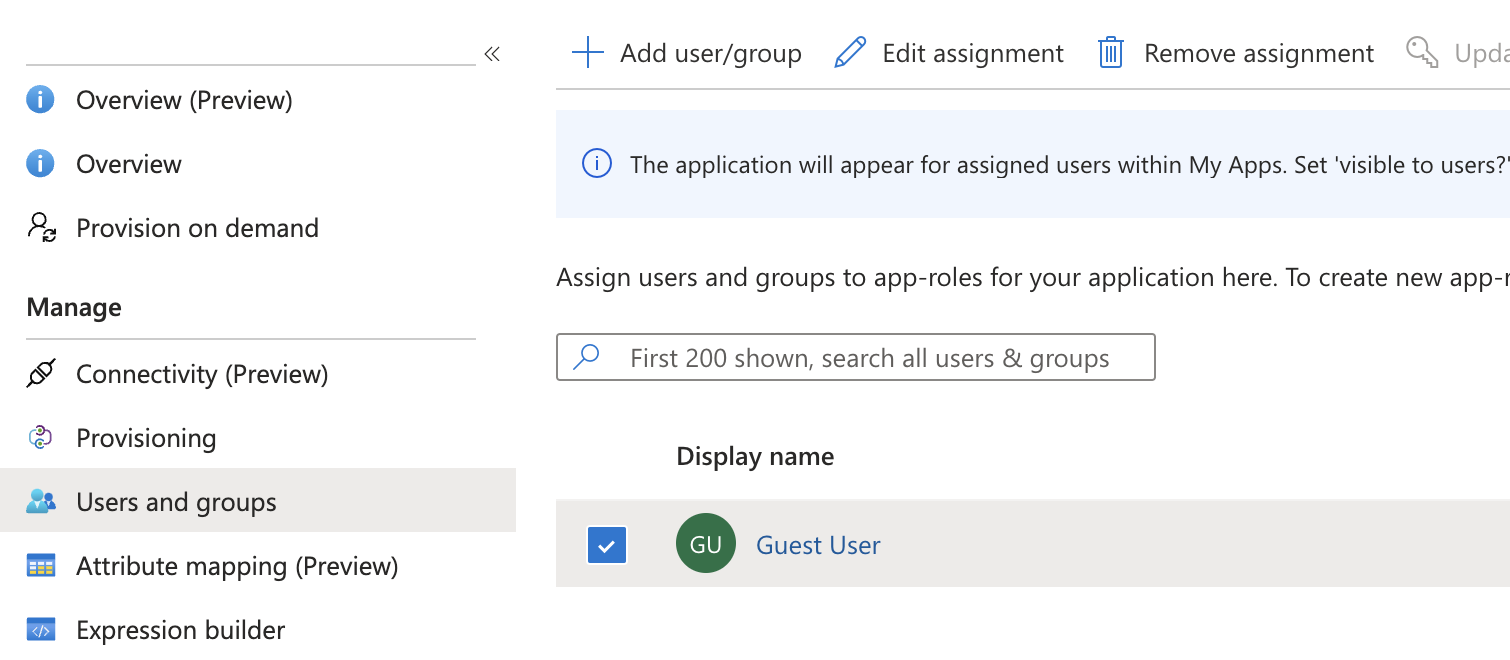
Note that some roles—in particular, Guest User—can only be assigned during user creation. To avoid issues, ensure that users who need this role are assigned to the correct role when they are initially provisioned. One way to do this easily is to assign users through an Entra group and assign a role to the entire group at once.
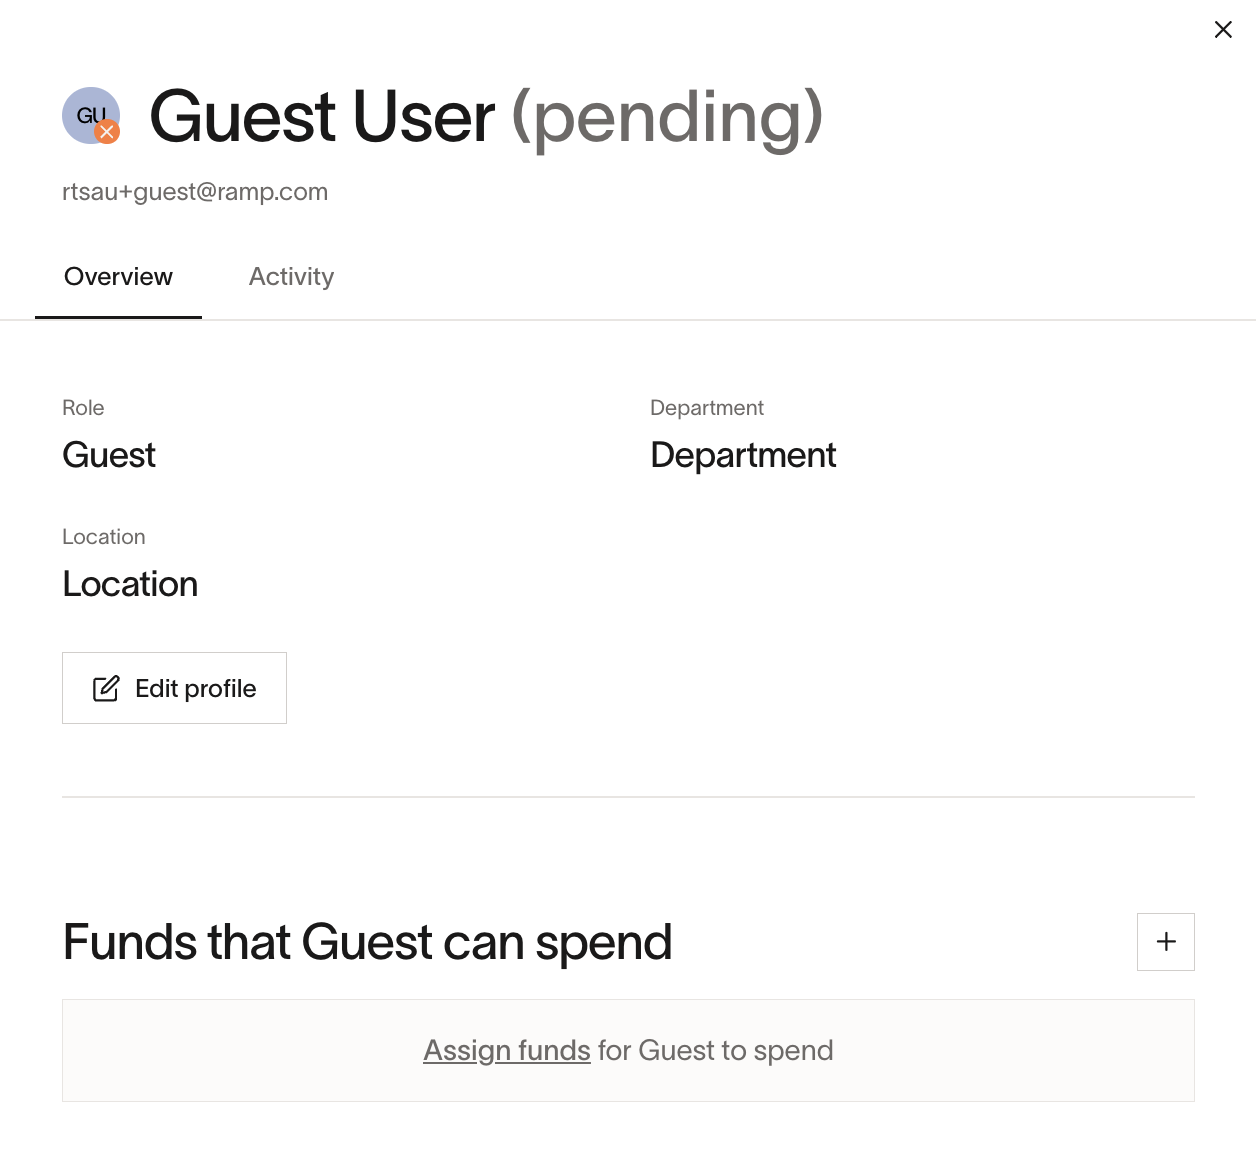
Once users are provisioned, they should appear in Ramp's People page with their updated roles within approximately 10 minutes:
Assign roles by Ramp Role ID in Microsoft Entra (Early Access)
Early Access. Ramp Role ID assignment is currently in Early Access.
Important: After you configure Ramp Role ID assignments, use them when provisioning new users or updating roles for existing users. Do not send both legacy enum values and Ramp Role IDs for the same user.
The roles attribute assigns roles using stable Ramp Role IDs. This supports both built-in roles and Custom Roles and allows assigning multiple roles at once. Custom Roles require Ramp Plus. In Microsoft Entra, create one app role for each Ramp role and use its Ramp Role ID as the app role's Value. Assign multiple app roles to the same user or group to assign multiple Ramp roles.
If ramp-admin is included with other Ramp Role IDs, Ramp assigns the Admin role and ignores the other roles.
Not all role combinations are valid. For example, Custom Roles can only be assigned to users with Employee, Accounting, or IT Admin as their base role. See User roles overview for details.
Update users from system roles to Ramp Role IDs
Important: Before migrating your whole organization from legacy enum role values to Ramp Role IDs, test the new assignments with a small group. Configure Microsoft Entra so only the pilot group receives Ramp Role IDs, and keep legacy enum role assignments for everyone else until you verify the pilot. Do not assign legacy enum values and Ramp Role IDs to the same person.
After each pilot provisioning run, confirm that each user's roles and reporting structure match what you expect before moving the rest of your team.
For each user or group you migrate, complete its role changes before its next provisioning run. Do not create a second roles attribute or a second mapping to roles.
- Inventory every role currently assigned to each user in Ramp. Include the base role and all add-on roles, such as Manager, Finance Admin, Accounts Payable, Assistant, and any Custom Roles.
- Create replacement Microsoft Entra app roles whose values are the corresponding Ramp Role IDs, then move each user or group to every replacement app role they need.
- Remove all user and group assignments to app roles that use legacy enum values such as
BUSINESS_USERorBUSINESS_ADMIN, then disable or delete those legacy app roles. - Update the existing
rolesattribute and mapping by following the sections below.
Every role the user needs must be represented by a Ramp Role ID assignment before provisioning runs again. A SCIM update removes role access that is not included in the new assignments.
Find your Ramp Role IDs
Ramp Role IDs are stable identifiers that do not change when a role is renamed. To find a role's Ramp Role ID:
- Go to Roles and Permissions in Ramp.
- Select the role you want to assign.
- Copy the Ramp Role ID shown beneath the role name in the drawer heading.
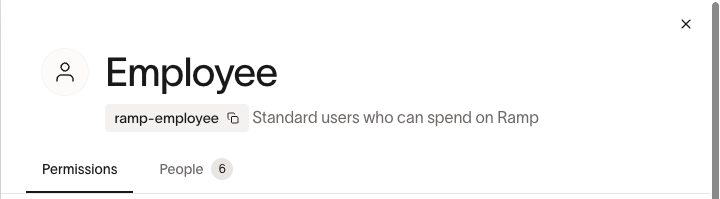
You will need the Ramp Role ID for each role you want to assign via SCIM. For example, the built-in Employee role has the Ramp Role ID ramp-employee, and the built-in Accounting role has the Ramp Role ID ramp-accounting. Custom Roles have Ramp Role IDs set when the role is created.
To review all roles at once, select the download button to download a CSV list of all roles.
Create Ramp Role ID app roles in Microsoft Entra
- In Microsoft Entra, open App registrations, select All applications, and select your Ramp application.
- Select App roles, then select Create app role.
- Enter a human-readable Display name and description.
- Set Allowed member types to Users/Groups.
- Set Value to the exact Ramp Role ID copied from Ramp, such as
ramp-employee. - Enable the app role and save it.
- Repeat these steps for every built-in or Custom Role you want to assign through Microsoft Entra. If you are migrating, replace the legacy enum app roles instead of keeping both versions.
Configure Ramp Role ID attribute mapping in Microsoft Entra
- Open Enterprise applications, select your Ramp application, then select Provisioning > Attribute mapping (Preview) > Provision Microsoft Entra ID Users.
- Select Show advanced options, then Edit attribute list for customappsso.
- Find the existing
rolesattribute, keep its type as String, select Multi-Value, and save the attribute list. If your configuration does not already haveroles, add it instead. Do not create a secondrolesattribute.

- Return to Attribute mapping and edit the existing mapping whose target is
roles. If no such mapping exists, select Add New Mapping. Configure one mapping as follows:
- Set Mapping type to Expression.
- Set Expression to
AssertiveAppRoleAssignmentsComplex([appRoleAssignments]). - Set Target attribute to
roles. - Set Apply this mapping to Always.
- Save the mapping.
Assign multiple Ramp roles in Microsoft Entra
Microsoft Entra allows one app role per assignment. To assign multiple Ramp roles, create a separate assignment for each role:
- In your Ramp enterprise application, select Users and groups, then Add user/group.
- Select the user or group.
- Select one app role and complete the assignment.
- Repeat these steps for each additional Ramp role the user or group needs.
After provisioning runs, Ramp applies all valid assigned roles to the user. Users should appear in Ramp's People page with their updated roles within approximately 10 minutes.