Bill Pay set up
Overview
Paying bills with Ramp Bill Pay is fast. Setting it up is even faster. In this guide we'll go over the basics, and provide some helpful recommendations on configuring Ramp to best meet your needs.
Video walkthrough: Get started with Bill Pay on Ramp: setup, approvals, payments, and accounting sync. Best before paying your first bill so your AP workflow is ready end-to-end. Watch the playlist.
Setting up accounting
An important prerequisite step to using Ramp Bill Pay for all your accounts payable needs is to get through accounting set up. If you haven't already integrated with your accounting provider, you'll be prompted to configure this when you get started under the Bill Pay tab in Ramp.
If you want to test out Bill Pay without linking an accounting provider, we can do that, too. Just select Set up later and proceed to the next step.
That said, we strongly recommend establishing a direct connection with your accounting provider by following the steps here, and you can see more about how Bill Pay Accounting works in ourBill Pay Accounting article.
Also recommended at this stage:
If you're switching from Bill.com onto Ramp Bill Pay, you should turn off 2-Way AP Payment Sync and enable 1-Way Transactions Sync in Bill.com's settings. Since both products use your accounting software as a system of record, Bill.com will generate duplicate bills of the ones you create in Ramp. Disabling this will let you delete bills in Bill.com without losing the original bill in your accounting software.
Choosing a bank account for payments
Next, let's choose the bank account from which you want us to withdraw (debit) funds for your bill payments.
First you'll need to ensure that any account you wish to use for payments is linked and verified to prevent payment issues. We've written more on this in our Ramp bank connections overview article.
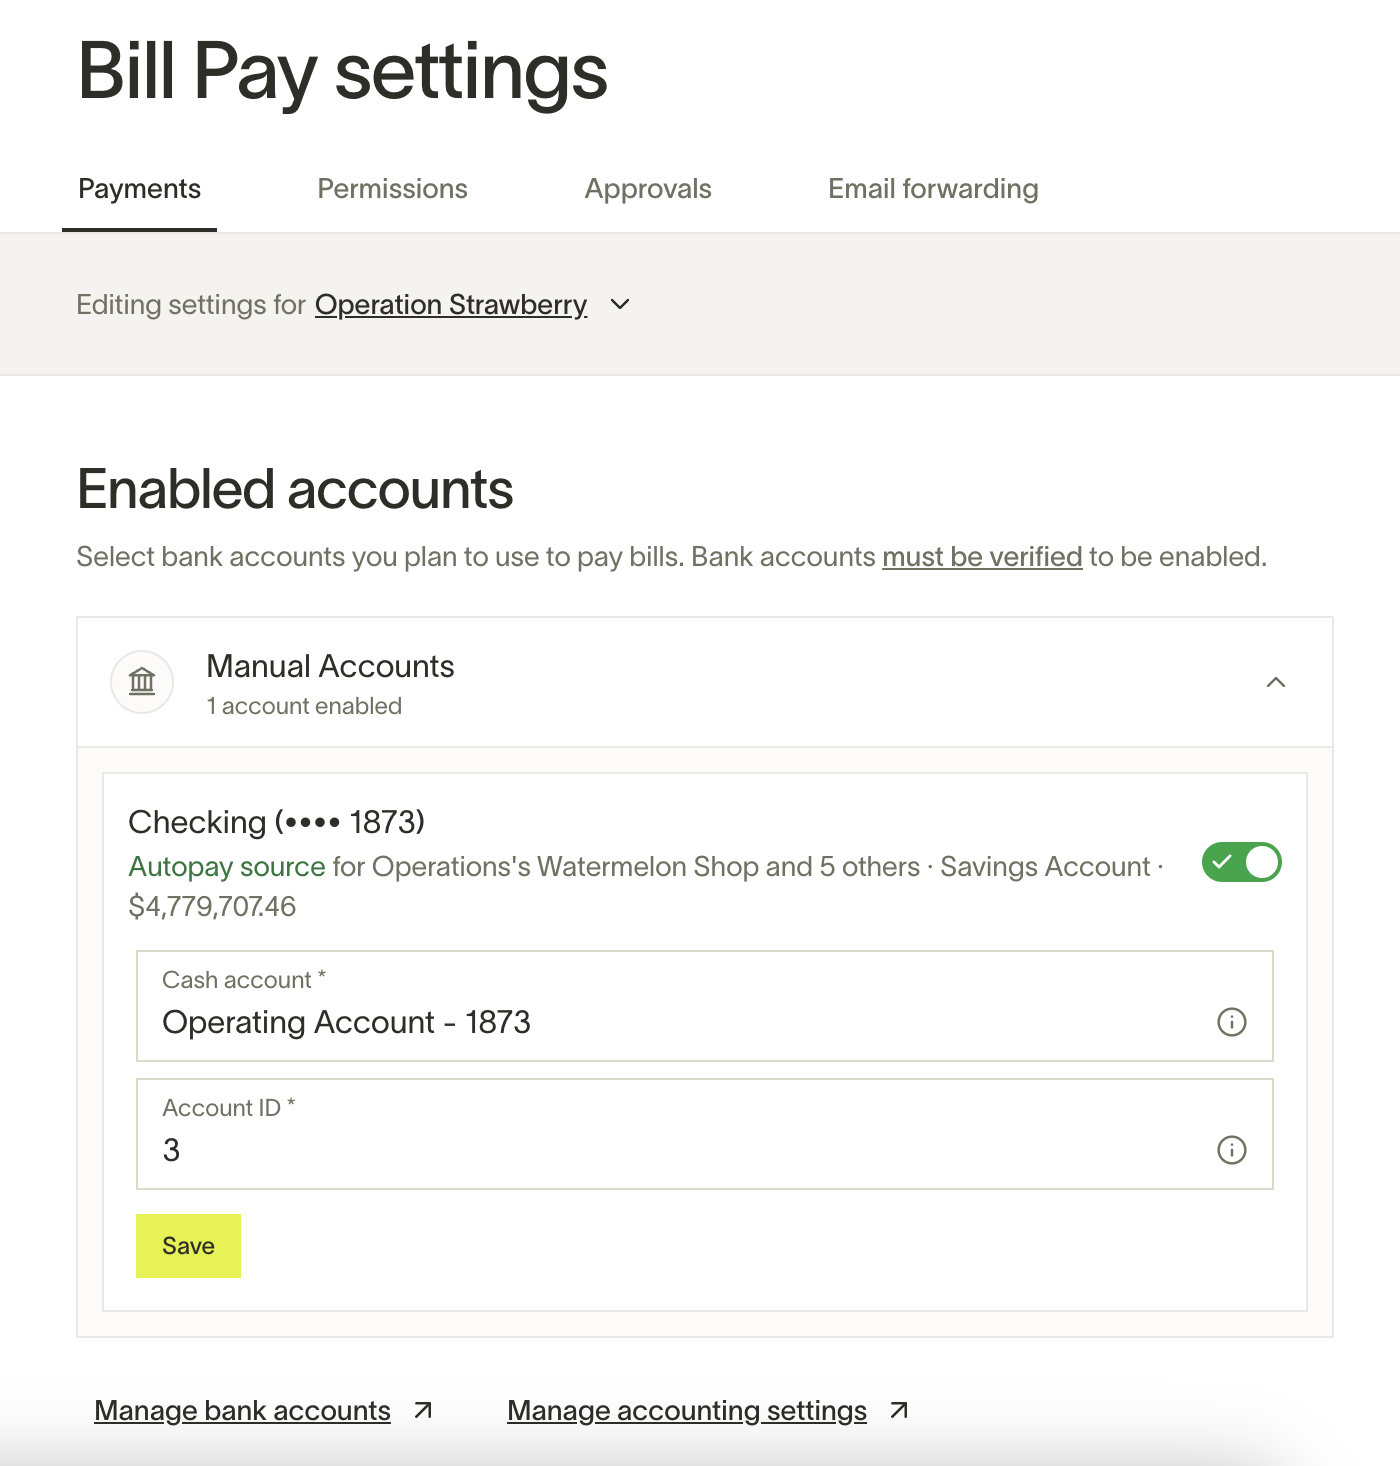
Once you're ready to select an account (or accounts), head to the Payments section your Bill Pay settings to see all the bank accounts currently eligible. Use the toggle to enable or hide the account in Bill Pay, and then specify the cash account in your accounting provider that corresponds to that bank account.
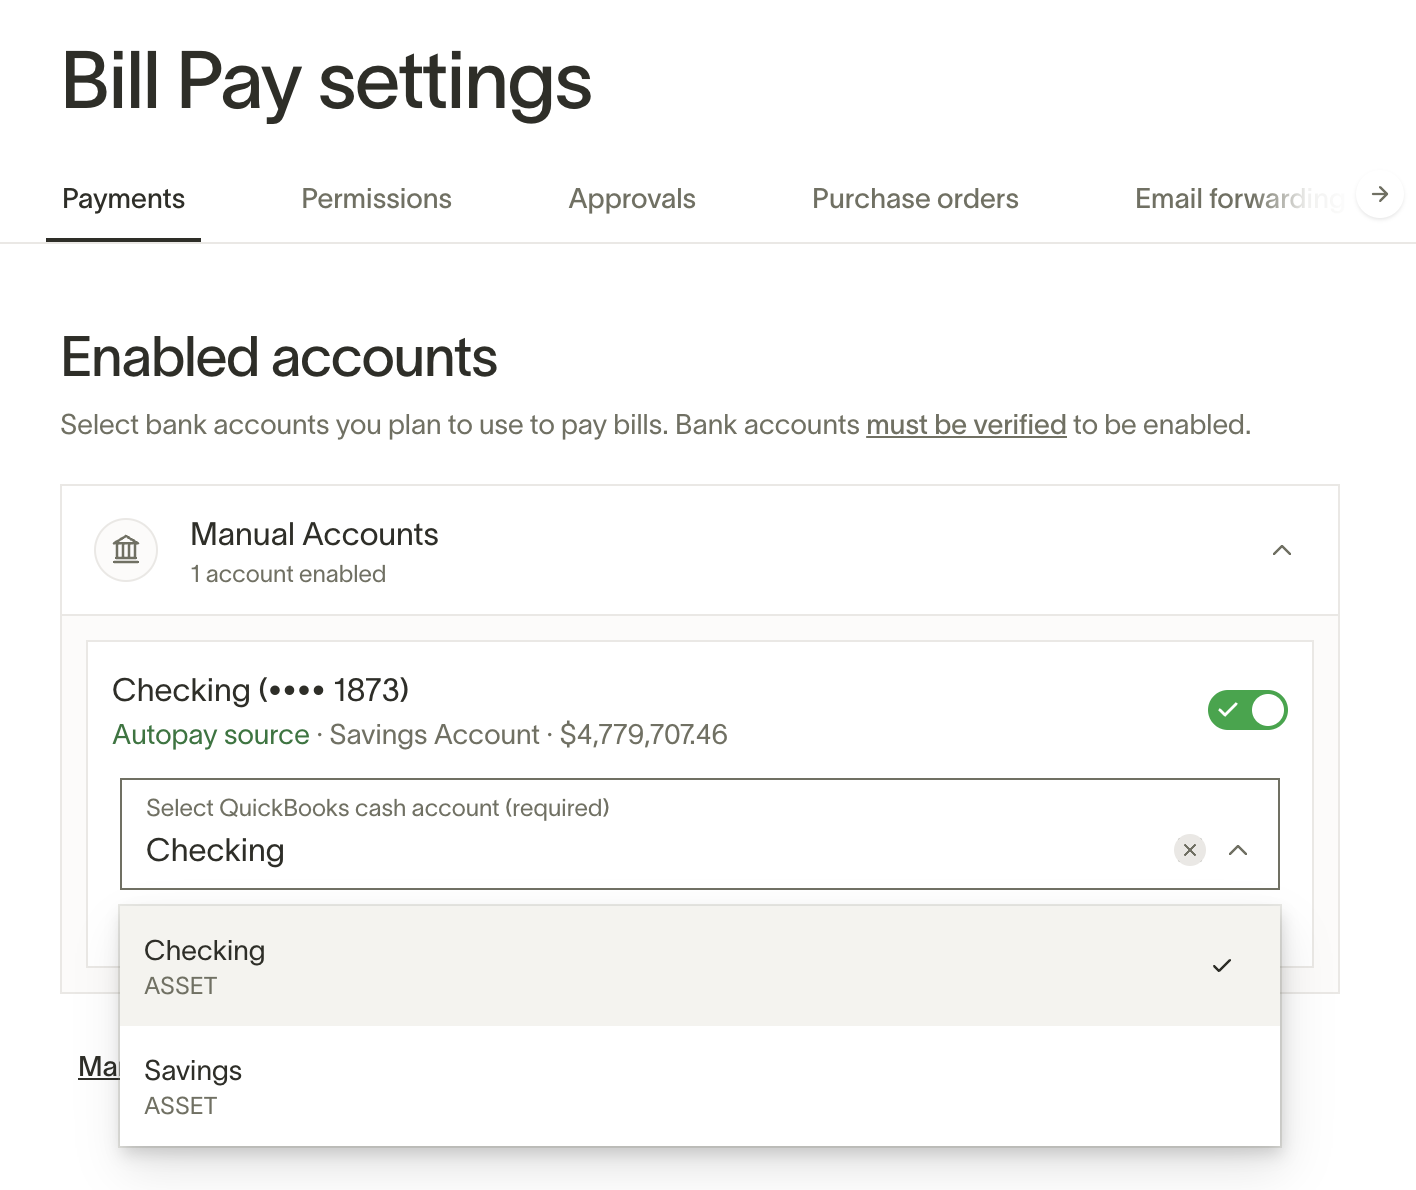
Note: If you remove and re-add a bank account, it may no longer be selected as your default payment account. Verify your default in Bill Pay > Settings to avoid unexpected payment routing — see Setting a default payment account below.
Note: For customers using Ramp's Multi-Entity support, you can configure these settings differently for each entity.
Use the dropdown to toggle between the entities you've created in Ramp and review the article above if you need help getting set up.
Pay bills for free with your Ramp Checking Account
Select your Ramp Checking Account to pay bills without fees while holding your cash for longer. Enjoy unlimited, free same-day ACH payments with the confidence that your vendors receive funds the day you send them. Plus, send free domestic and international wires with no fees.
To pay with your Ramp Checking Account, simply navigate to the Banking tab and click “Open a free account”.If you don’t have a Ramp Checking Account yet, you can sign up here.
Setting a default payment account for Bill Pay
Admins can optionally set a default payment account for Bill Pay. This helps streamline the bill payment process when paying vendors for the first time.
If a default payment account is set:
- For vendors that have not been paid before, Ramp will use the default payment account.
- For vendors that have been paid before, Ramp will default to the last bank account used for that vendor.
If a default payment account is not set:
- For vendors that have not been paid before, Ramp will default to the bank account used on the last bill period.
To set a default payment account, navigate toRamp → Bill Pay → Settings, then select your preferred source account underDefault payment account.
Add controls and approval logic
If you've already completed the steps above, you are free to upload invoices, edit drafts, and pay bills to your vendors, but you may also want to implement controls and policies to make sure AP spend is handled properly.
Ramp allows you to set your bill approval logic directly from Bill Pay settings > Approvals:
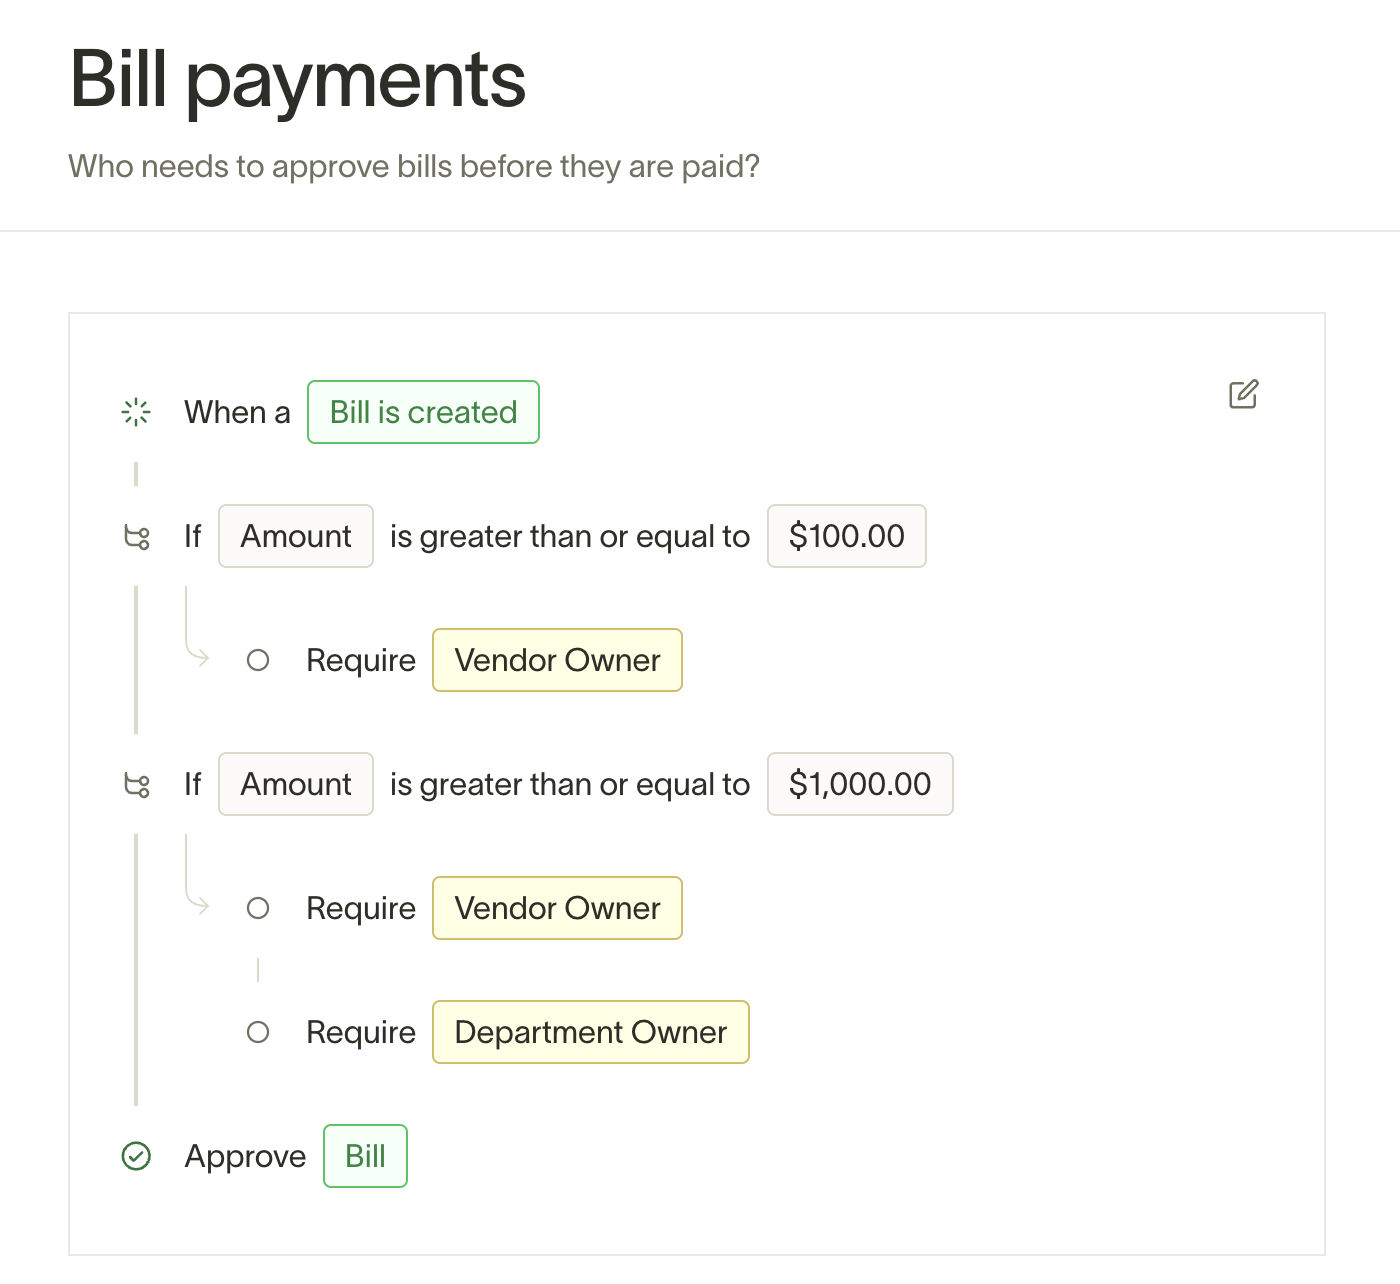
We've written more about this in detail in our Bill Pay Approvals article.
Configure additional permissions
By default, only your business owner and admins can access Bill Pay.
You can allow additional users to use Bill Pay by assigning them Accounts Payable access. Accounts Payable roles can view, create, and edit bills for any vendor.
We commonly see Accounting roles granted Accounts Payable permissions, but you can enable this for any user in the Permissions section of your Bill Pay settings:

Read more about Approval Layers and Accounts Payable roles in our Bill Pay Approvals and Accounts Payable roles article.
Set up automatic invoice forwarding
Once Ramp has access to your vendors and accounting info, payments have been configured, and your roles and policies have been set up, you're ready to take full advantage of Ramp Bill Pay's time-saving capabilities.
Check out our guide on AP Email forwarding to automatically create draft bills based on vendor invoices you receive.