Ramp Vendor Portal
Overview
Ramp's Vendor Portal allows vendors who receive bill payments to easily manage and track those payments. The Vendor Portal:
- Simplifies payment tracking for vendors.
- Provides a central location for managing receivables.
- Allows for quick and secure updates to company and payment information.
- Lets vendors comment directly with payers on bills
If you're using this guide, it means one of your customers is using Ramp to process accounts payable and send vendor payments.
Note: The Vendor Portal is for vendors who receive payments from Ramp customers. If you are a Ramp customer looking to pay your vendors, see Bill Pay overview.
Vendor Portal process
Vendor account creation
- Vendors cannot create an account on their own from a public signup page. A vendor must be invited by a Ramp customer (payer), if the customer:
- Adds the vendor to Bill Pay and sends a request for payment and tax details
- Invites the vendor to Ramp's Vendor Network
- If a customer does one of the above, you will receive an email from Ramp with a secure link to submit payment details. Creating a Vendor Portal account allows you to manage and track payments, and get access to the additional features described below.
How to access the portal after account creation
Sign in at app.ramp.com/sign-in using the email address you signed up with. After signing in, you can access the Vendor Portal directly at app.ramp.com/vendor-portal.
If you have both a Ramp customer account and Vendor Portal account, sign in and switch between them using the account selector in the top-left of the navigation.
Note: There is no separate vendor sign-in page. Vendors use the same Ramp sign-in page as all other users. URLs such as
vendor.ramp.comare not valid Ramp addresses — always use app.ramp.com/sign-in to sign in.
Bill payment initiated
- When a company wants to pay you for a service or product, they can select you as the vendor on a bill and either:
- Request payment and tax details from you (You will receive an email at the address your customer entered in Ramp.)
- Manually enter your payment and tax details
- Connect with you on the Vendor Network to get your details.
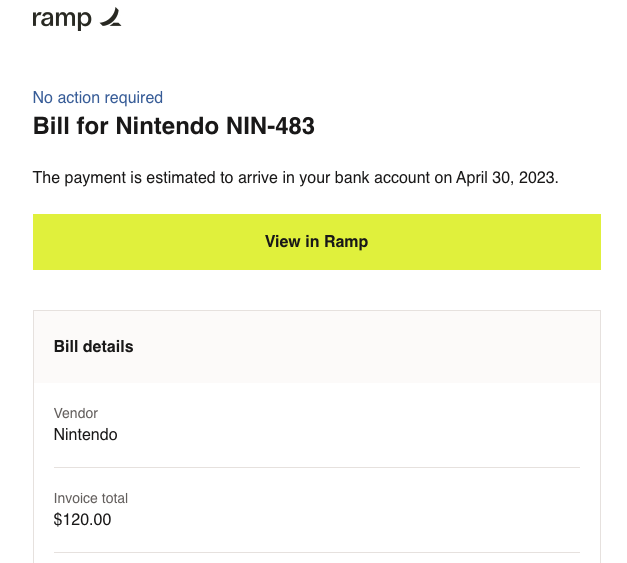
- You will receive an email notification about the incoming payment, from which you create a Vendor Portal account to view more details in Ramp.
Tracking payments
- Once your account is created, you can view pending bill payments and track their progress.

- Additional bills paid to you by other companies using Ramp will also appear in the portal.
- FYI that 'Payment destination' only populates after payment is initiated, not before.
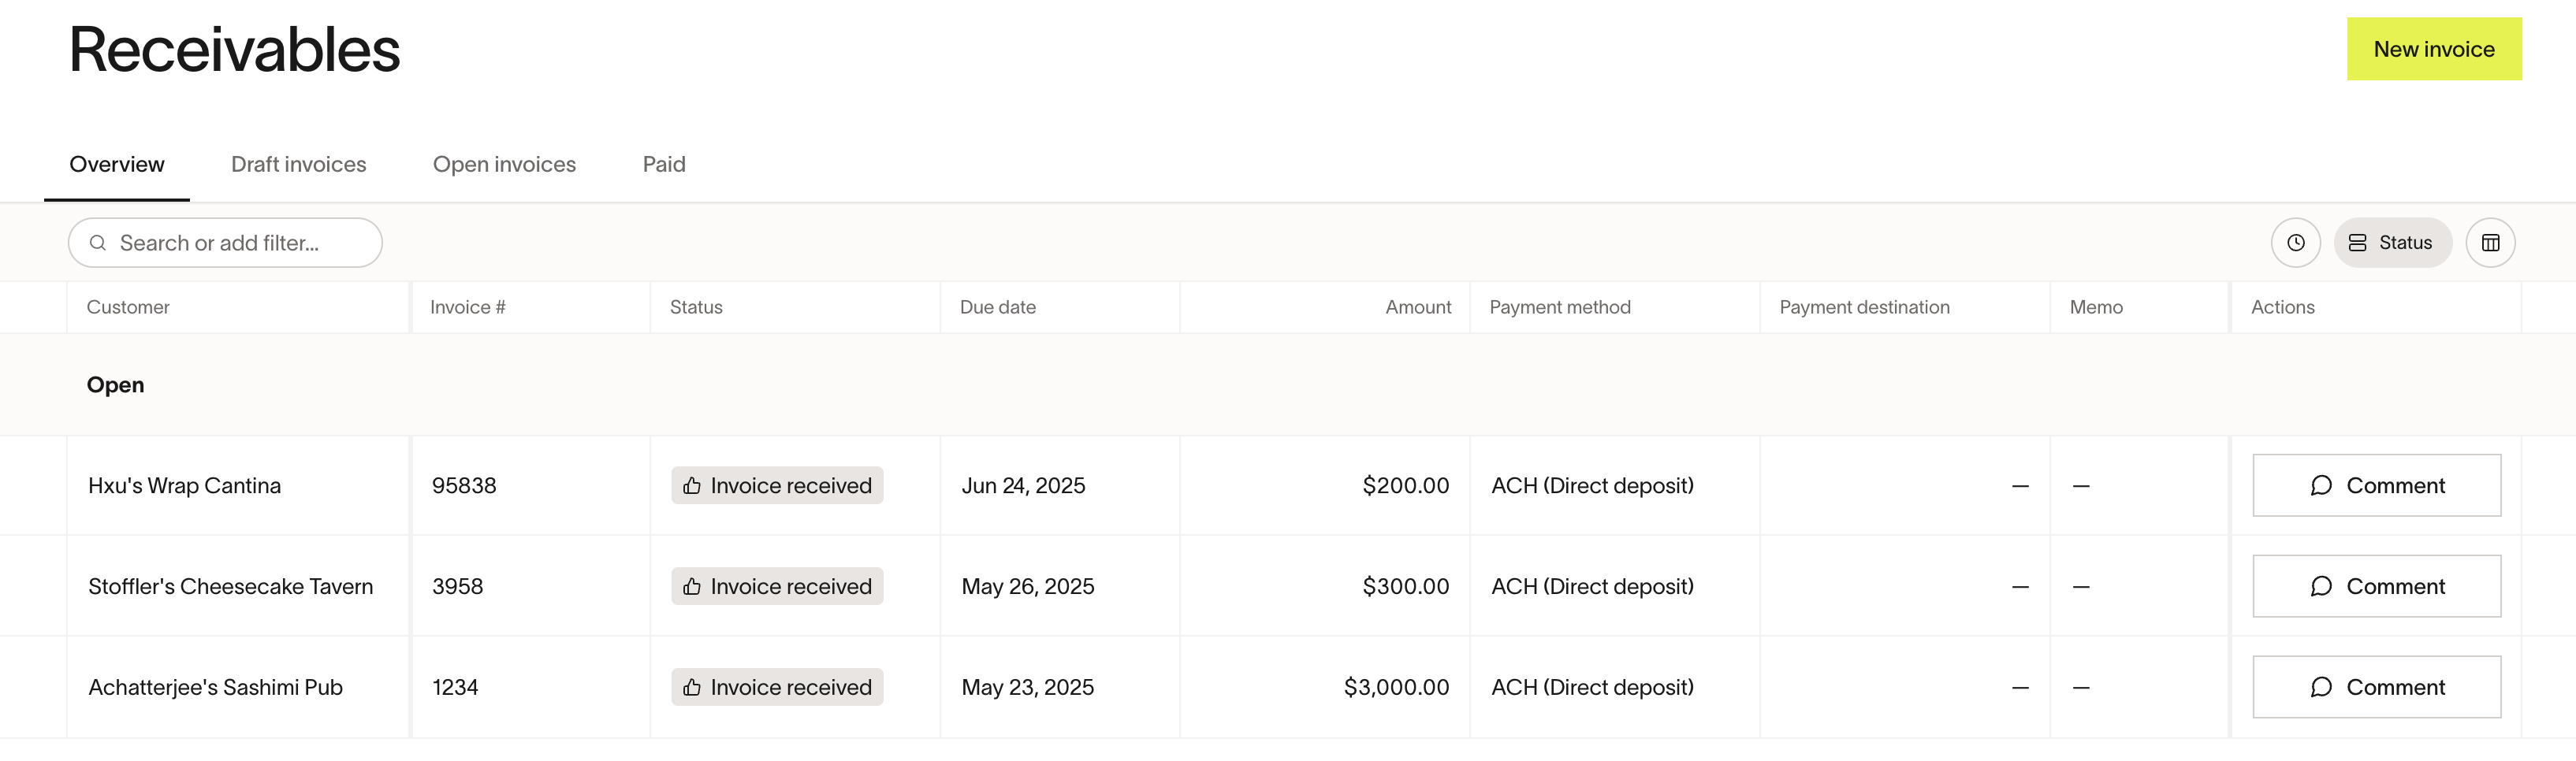
- To contact your payer about a payment, click "Comment" on the relevant bill. Your payer will receive an email notification and reply to your message directly in Ramp. You can view any responses directly on the bill under "Activity".
Bill statuses in Vendor Portal
When tracking payments, you will see different bill statuses that indicate where the payment is in the customer's process:
- Invoice received - Your customer has received your invoice in Ramp. They have not started the payment yet.
- Initiated - Your customer has started the payout process and the payment is being sent.
- Payment received - The payment has finished processing and should have landed in your account.
You should only expect funds to arrive once the bill shows as Initiated and an expected delivery date is available.
What to do if a payment is delayed
If a payment shows as Initiated or Payment received but has not arrived in your bank account by the expected date:
- Check the payment status — Open the bill in your Vendor Portal and confirm the current status and expected delivery date.
- Verify your payment details — Go to Vendor profile > Payment details and confirm your bank account information is correct. If you recently updated your details, your payer may need to approve the change before payments are redirected to the new account.
- Contact your payer directly — Use the Comment feature on the bill to message your payer and ask for a status update. Your payer has access to additional payment processing details that are not visible in the Vendor Portal.
- Contact your bank — If the payment shows as Payment received , check with your bank to confirm whether the funds were received or returned.
Vendor credits on receivables
Your customer (the Ramp payer) may apply vendor credits to reduce the payment amount on a bill. When credits are applied, the receivable in your Vendor Portal shows the credit amount alongside the payment details. This is an informational display — vendor credits are created and managed by the customer on their side, not through the Vendor Portal.
If you need to issue a credit or refund to your customer, send the credit memo directly to your customer and ask them to record it in Ramp. You can use the Comment feature on the relevant bill to coordinate with your customer.
1099 e-delivery consent
Payers filing 1099s on Ramp can request e-consent from vendors to digitally deliver 1099s via email, as opposed to by mail. When a payer requests e-consent, you will:
- Receive an email requesting e-consent (or tax details and e-consent). This link becomes inactive after 2 days, but you'll be able to generate a new link.
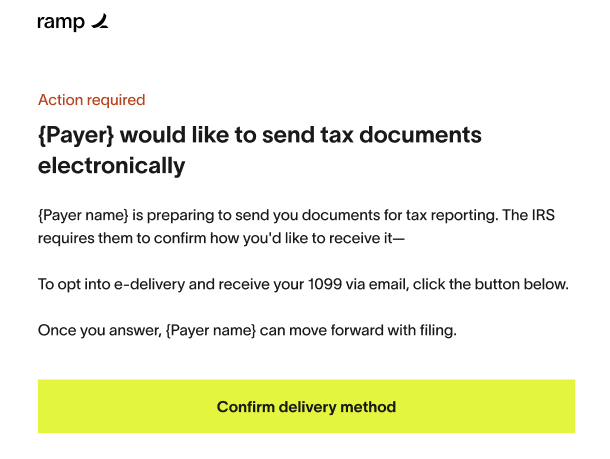
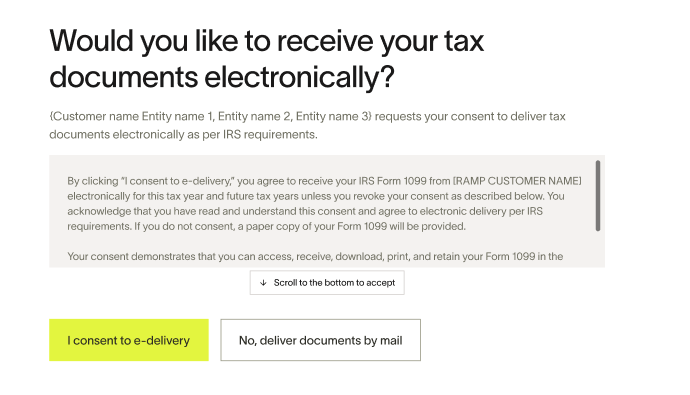
- View a page to consent to e-delivery
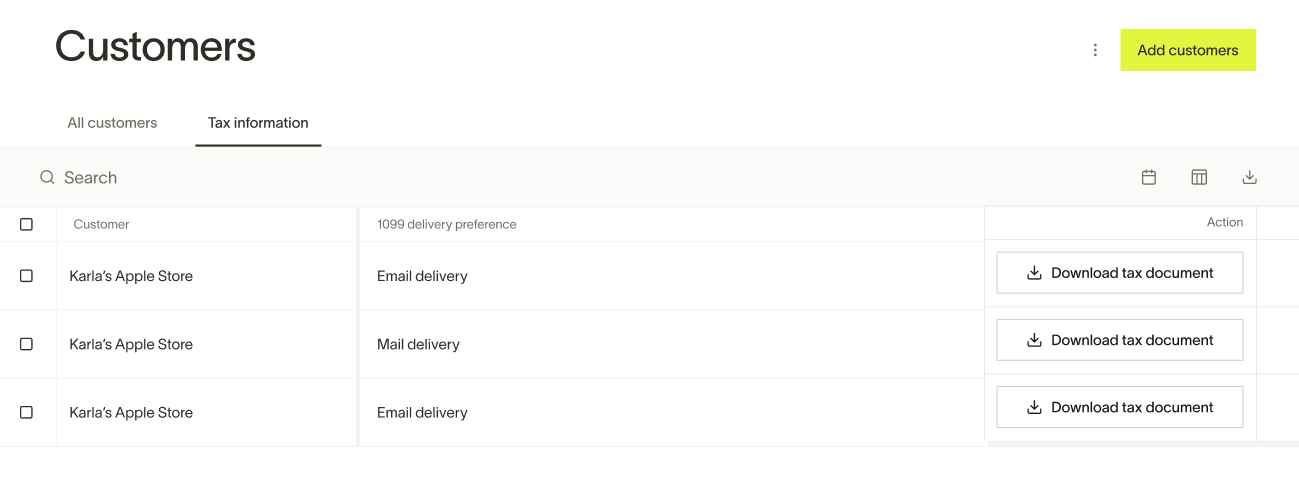
- After your customer files their 1099s, you'll receive a copy via email, as well as have access in your Vendor Portal. Go to Customers → All customers → to manage e-consent preferences, and go to Customers → Tax forms → to download tax documents. You must be connected on the Vendor Network to download your tax documents. If your connection is inactive, reach out to the customer and ask them to re-connect .
Managing your Vendor Portal account
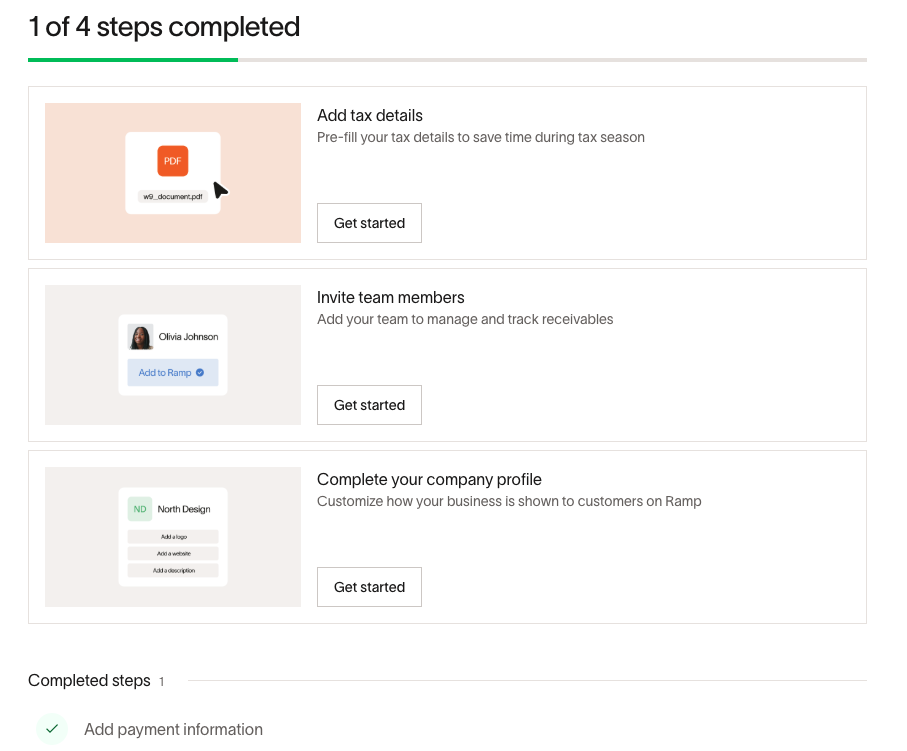
Setup guide
After signing up, you will see a setup guide with the remaining steps to complete setting up your account.
Company profile
Customize how your company is shown to customers and what details you share. Go to Vendor profile > Edit profile to update your company name, description, location, logo, and discoverability setting.
Profile discoverability
Discoverability controls whether Ramp customers (payers) can find your business on the Vendor Network. When your profile is set to discoverable, payers can search for your business and connect with you directly — without needing to send a payment details request first.
To change your discoverability setting, go to Vendor profile > Edit profile.
When discoverability is on:
- Payers who search for your business by email can find and connect with you on the Vendor Network. Once connected, your public payment and tax details are shared automatically.
- Payers who create a new vendor in Ramp and enter an email associated with your business are automatically connected to your Vendor Network profile.
- If a Vendor Network connection becomes inactive, the payer can use the reconnect option to restore the connection.
- Other Vendor Portal accounts on the same email domain can see your account as a merge candidate .
When discoverability is off:
- Payers cannot find your business through Vendor Network search. They must send you a payment details request or invite you to the Vendor Network directly to connect.
- Your account does not appear as a merge candidate for other accounts on the same email domain.
- You can still receive payments and share payment details with customers you are already connected to.
Note: Discoverability only takes effect after you complete your Vendor Portal account setup. If your account is not fully set up, your profile will not appear in search results even if discoverability is turned on.
Manage payment details
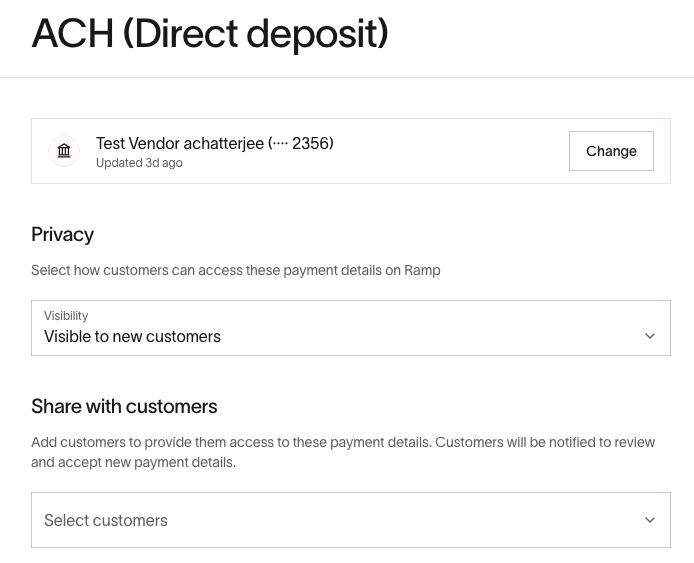
- Go to 'Vendor profile' > 'Payment details' to access your payment accounts. You can add payment details for the following payment methods:
- ACH (Direct Deposit)
- International bank accounts (if relevant)
- If your country doesn't use IBAN, enter your standard bank account number in the IBAN field
- Check mailing
- Card payments - you can select whether you allow Card payments or not
- To add an ACH payment account, you'll have two options:
- 'Manual entry' - entering your account and routing number manually
- ' Secure bank connection ' - linking your bank account to automatically upload your bank details for payment
- To add a new payment account, click the "+" symbol or "Add account" button to get started.
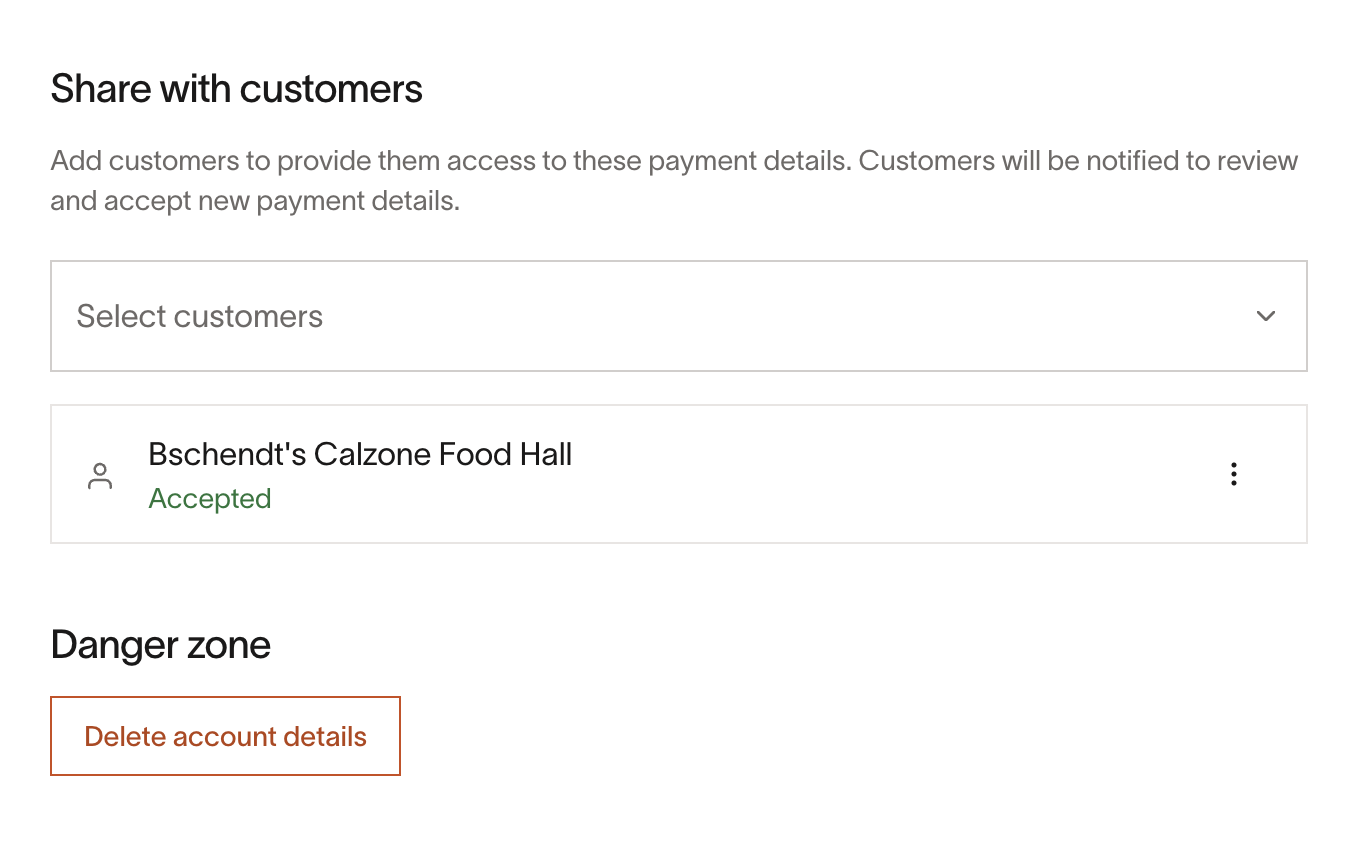
Share payment details
Your public payment details are visible to any customer searching for you when your profile is set to discoverable. To share specific payment details with a particular customer, you must be connected to that customer.
- You can add multiple payment methods to receive payments, and also select which payment details are shared with specific customers.
- You can assign multiple bank accounts to one customer, but only one of each type (i.e. one ACH, one International, one Check)
- You can only have one public bank account that will be shared with customers upon connection
- To share specific payment account details with a specific customer, click on the payment details > 'Share with customers' > select the customer > Save > Confirm.
- You will then be able to see if the customer has 'Accepted' the payment details, or whether this update is 'Pending' or they have 'Rejected' these new details.
- If the status is 'Rejected' you can re-send payment details by clicking the 'Resend' arrow.
- Note : A customer/payer will need to accept any payment detail updates (payment account, mailing address, card acceptance policy) made before these new changes take effect for their payments. Updates are not automatically redirected to the new account. Until the payer approves the change, payments may continue to use the previous approved bank account or failed, depending on whether the account exists.
- For a payer to approve a vendor's updated bank details, they need to go to Vendors > open the relevant vendor profile > open the banner indicating the vendor has updated their bank details > review the information and Approve to confirm that future payments should be sent to that account
If you want to stop sharing your payment details with one customer while keeping them available for others:
- Go to Payment details and select the payment account
- Open 'Share with customers' and deselect the customer you no longer want to share with and save
Manage tax details
- Go to 'Vendor profile' > 'Tax details' to access your tax details.
- To add your W9 or W8 details > 'Edit tax details' > upload the document and/or manually add the details
- In order to add W8 details, 'Federal Tax Classification' must be 'International'.
- Note : If you update existing tax details, any customers you're connected to will need to accept your tax detail updates before these new changes take effect.
Documents
- Upload common documents you regularly share with customers (like a SOC2 or Certificate of Insurance),
- Once uploaded, Ramp will automatically pre-fill them for you when customers request them in the future, saving you time in the process.
Invite people to your Vendor Portal account
You can invite multiple users to have access your Vendor Portal account.
- To invite others, use the 'Invite team members' step in your setup guide after signing up, or go to People > Invite.
- Enter the email addresses of the people you would like to invite. An email invite to join your Vendor Portal will be sent to this account. Then click 'Send Invite'.
- Invitees must match your email domain for the invite to go through ( unless you're a multi-entitled business using Ramp for spend, AP, etc.)
- After sending an invite, the invitee will receive an email to join your Vendor Portal account.
- To check the status of sent invites, click 'Invites' where you can either 'Resend' or 'Revoke' a sent invitation.
Frequently asked questions
How will I be notified of an incoming payment?
- You will receive an email notification whenever a company sends you a payment.
I signed up, but how do I access this later as a vendor?
- Go to app.ramp.com/sign-in and enter your email to sign in. After signing in, navigate to app.ramp.com/vendor-portal to access your Vendor Portal. There is no separate vendor sign-in page — use the standard Ramp sign-in page.
Can I update my bank account details?
- Yes, you can update your bank account details in Vendor profile > Payment details . Note that only one bank account can be selected as the default at a time.
Can I track payments from multiple companies using Ramp?
- Yes, all payments made by any company using Ramp will be available to track in your Vendor Portal.
What should I do if an ACH payment is missing?
-
Confirm with your payer that they used your ACH routing number, not a wire routing number, when submitting the payment. If the wrong routing number was used, have your payer update the payment details and resubmit the payment.
-
If the routing number is correct and the payment still has not arrived, use the Comment feature on the bill to contact your payer and ask them to check the payment status in Ramp. You can also check with your bank to confirm whether the funds were received or returned.
Can I contact Ramp Support about a missing or delayed payment?
- Ramp Support can only review payment processing details with the payer (the Ramp customer who sent the payment). As a vendor, the best path is to contact your payer directly — use the Comment feature on the bill in the Vendor Portal, or reach out to them outside of Ramp. You can also contact your bank to check whether funds were received or returned.
Is there a vendor-specific support email or sign-in page?
- No. Ramp does not have a dedicated vendor support email address. There is no
[email protected]or similar email for vendors. For payment questions, contact your payer directly using the Comment feature on the bill in your Vendor Portal, or reach out to them outside of Ramp. For account access, sign in at app.ramp.com/sign-in — this is the only Ramp sign-in page. URLs likevendor.ramp.comare not valid.
How do I issue a refund or credit to my customer?
- The Vendor Portal does not support issuing refunds or credits directly. Vendor credits are created and managed by your customer (the Ramp payer) on their side. To issue a credit, send your credit memo to your customer outside of Ramp or use the Comment feature on the relevant bill to coordinate with them. Your customer can then record the credit in Ramp and apply it to future payments.
What does discoverability do and should I turn it on?
- Discoverability controls whether payers can find and connect with your business on the Vendor Network by searching your email. When it is on, payers can connect automatically and receive your public payment and tax details without sending a manual request. When it is off, payers must invite you directly or send a payment details request. Turning discoverability on is recommended if you want to make it easier for your customers to find and pay you through Ramp.