Punchouts in Ramp
Overview
Important: Before you can shop a vendor catalog, a user with permission to manage integrations must connect the supplier, and an Admin must grant your role permission to use punchouts. See Prerequisites.
Punchouts connect Ramp directly to a supplier's catalog — such as Amazon Business or CDW — so you can shop at your company's negotiated contract rates without leaving your procurement workflow. Instead of buying off-contract, you launch a shopping session from Ramp, browse the supplier's site with your pricing already applied, and send your cart back to Ramp, where its line items and prices are loaded into a purchase request form.
Note: Procurement requires the Procurement add-on.
Approvers see exactly what's being bought and where it came from. Once the request is approved, Ramp assigns the purchase order (PO) number and routes the order electronically to the supplier — no manual re-entry and no off-contract spend.
Prerequisites
Punchouts are part of Ramp's procurement and purchase-request workflows. To shop a vendor catalog, the supplier must be connected and your role must include the punchout permission:
-
The supplier must be connected under Integrations by a user with permission to manage integrations (Admins and Owners by default). Connected suppliers appear as shopping options. If you can manage integrations, supported suppliers that aren't connected may also appear with a Set up option.
-
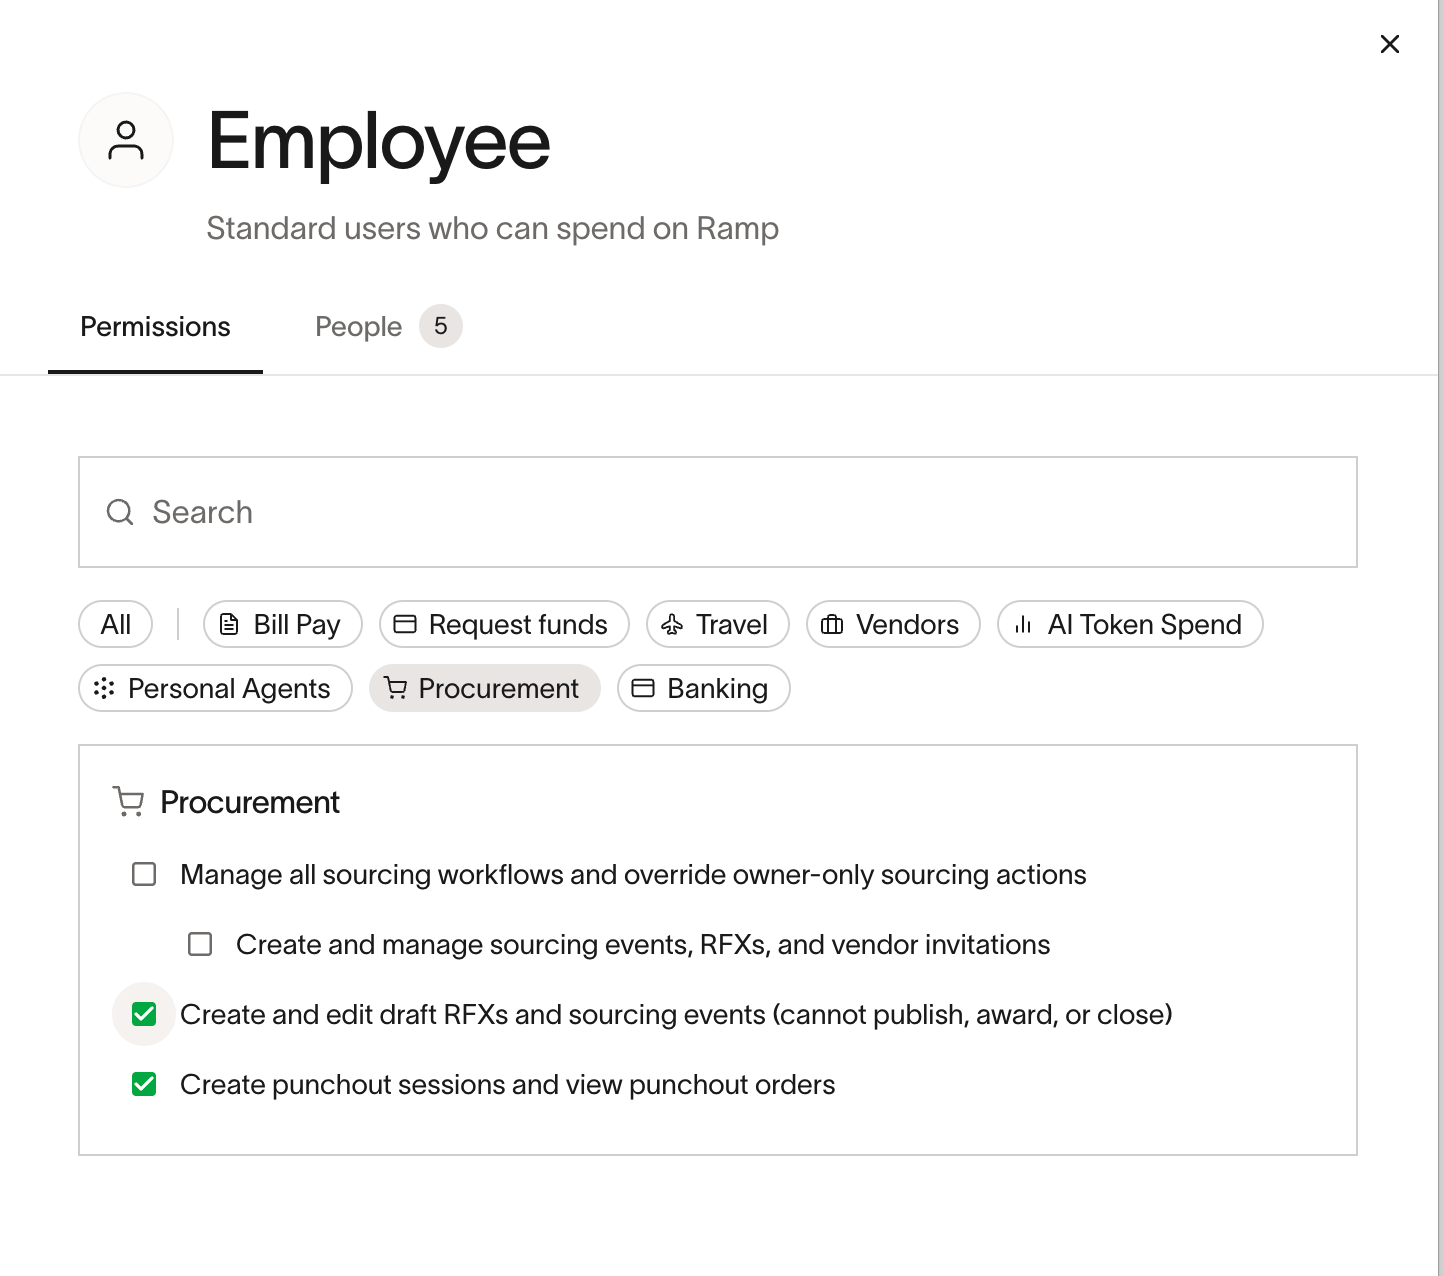
An Admin must grant employees permission to use punchouts. From Roles & permissions, edit each relevant role and enable Create punchout sessions and view punchout orders under Procurement. Employees assigned to a role without this permission can't shop supplier catalogs or view their punchout orders.
-
To add a supplier, a user with permission to manage integrations goes to Integrations and connects it using that supplier's credentials, following the supplier's setup guide. See Set up a punchout supplier.
If you don't see a supplier you need, see Supported vendors for how to request it.
Supported vendors
Punchouts currently support these suppliers:
- Amazon Business (US) — office supplies, electronics, and more.
- CDW — technology products and solutions.
- Staples — office supplies, furniture, and business essentials.
More suppliers are coming soon. Connected suppliers appear as shopping options. If you can manage integrations, supported suppliers that aren't connected may also appear with a Set up option.
If you don't see a supplier you need, select Request new vendor in the vendor picker to submit a vendor suggestion for Ramp to review. If you need further help, contact Ramp Support.
Set up a punchout supplier
Note: Connecting a punchout supplier requires the permission to manage integrations, which Admins and Owners have by default. Employees should ask a team member with this permission to connect the supplier.
Connect a supplier so it appears in the Shop a vendor catalog picker for your team. Each supplier provides its credentials and configuration differently; complete the supplier-specific setup below, then connect the supplier in Ramp.
Amazon Business
Follow the Amazon Business Punchout integration guide (PDF) to complete the Amazon-side configuration. Amazon Business provides the punchout URLs and credential fields you'll enter in Ramp. Once you have them, use the shared Ramp connection steps below.
Order confirmations and ship notifications are optional. To configure them, see Advanced setup: supplier order confirmations and ship notifications.
CDW
Follow the CDW Punchout Integration Guide for Ramp (PDF) to complete the CDW-side configuration. The guide provides the punchout URLs and credential fields you'll enter in Ramp. Once you have them, use the shared Ramp connection steps below.
Order confirmations and ship notifications are optional. To configure them, see Advanced setup: supplier order confirmations and ship notifications.
Staples
If you don't have a Staples business account, email [email protected] to get started, and Staples will help you configure the punchout. If you already have a Staples business account, email [email protected] for help configuring the punchout.
- Contact your account manager at Staples Advantage to set up a client account and curate a catalog. Expect up to 30 days for Staples to set up your online catalog.
- Once your Staples account is set up, ask your Staples account manager for these details:
- From identity
- Shared secret
- Punchout URL
- Test punchout URL
- Production buyer identity
- Test buyer identity
Once you have them, use the shared Ramp connection steps below.
Connect the punchout supplier in Ramp
- Go to Integrations. Filter the catalog by the Procurement category (or search) to find the punchout suppliers.
- Select the supplier tile — for example, Amazon Business Punchout or CDW — to open the connection drawer. (The Amazon Business tile without "Punchout" is a separate receipts integration.)
- Complete the connection form:
- Credentials — enter the credentials for the supplier. The exact fields vary by supplier. Follow the supplier's setup guide for the exact values to enter.
- Vendor — link a Ramp vendor to the supplier. If your role can create vendors, you can create one inline.
- Default addresses — set the default shipping and billing addresses used for purchase orders, configured in your PO settings. These are required before you can connect.
- Select Connect. You'll see a Punchout connection configured confirmation, and the supplier becomes available in the vendor picker.
To change credentials later, reopen the connection and use Override; to remove the connection, use Disconnect.
Shop a vendor catalog and submit a request
Shopping a vendor catalog opens the supplier's online store in a new tab (a punchout shopping session), lets you build a cart at your company's pricing, and loads that cart into a Ramp purchase request form.
-
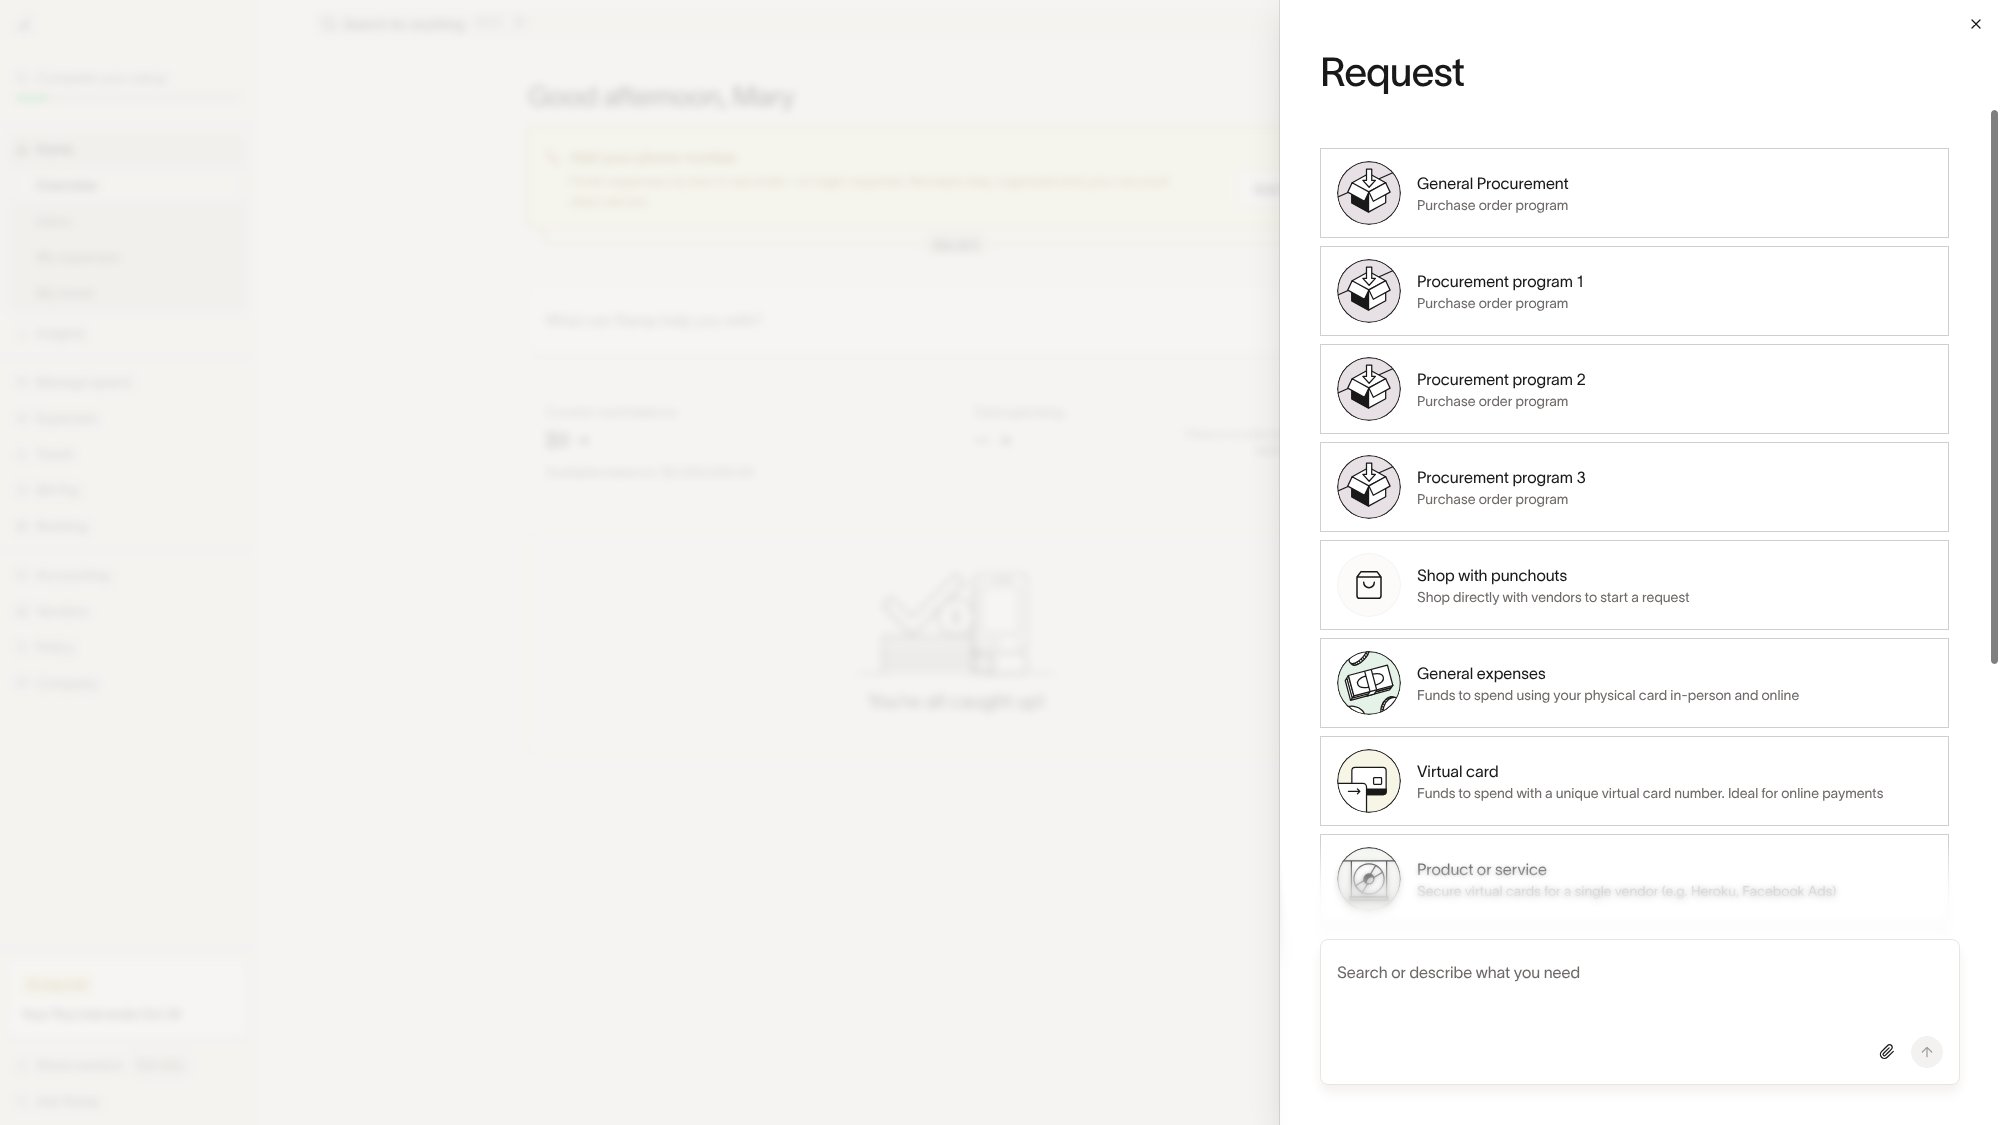
Start a request from Request spend, then select Shop with punchouts (Shop directly with vendors to start a request).
-
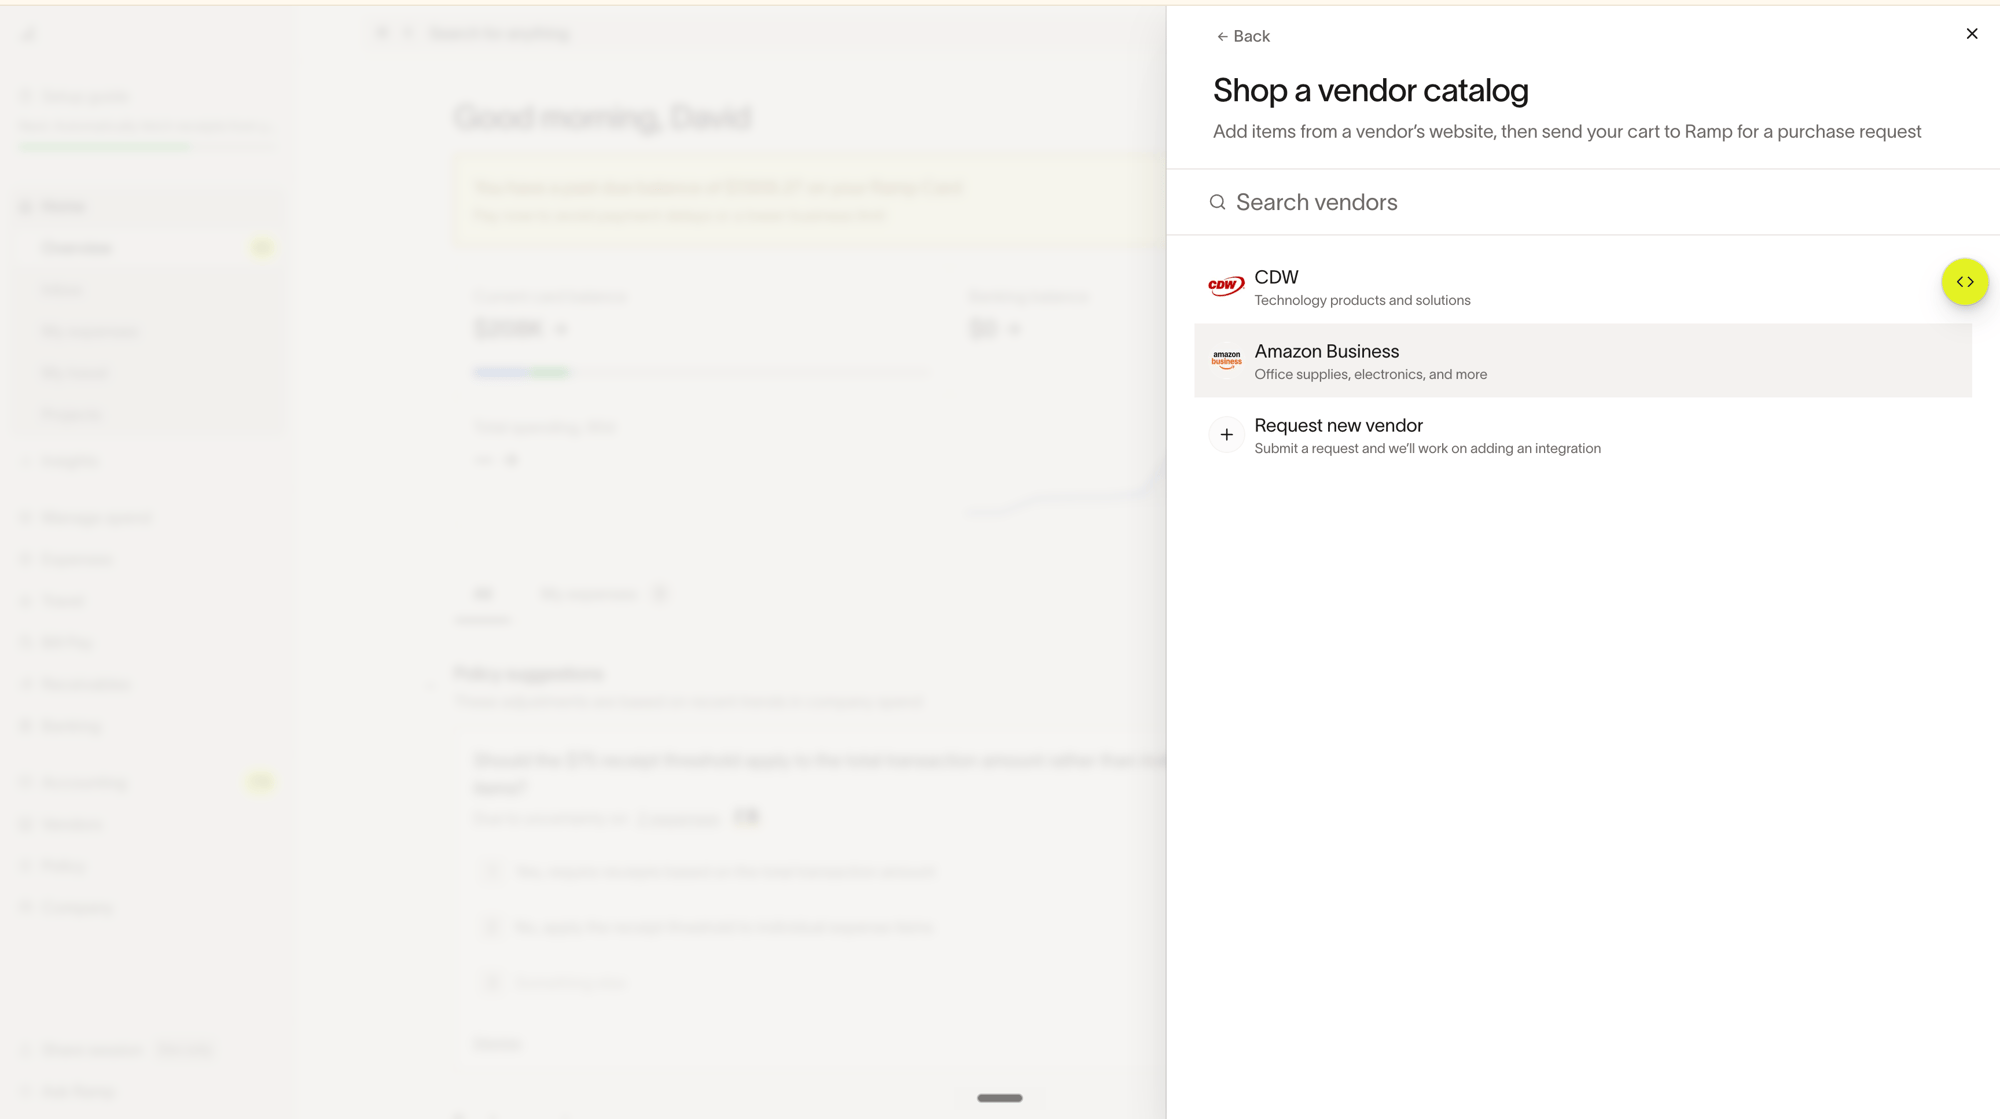
Select a connected supplier you'd like to shop from. If you can manage integrations, unconnected supported suppliers may also appear with Set up; connect one before shopping. Otherwise, ask a team member with permission to manage integrations to configure the supplier under Integrations.
-
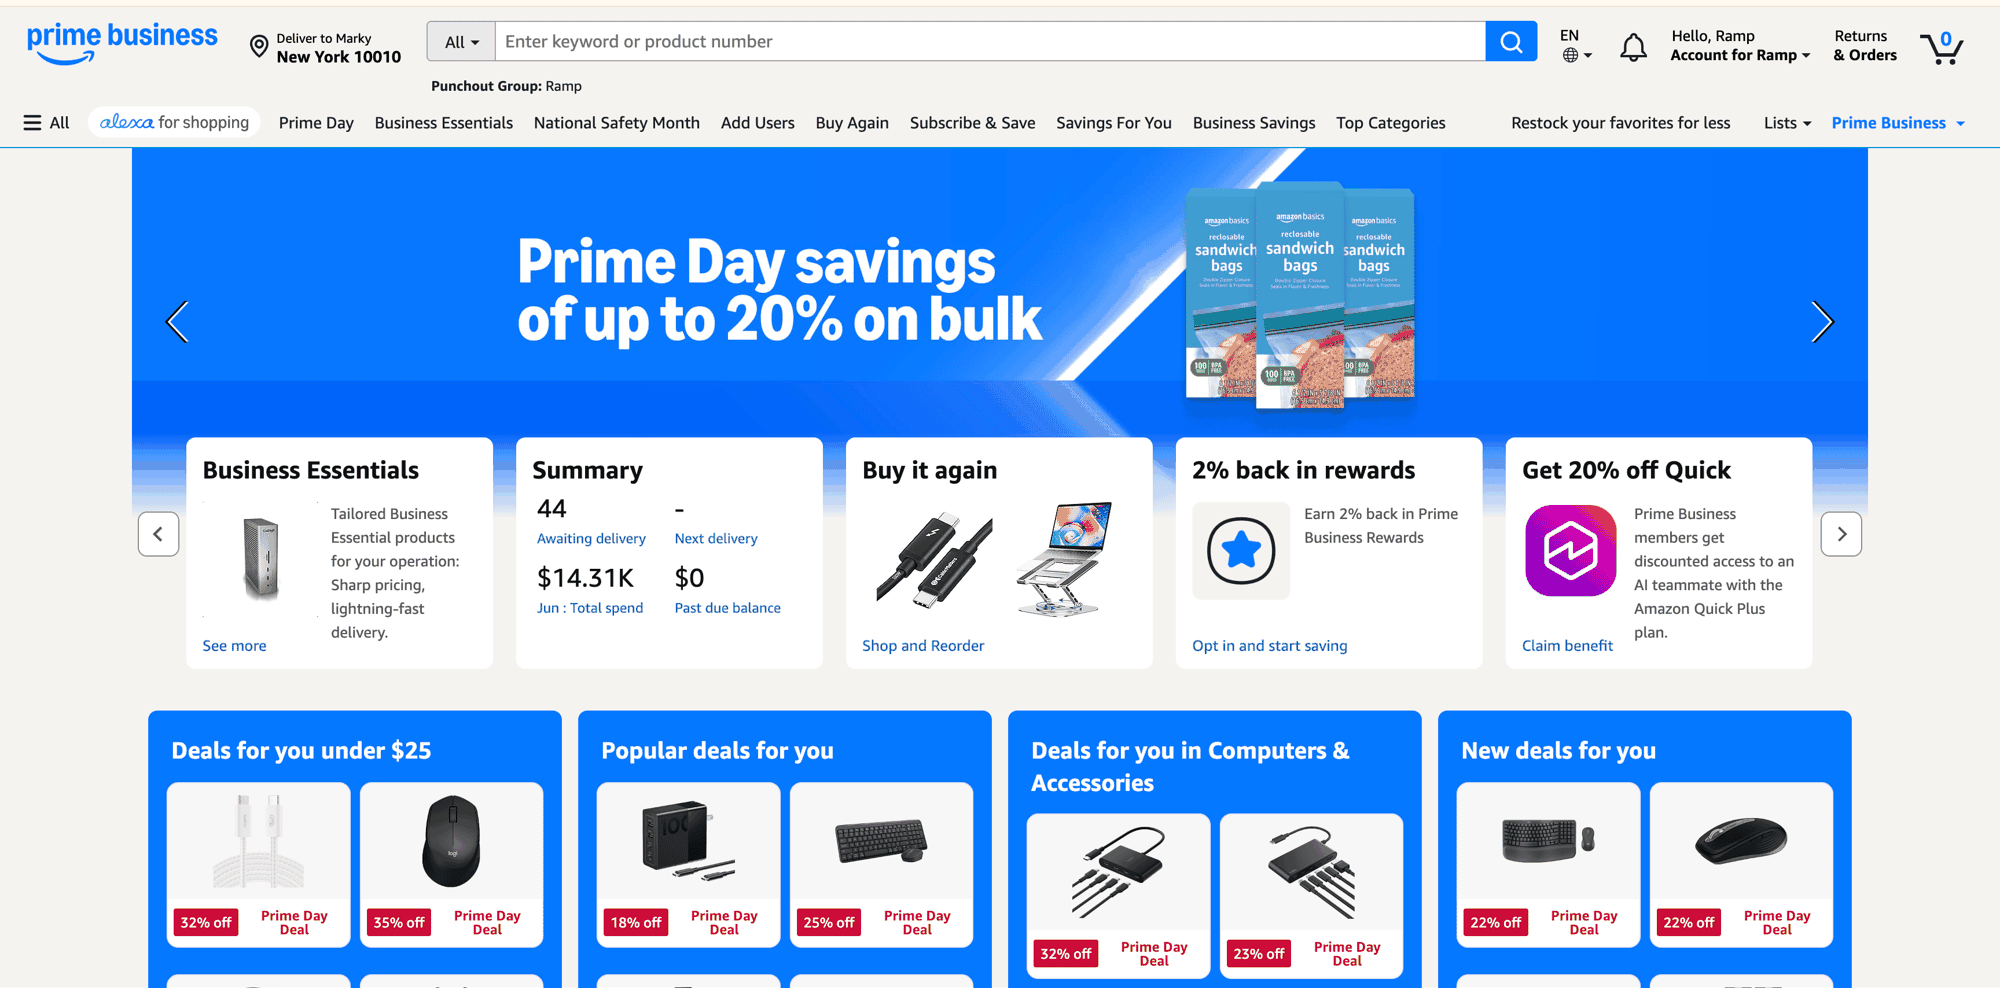
Ramp opens the supplier's store in a new tab with your company's pricing applied. Keep the Ramp window open while you shop — Ramp shows a Shopping in progress message until your cart returns. Add the items you need and go to the supplier's cart.
-
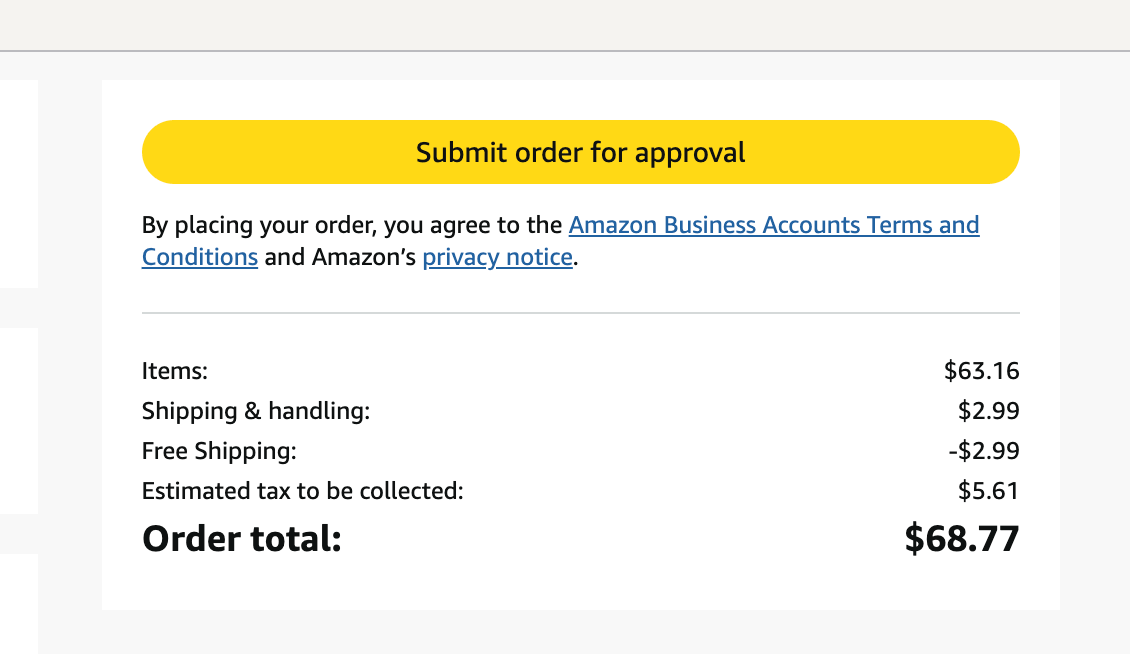
On the supplier's site, submit the cart for approval instead of purchasing — for example, on Amazon Business you select Submit order for approval. This returns the cart to Ramp and loads it into a purchase request form; it does not submit the Ramp request or place an order with the supplier.
-
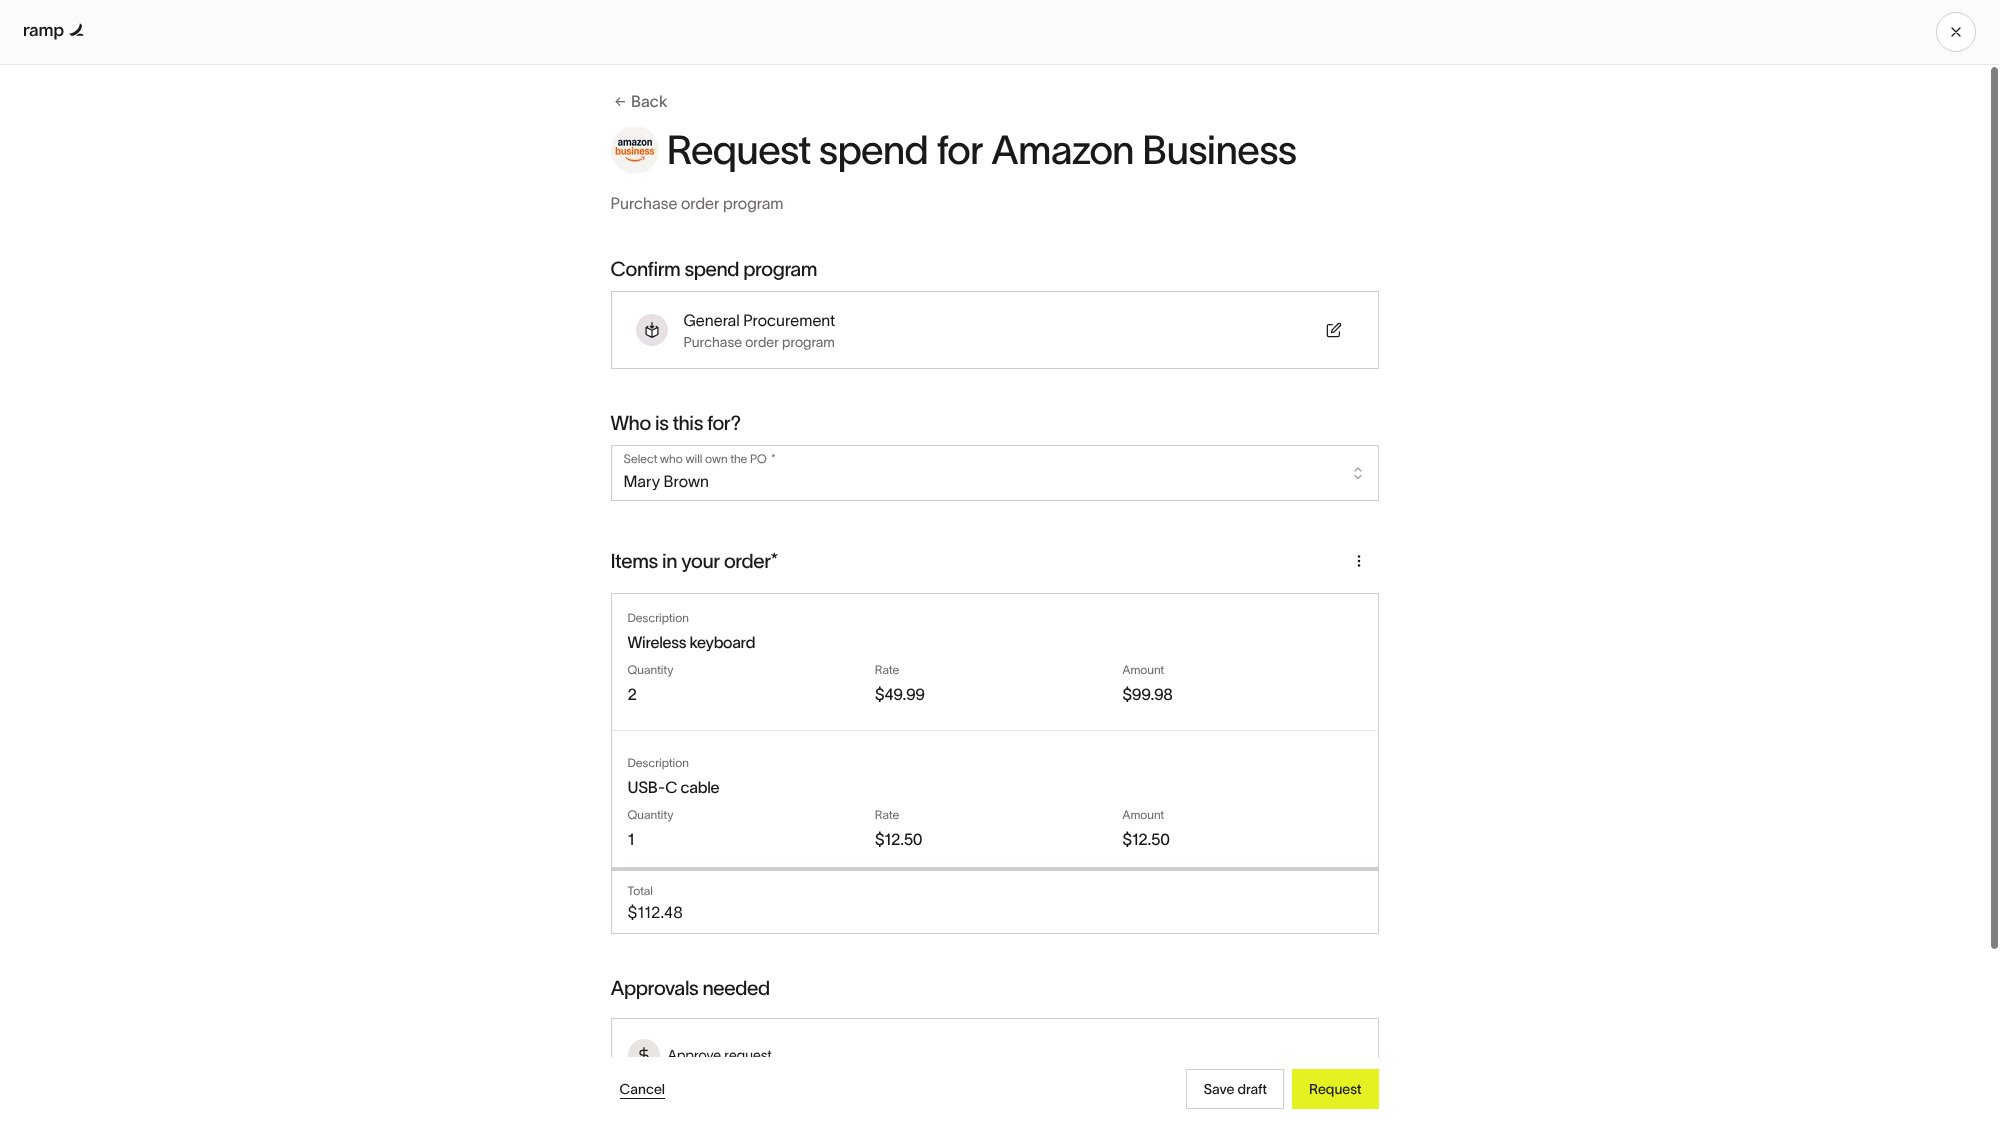
You're routed back to Ramp, where a purchase request opens for the supplier you shopped. Ramp auto-suggests the best Spend Program based on the line items in your cart and the vendor, and pre-fills the line items, prices, and vendor for you. Review the suggested program under Confirm Spend Program.
The remaining questions you answer depend on the selected Spend Program — they can include fields such as Who is this for? (who will own the PO and the entity) and a message for approvers. The line items appear under Items in your order (Description, Quantity, Rate, and Amount); accounting categories are not pre-filled from the supplier, so select the required accounting fields for your business (for example, GL account or department) yourself.
-
Select Request to submit, or Save draft to finish later.
Note: If the selected Spend Program includes a Ship-to address question, the requester's answer sets the shipping address used for the order. If it doesn't, the order uses the default shipping address from your purchase order settings. If requesters need to choose the shipping address per request, add a ship-to address question to the Spend Program — see Get started with Procurement. Billing addresses for punchout orders are set from your purchase order settings.
Your request then follows your normal procurement approval flow. For general guidance on requests, see How to submit procurement requests.
Track your punchout purchase order
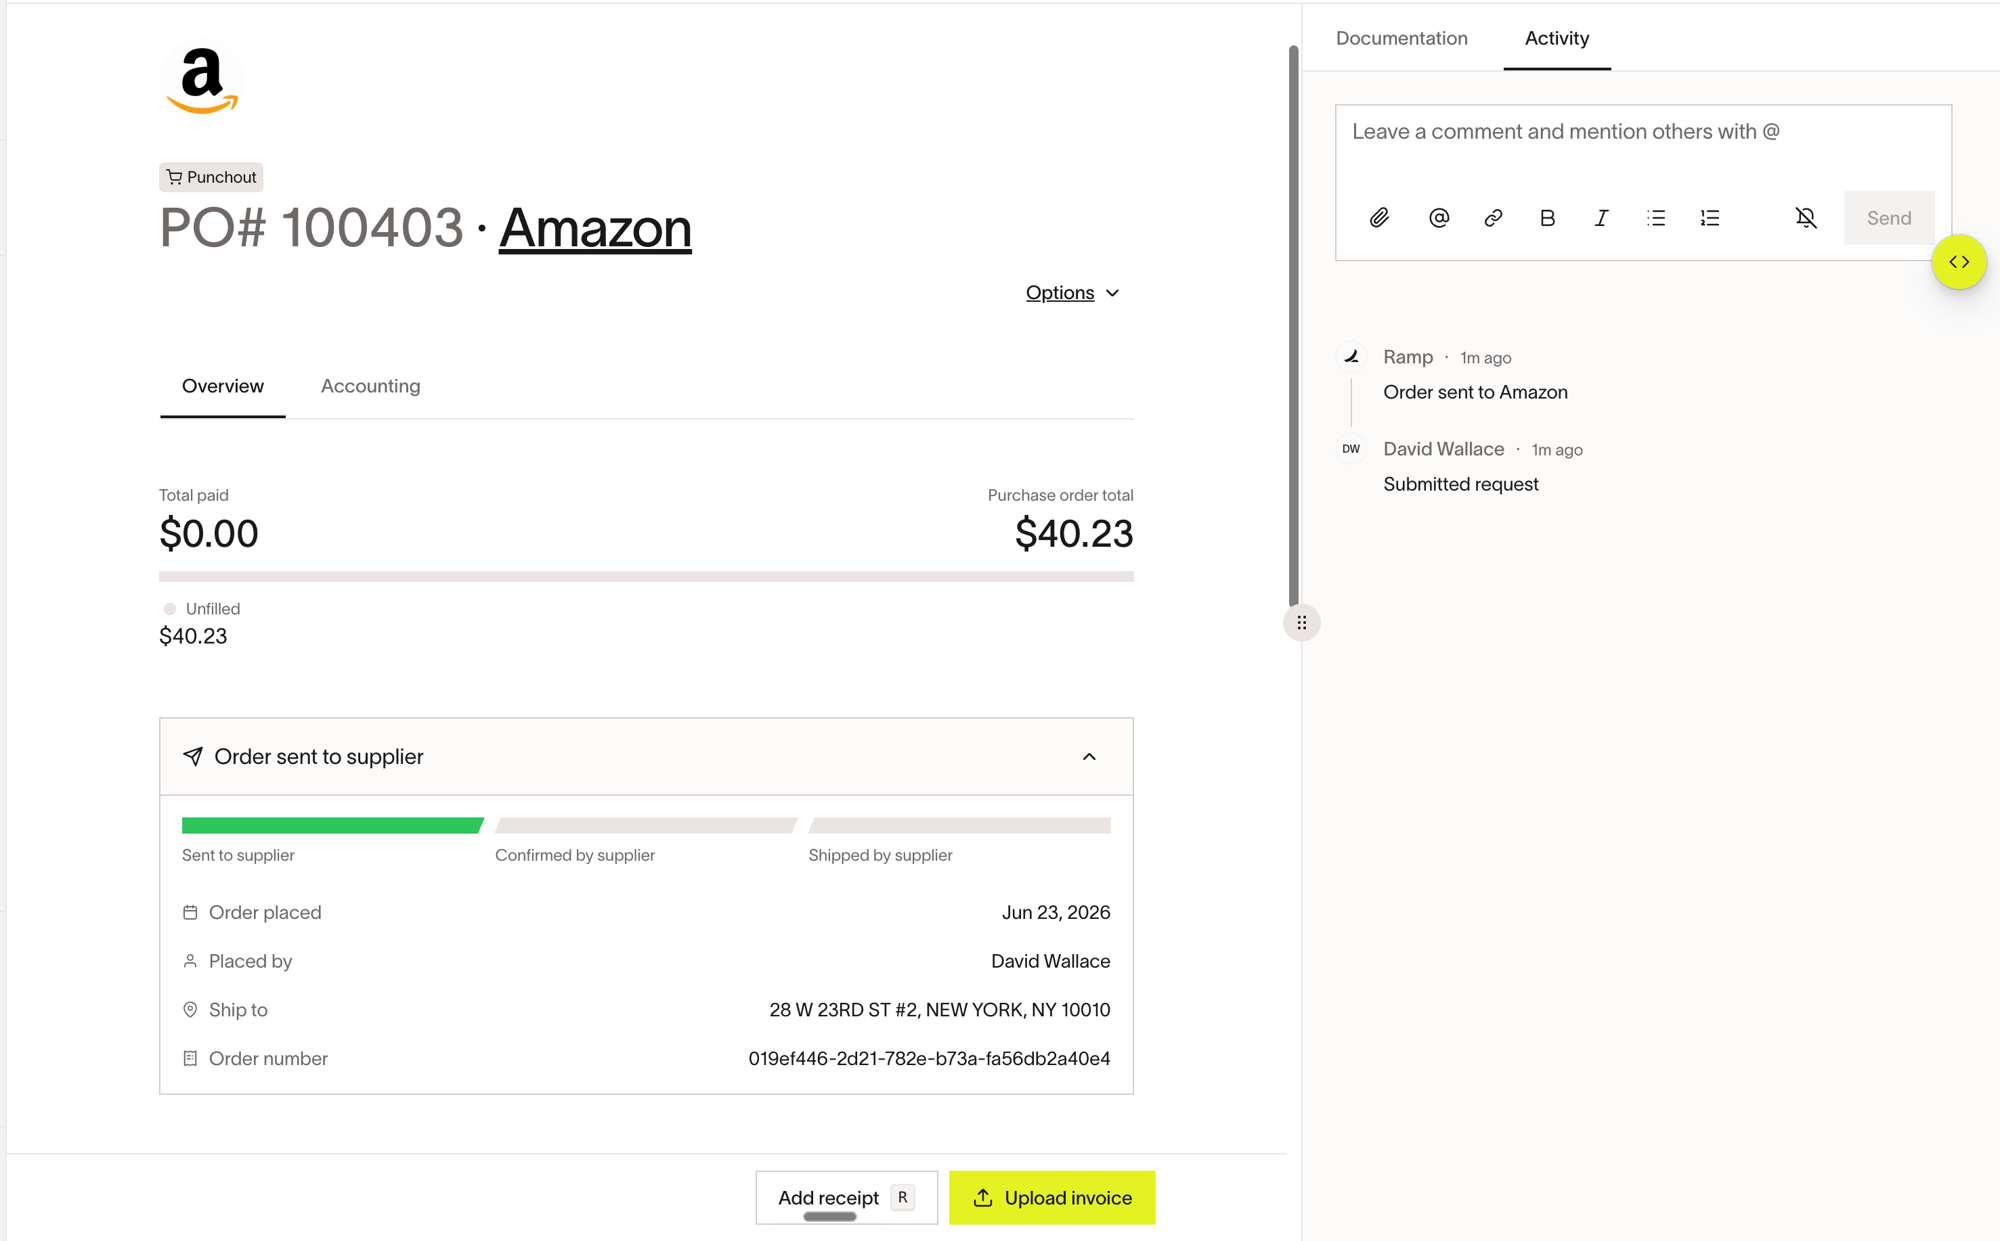
When your request is approved, Ramp assigns the purchase order number and routes the order to the supplier. POs created from a punchout are labeled Punchout.
Order status
A punchout PO shows fulfillment progress through these stages:
- Sent to supplier — the order has been sent to the supplier.
- Confirmed by supplier — the supplier confirmed the order.
- Shipped by supplier — the supplier shipped the order.
For Amazon Business orders, these confirmation and shipping updates reach Ramp through the order confirmation and ship notification connections in your punchout configuration — see Amazon Business order confirmations and ship notifications.
If the supplier can't fulfill some or all of the order, the PO shows that items were rejected — this usually happens when items go out of stock or their price changes. In that case, you can shop again and submit a new order.
Order details
The PO Overview tab shows order details, including:
- Order placed — the date the order was placed.
- Placed by — the person who owns the PO.
- Ship to — the shipping address.
- Order or Order number — a supplier order link or the order's reference number.
Activity tab
The PO's Activity tab logs order updates from the supplier — when the order is sent to the supplier, confirmed by the supplier, shipped by the supplier, or when the supplier rejects some or all items — alongside request activity and comments. To follow a punchout order, open the PO and check the Activity tab. For more on viewing and managing POs, see Purchase orders in Ramp.
Advanced setup: supplier order confirmations and ship notifications
Order confirmations and ship notifications are optional. Punchout orders work without them, but enabling them lets Ramp show the Confirmed by supplier and Shipped by supplier stages on the PO.
Amazon Business order confirmations and ship notifications
Amazon Business sends order confirmations and ship notifications to Ramp over two separate connections. These are configured on the Amazon Business side, not in Ramp — your Amazon Business administrator must turn both on and point them at Ramp.
In your punchout configuration page, set both of these connections to On:
- Order confirmation connection to Amazon Business
- Ship Notification connection to Amazon Business
Both connections use the same three settings:
- UserName/Identity — the same value as the From Identity used in your cXML punchout setup.
- Password/SharedSecret — the same value as the Shared Secret used in your cXML punchout setup.
- URL for your server —
https://api.ramp.com/v1/webhooks/punchout/cxml. This is the same URL for both connections.
Don't generate new credentials for these connections. The identity and shared secret must exactly match the values already used in your cXML punchout configuration — if they don't match, Amazon Business can't deliver updates to Ramp. Both toggles must be On; if only one is on, Ramp receives only that type of update.
CDW order confirmations and ship notifications
CDW order confirmations and ship notifications aren't self-service. To have them enabled, email your CDW Integrations Specialist at [email protected].
Limitations
- Shopping sessions are not saved. Each time you shop a vendor catalog, Ramp starts a new shopping session — there's no way to resume a previous one. Keep the Ramp window open while you shop; closing the supplier's shopping tab does not save your session. To end a shopping session without submitting a cart, select Cancel, then End session in Ramp.
- Credits, refunds, and returns aren't supported in Ramp. To resolve a problem with an order — such as a credit, refund, or return — go back to the supplier's site to handle it there. If you need different or replacement items, shop the vendor catalog again and submit a new order using the steps above.
Frequently asked questions
Why don't I see the supplier I want to shop from?
Connected suppliers appear as shopping options. If you can manage integrations, an unconnected supported supplier may also appear with Set up. See Supported vendors for connection and request options.
Which vendors can I shop today?
Amazon Business (US), CDW, and Staples, with more suppliers coming soon. See Supported vendors for availability details.
What happens when I submit my cart on the supplier site?
Submitting the cart for approval loads it into a Ramp purchase request form without placing the order. See Shop a vendor catalog and submit a request for the full workflow.
How are my Spend Program and line items filled in?
When your cart returns to Ramp, Ramp suggests the best Spend Program based on the items in your cart and pre-fills the line items, prices, and vendor on the Request spend form. Accounting fields, such as accounting category, are not pre-filled from the supplier cart. You confirm or change the program and complete the remaining fields before submitting.
How do I handle a return, refund, or credit?
Returns, refunds, and credits aren't supported in Ramp for punchout orders. Resolve them directly on the supplier's site. If you need replacement items, shop the vendor catalog again and submit a new order.