NetSuite integration: Set up with Ramp (no subsidiaries)
Overview
Available on Ramp Plus. See Ramp Plus overview for plan details.
Before proceeding, make sure you are signed in as an Administrator on NetSuite and that you are assigned the Accounting or Admin role on Ramp.
If you are validating NetSuite's current API and authentication requirements before setup, see NetSuite integration: API and authentication requirements.
Step 1
-
Begin in Ramp and open the Accounting tab - click “Get Started Now”.

-
Click on “NetSuite” on the next page
Step 2
- Open up your NetSuite account in another tab or choose the hyperlink in the setup guide
- Copy your Account ID from the URL on your NetSuite account and enter it into the NetSuite ID field in Ramp
- Navigate to Setup->Company and see if the “Subsidiary Settings Manager” option is available. If it is, please select “Yes, I see Subsidiary Settings Manager.”
- NOTE: If Subsidiaries are enabled for your NetSuite account, DO NOT PROCEED . Instead, go to our multiple subsidiaries guide and follow the steps there.
- Click Continue when complete
Step 3
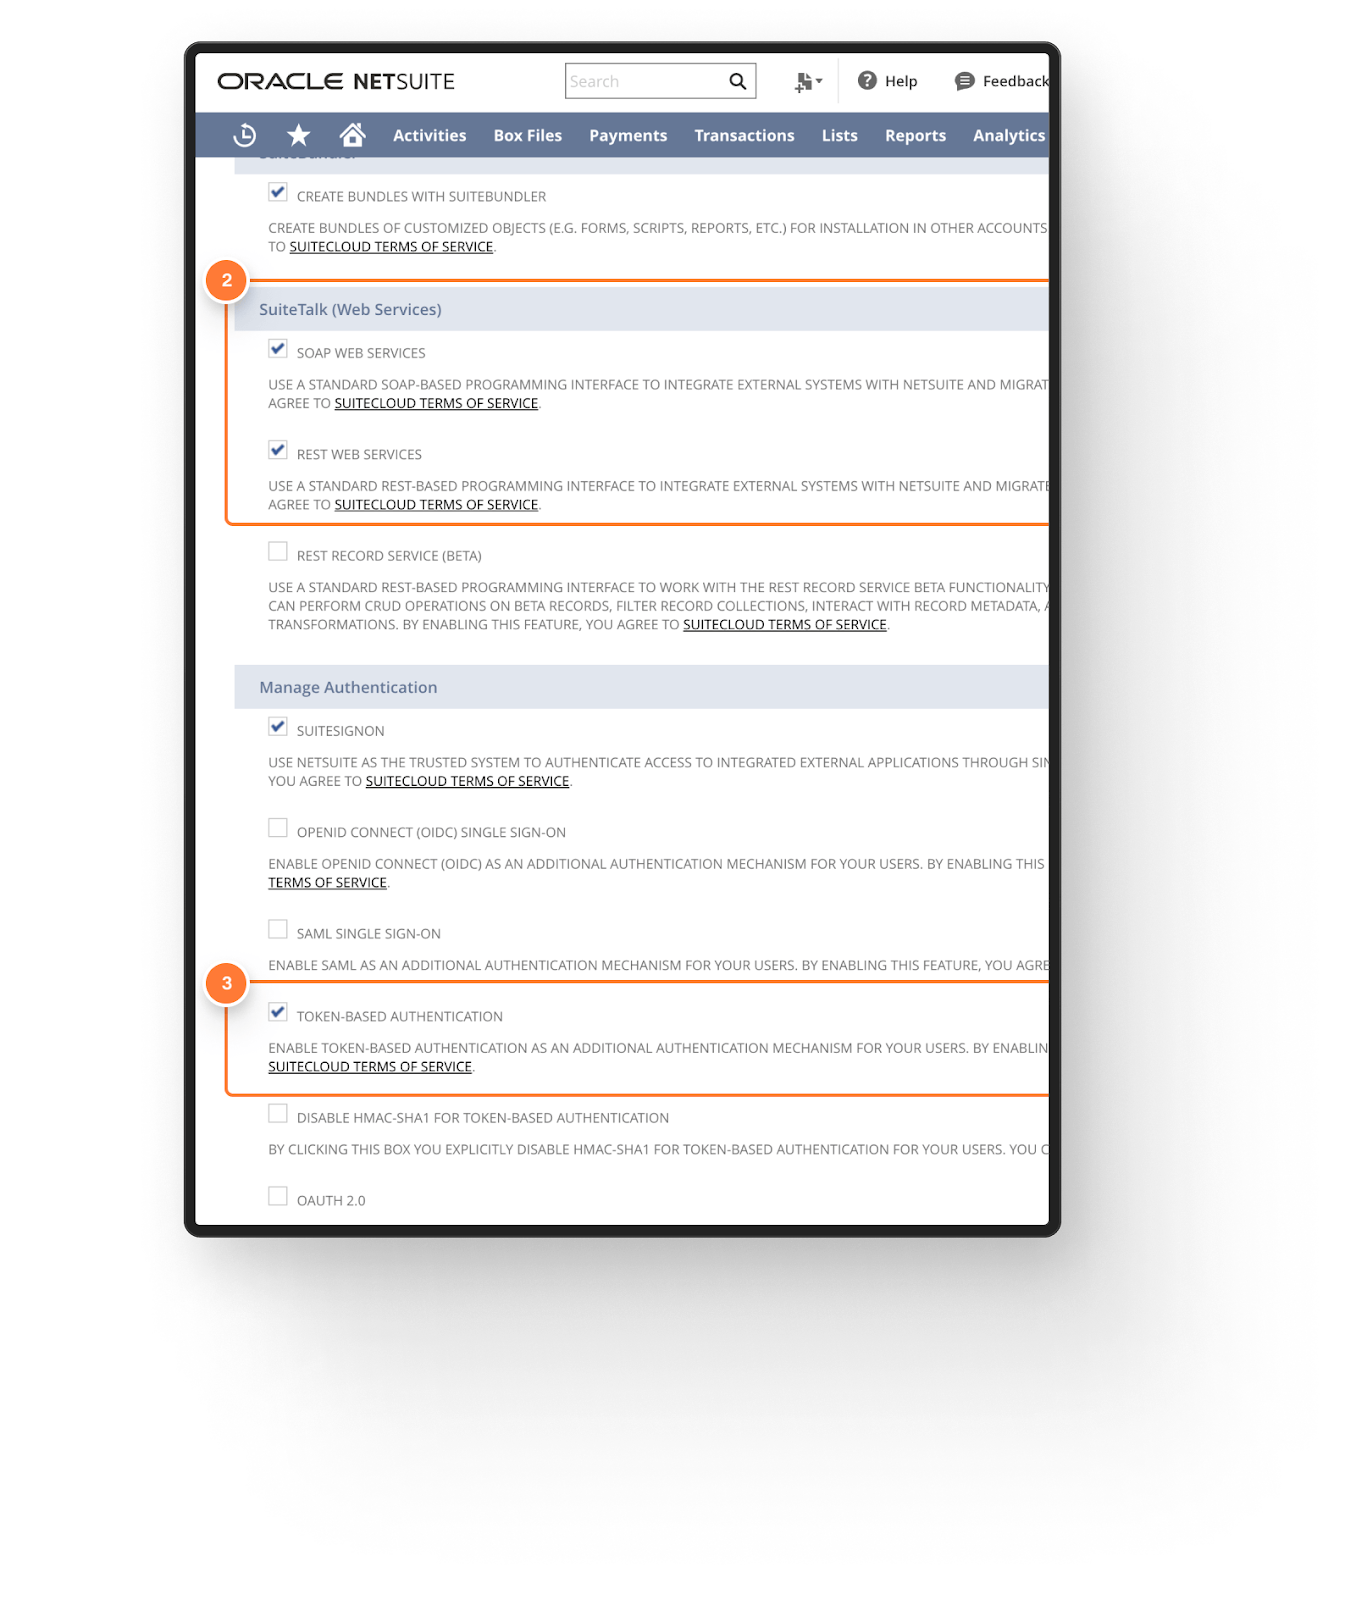
- On the next page, click the hyperlink or navigate in your NetSuite account to Setup -> Company and click Enable Features. Then click the SuiteCloud tab.

-
Ensure that the checkboxes for SOAP WEB SERVICES, REST WEB SERVICES, and TOKEN BASED AUTHENTICATION are checked (note that the latter checkbox is under 'Manage Authentication, rather than SuiteTalk).
-
Click Save in NetSuite and click Continue on the Ramp setup page.
Step 4
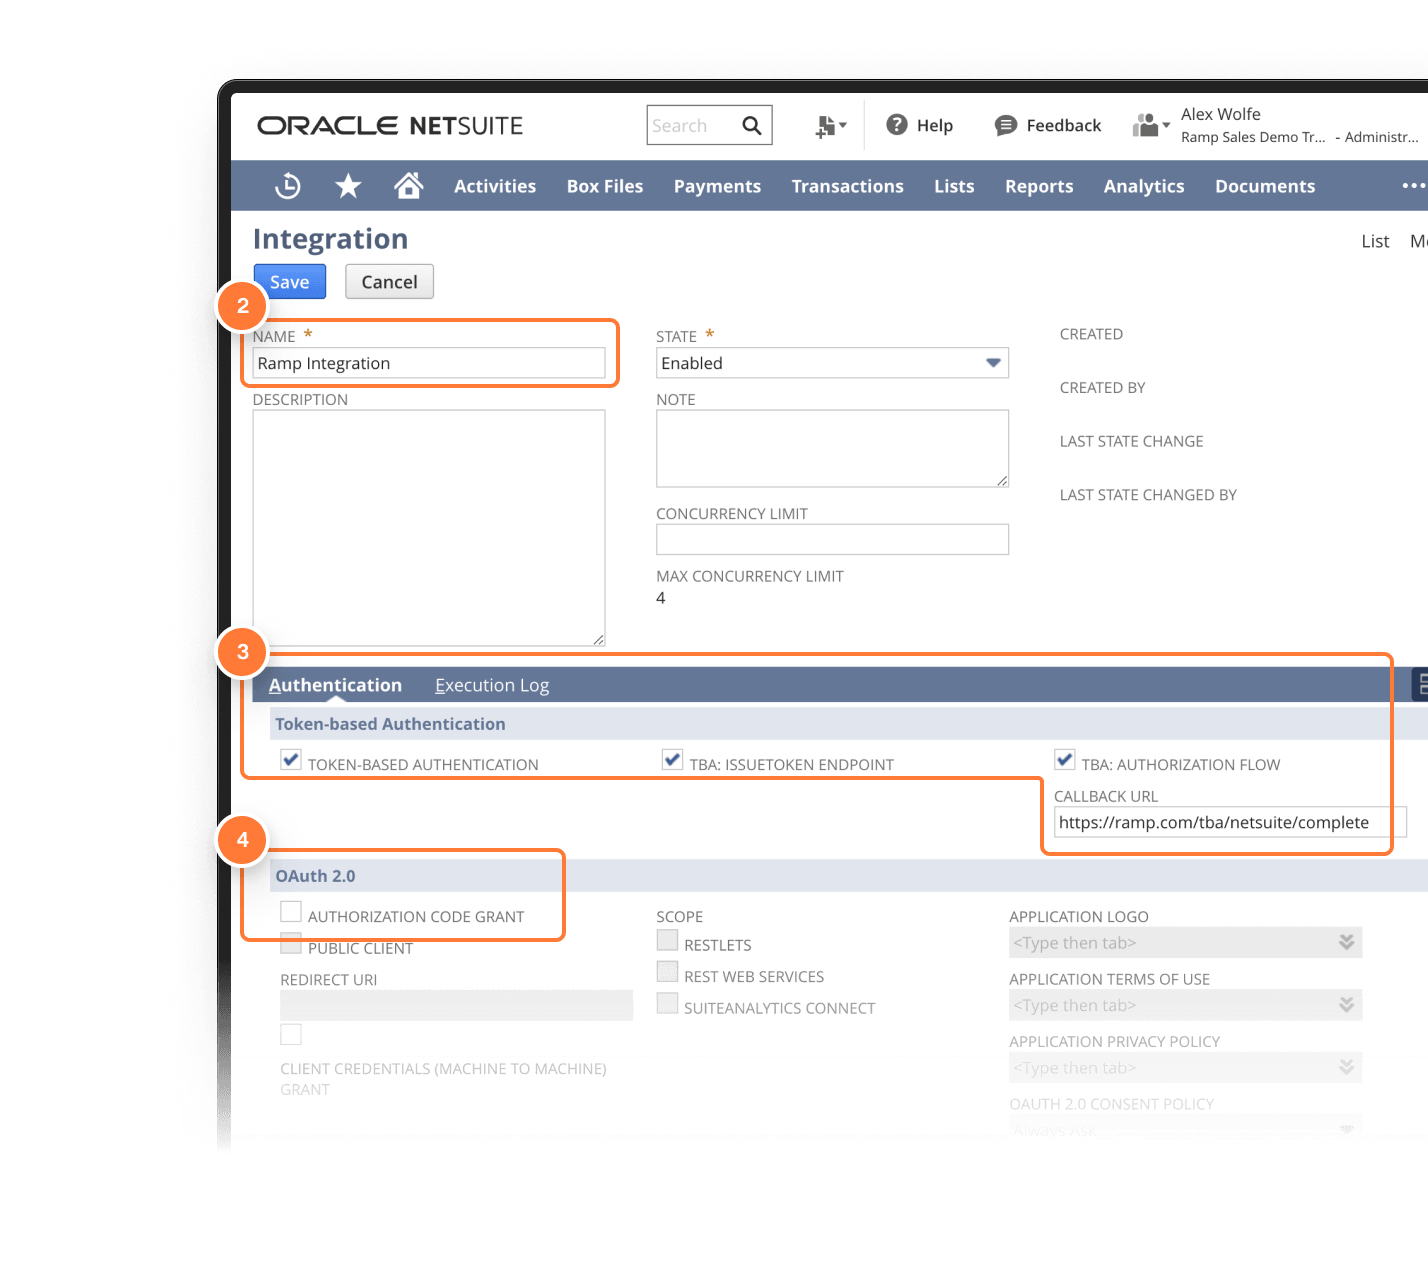
- Use the hyperlink in Ramp or navigate to Setup -> Integration -> Manage Integrations -> New
- Enter this information on the Integration Record:
- Name: Ramp Integration
- Check the boxes for Token-Based Authentication, TBA: Issuetoken Endpoint, and TBA: Authorization Flow
- Callback URL: https://ramp.com/tba/netsuite/complete
- Make sure the box is unchecked for the Authorization Code Grant
- Click Save - then copy the Client ID and Client Secret codes to input into Ramp
-
Do Not click off of this page until you have moved on - if you do, you will not be able to access the secret codes again.
-
- Click Continue in Ramp once this is complete
Step 5
- Use the Hyperlink or navigate to Setup > Users/Roles > Manage Roles
- Find the role called "Accountant" and click "Customize." (if you don't see this role, check "Show Inactives.")
- Call the role "Ramp Accountant"
- Click Save and Continue in Ramp
| ADMI_ACCTSETUP | Set Up Accounting | FULL |
|---|---|---|
| LIST_TAXDETAILSTAB | Tax Details Tab | FULL |
| TRAN_PURCHORDBILL | Bill Purchase Orders | EDIT |
| TRAN_PURCHORDRECEIVE | Receive Order | EDIT |
| TRAN_VENDBILL | Bills | FULL |
| TRAN_CARDCHRG | Credit Card | FULL |
| TRAN_CARDRFND | Credit Card Refund | FULL |
| TRAN_CUSTCRED | Credit Memo | FULL |
| TRAN_VENDAUTHCREDIT | Credit Returns | FULL |
| TRAN_VENDCRED | Enter Vendor Credits | EDIT |
| LIST_ACCOUNT | Accounts | FULL |
| LIST_CLASS | Classes | FULL |
| LIST_CUSTJOB | Customers | FULL |
| LIST_DEPARTMENT | Departments | FULL |
| LIST_CATEGORY | Expense Categories | FULL |
| LIST_LOCATION | Locations | FULL |
| LIST_FIND | Perform Search | FULL |
| LIST_TAXITEM | Tax Records | EDIT |
| LIST_VENDOR | Vendors | FULL |
| LIST_CURRENCY | Currency | FULL |
| ADMI_MANAGE_OAUTH_TOKENS | Access Token Management | FULL |
| ADMI_ACCOUNTINGLIST | Accounting Lists | EDIT |
| ADMI_DELETEDRECORD | Deleted Records | FULL |
| ADMI_LOGIN_OAUTH | Sign in using Access Tokens | FULL |
| ADMI_ACCTPERIODS | Manage Accounting Periods | VIEW |
| ADMI_EMPLOYEELIST | Other Lists | EDIT |
| ADMI_RESTWEBSERVICES | REST Web Services | FULL |
| ADMI_WEBSERVICES | SOAP Web Services | FULL |
| ADMI_CUSTBODYFIELD | Custom Body Fields | FULL |
| ADMI_CUSTFIELD | Custom Fields | FULL |
| ADMI_CUSTLIST | Custom Lists | FULL |
| ADMI_CUSTRECORD | Custom Record Types | FULL |
| ADMI_MANAGECUSTOMSEGMENTS | Custom Segments | FULL |
Step 6
- Use the Hyperlink or navigate in NetSuite to Transactions > Bank >Use Credit Card & click Customize Form
- Go to Screen Fields > New Field
- In the Label field, enter "ramp_receipt_url"
- In the ID field, enter "ramp_receipt_url"
- In the Type field, select Hyperlink
- In the Applies To tab, check PURCHASE and VENDOR PAYMENT
- In the Display tab, ensure that "Main" is selected in the Subtab dropdown
- In the Access tab, ensure that the Default Access Level is Edit
- Go to Screen Fields > New Field
- Click Save and Continue in Ramp
Step 7
- Use the hyperlink or navigate to Setup → Users/Roles → Manage Users
- Find and Edit your Admin user
- Scroll down and click on the Access tab
- Add the Ramp Accountant role, click Save in NetSuite, and Continue in Ramp
Step 8
- First, go to https://assets.ramp.com/accounting/ramp_restlet.js . This should download a file onto your computer. If it doesn't, right-click anywhere on the page, click "Save As," and then save the file as ramp_restlet.js.
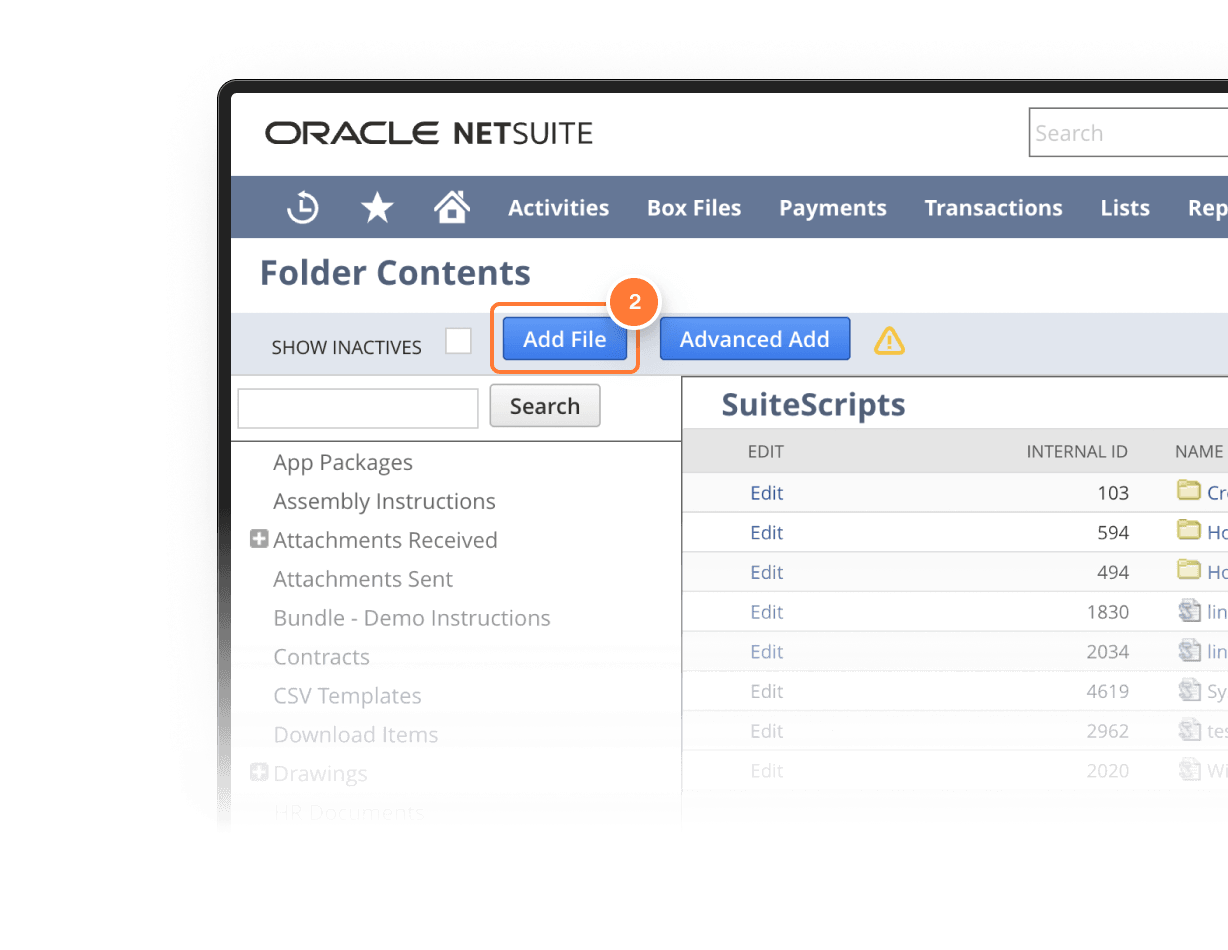
- In NetSuite, click on Documents -> files and click the SuiteScripts folder
-
Click Add File in the top left, and select the ramp_restlet.js file you downloaded.
-
Click Continue in Ramp for the next step
-
Step 9
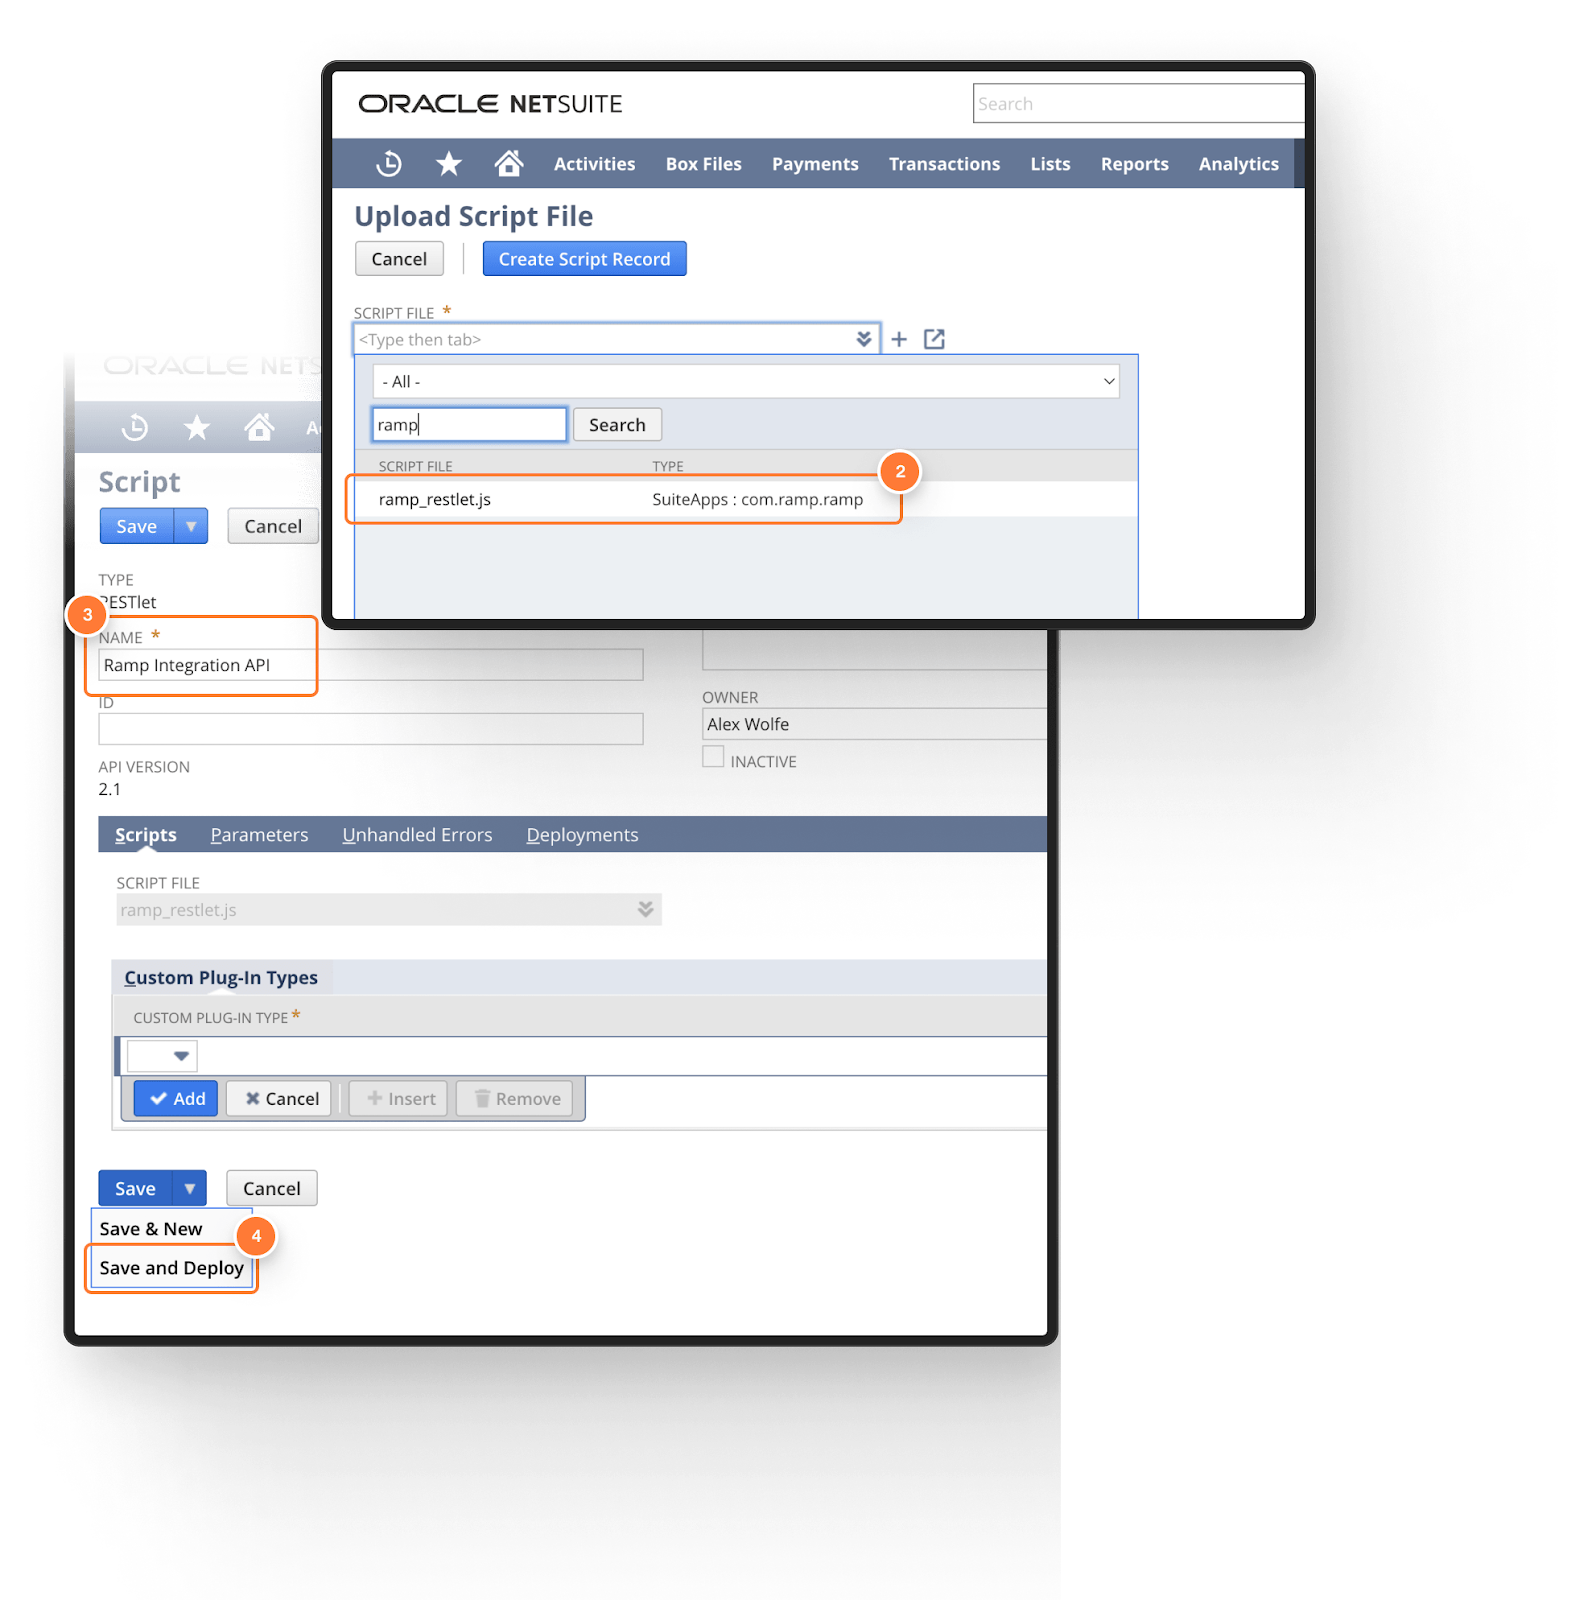
- Use the Hyperlink or navigate to Customization → Scripting → Scripts → New
- Select the file (ramp_reslet) that you added earlier, and click Create Script Record
- Name the script "Ramp Integration API", then click the arrow on the Save button and click Save & Deploy
- Click continue in Ramp to move to the next step
Step 10
-
On the deployment screen, input this information:
- Status: Released
- Log Level: Error
-
Under the Audience tab, check the “Select All” checkbox for Roles
-
Click save, then copy the EXTERNAL URL, copy your account ID (the digits at the beginning, in this example, 1234567), and save for use later.
-
Click Continue in Ramp to move on.

Step 11
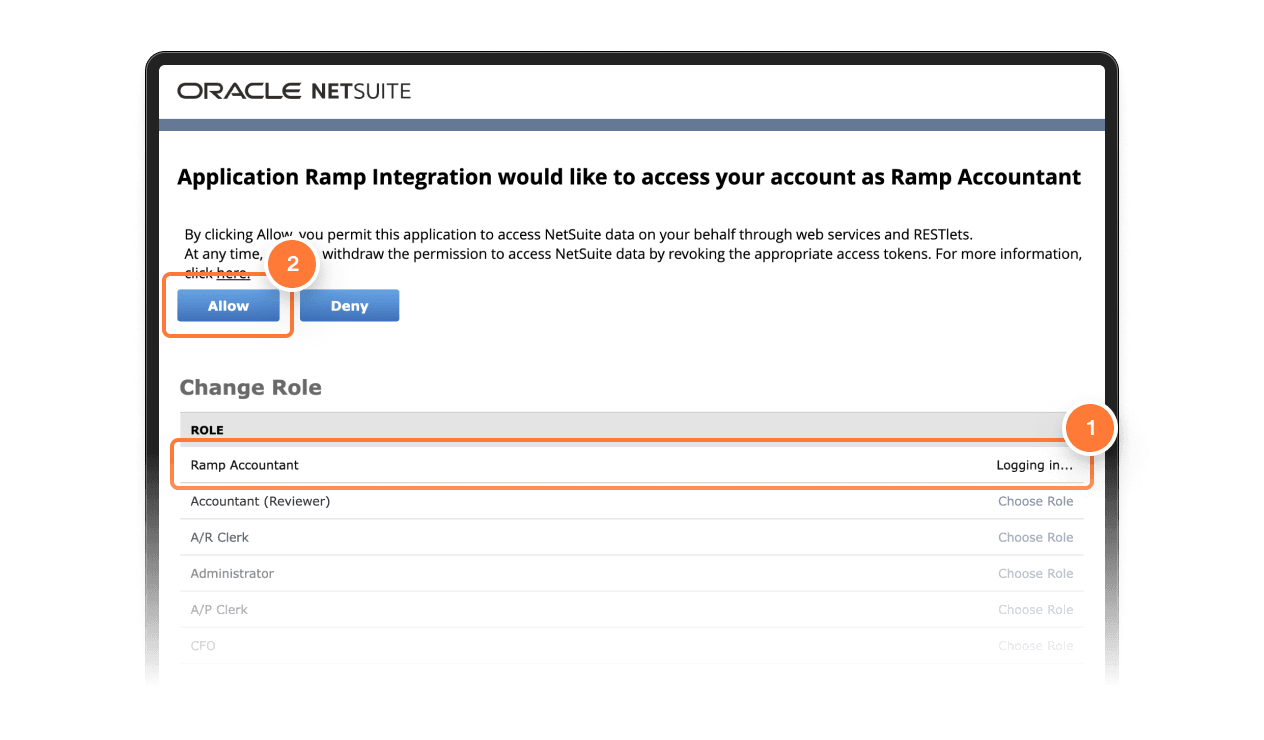
- Confirm Ramp access to NetSuite by clicking on the Approve access in NetSuite button. This opens up a screen to select the Ramp Accountant role using “Choose Role”, then click “Allow” at the top of the screen.
Step 12
- Once redirected back to Ramp, you will configure your multi-entity settings. If you receive a white screen, please contact your Account Manager or Customer Success Manager for assistance.
Extra set up: custom segments
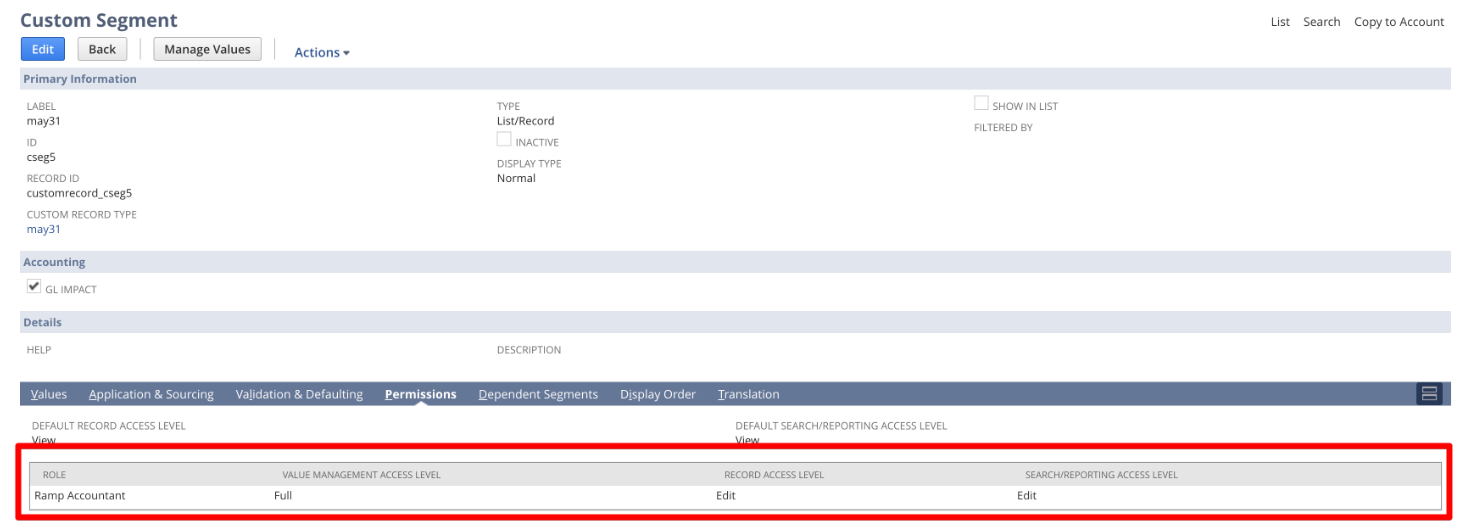
For each custom segment you want to view and code in Ramp, the segment must be viewable on the Credit Card, Bill, and/or Bill Payment Forms, and the following permissions set for the Ramp Accountant Role:
- Value Management Access: Full
- Record Access: Edit
- Search/Reporting Access: Edit.
To view custom segments, on NetSuite, go to Customization -> Lists, Records, & Fields -> Custom Segments. Then click edit next to the segment you'd like to view on Ramp and add the permissions in the Permissions tab laid out above (picture below).