Acumatica integration: Connect to Ramp
Overview
Available on Ramp Plus. See Ramp Plus overview for plan details.
This guide will walk you through the process of connecting Acumatica to Ramp, enabling seamless integration for managing your financial data. Please follow these steps carefully to ensure a successful connection.
Prerequisites
- Customers must have an active Ramp Plus account.
- We recommend the user who connects Ramp is an Acumatica admin with full access rights.
- Version support:
- Acumatica 2023R2 and later: partially supported
- In Acumatica 2023R1 and 2023R2, creating refunds as Cash Purchases is not supported. As a result, when a refund is synced to Ramp using either of these versions, it will appear as a Cash Transaction instead of a Cash Purchase. After updating to Acumatica 2024R1, refunds will sync as Cash Purchases with the Cash Return document type.
- Acumatica 2023R1: partially supported
- In Acumatica 2023R1, Ramp cannot grant indefinite access to the Acumatica environment. Because of this, the user who connects Acumatica to Ramp will need to re-enter their Acumatica credentials every 30 days in the Accounting tab. After updating to Acumatica 2023R2, Ramp is granted indefinite access to the Acumatica environment, and this step is no longer required.
- In Acumatica 2023R1 and 2023R2, creating refunds as Cash Purchases is not supported. As a result, when a refund is synced to Ramp using either of these versions, it will appear as a Cash Transaction instead of a Cash Purchase. After updating to Acumatica 2024R1, refunds will sync as Cash Purchases with the Cash Return document type.
- Acumatica 2022R2 and earlier: not supported at all
- Acumatica 2023R2 and later: partially supported
Note: on-premises deployments are NOT supported. Please ensure that the Acumatica URL has acumatica.com in it. If acumatica.com is not in the URL, then Ramp will not support a direct integration because you have an on-premise deployment.
Step 1: Initiate connection from Ramp
-
Sign in to your Ramp account.
-
Navigate to the Accounting section on the left sidebar.
-
Click on Get Started Now .

Step 2: Choose Acumatica
- SelectAcumatica from the list of options.
- Sign in to your Acumatica account as prompted.
- Click continue in Ramp.

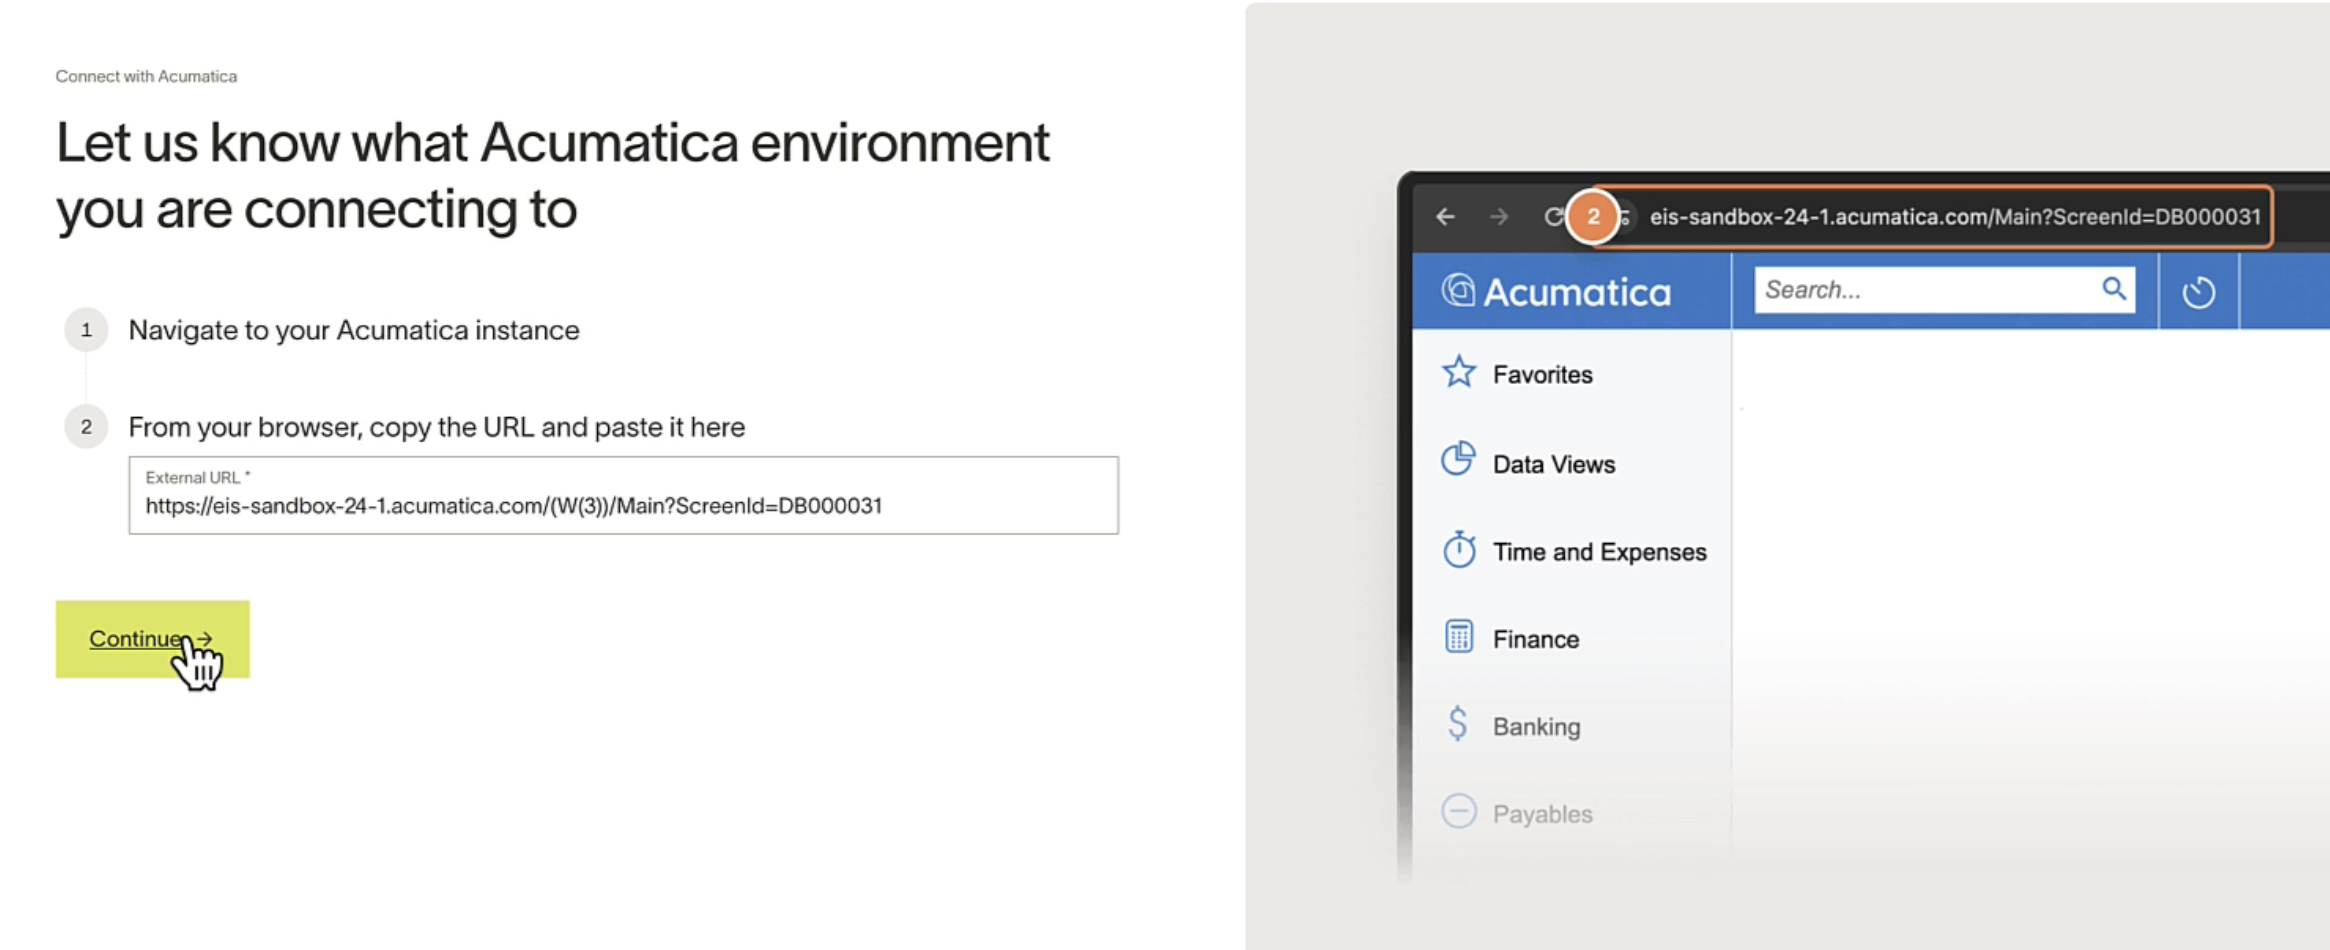
Step 3: Select an Acumatica environment
- Sign in to your Acumatica account.
- From your browser, copy the URL and paste it into Ramp.
- Click continue in Ramp.
Note: on-premises deployments are NOT supported. Please ensure that the Acumatica URL has acumatica.com in it. If acumatica.com is not in the URL, then Ramp will not support a direct integration because you have an on-premise deployment.
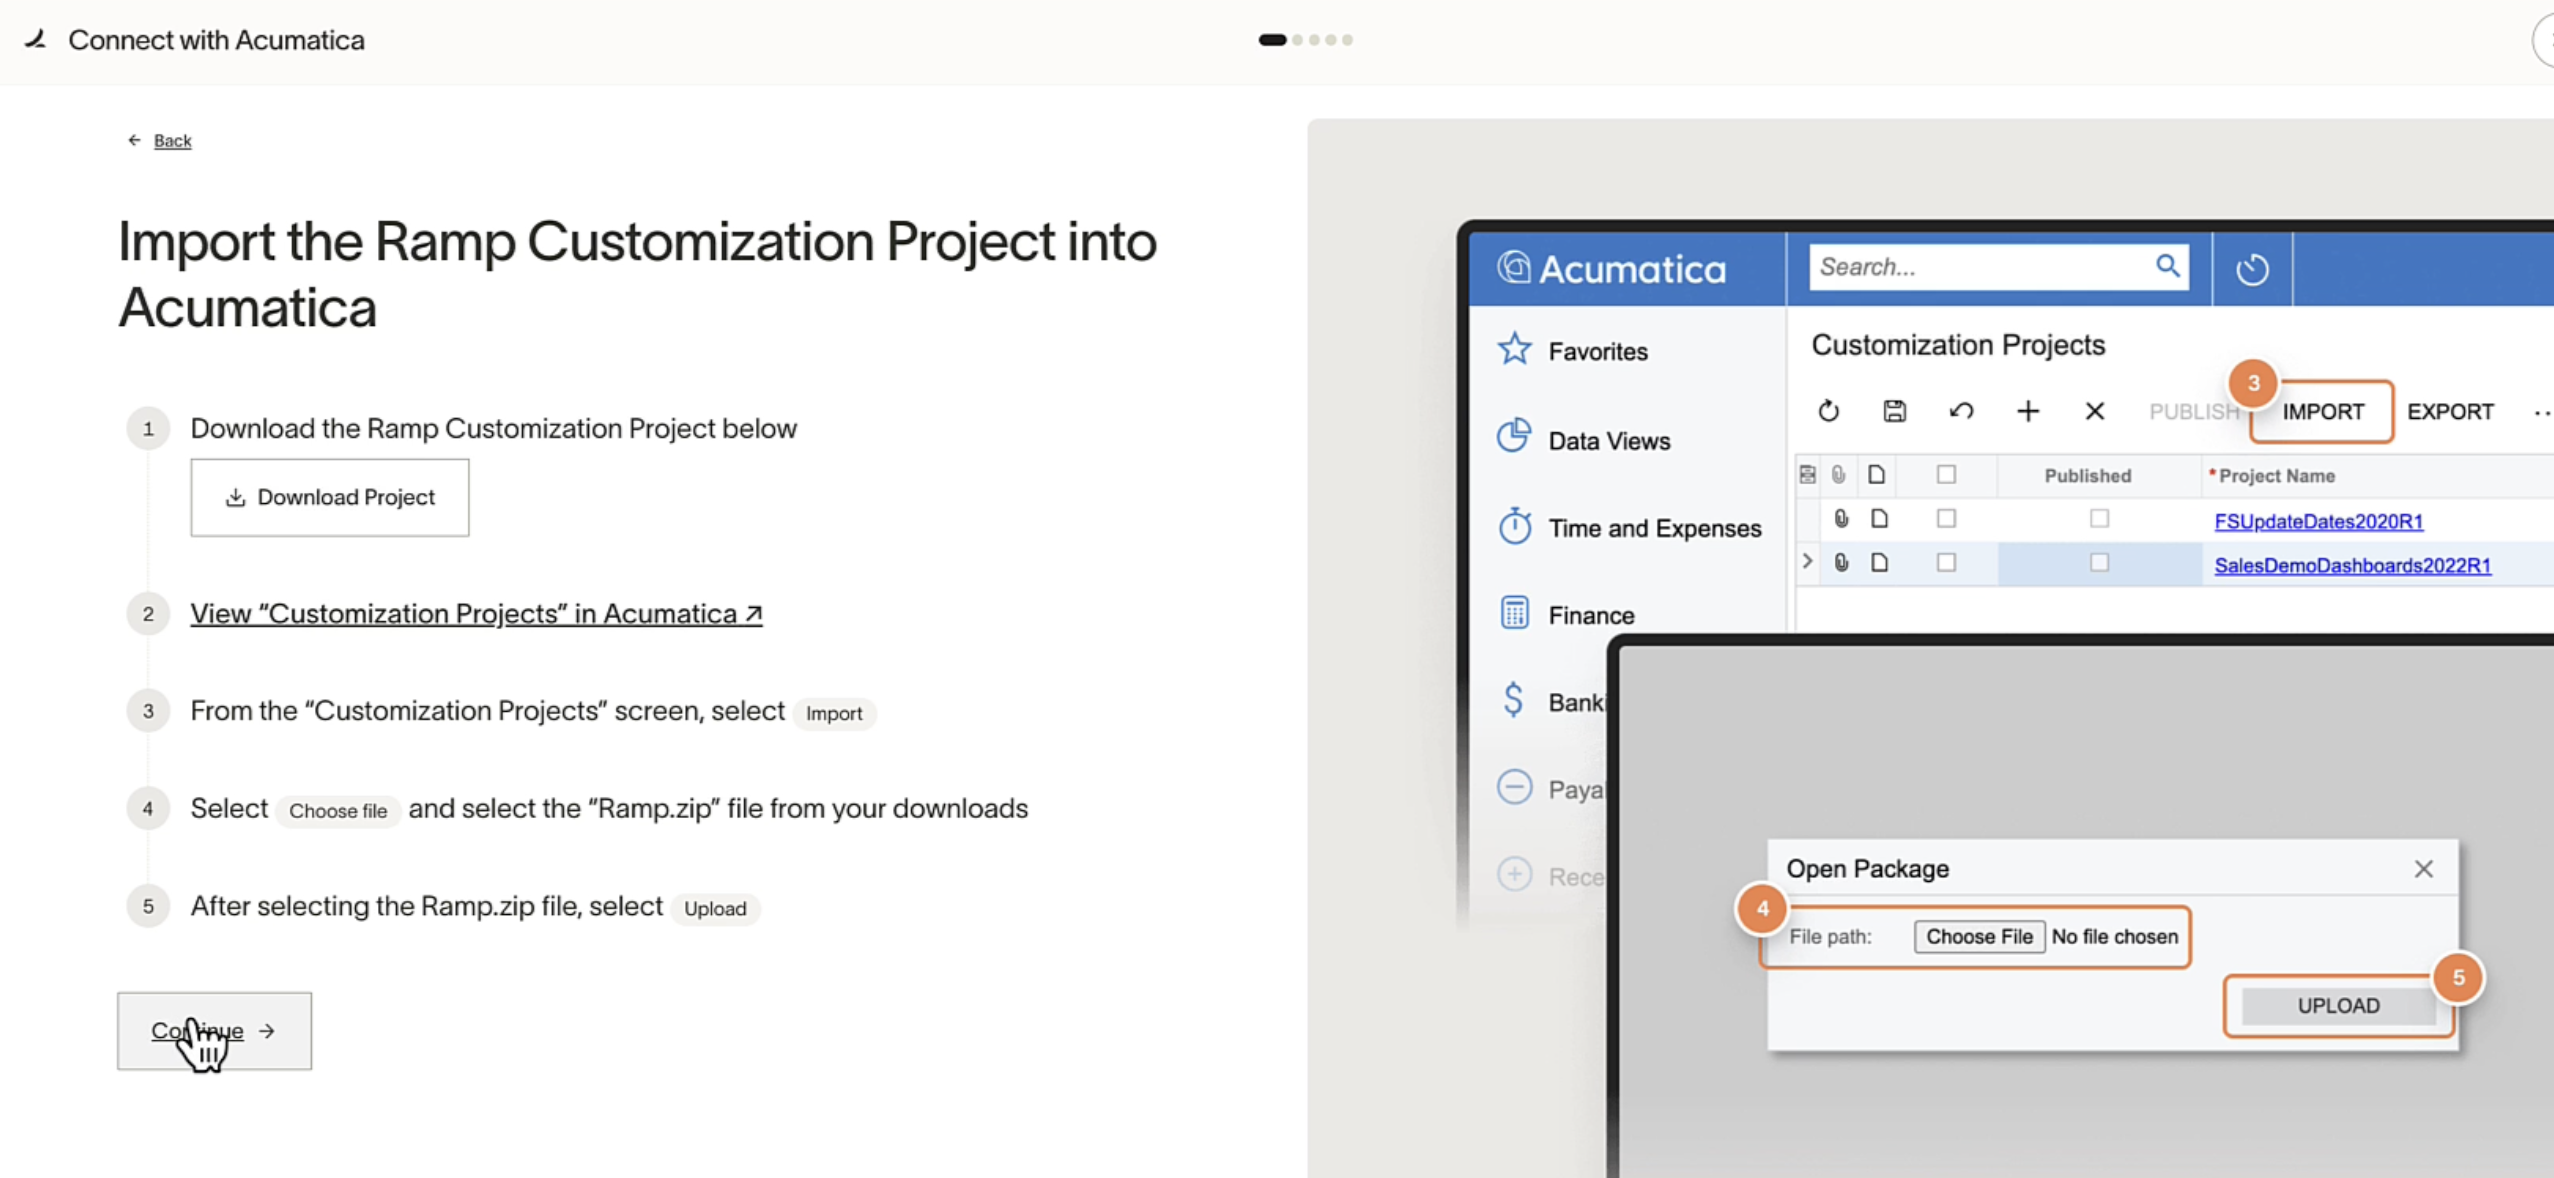
Step 4: Add the Ramp customization project into Acumatica
- Download the Ramp Customization Project.
- Click the quick link to open "Customization Projects" in Acumatica.
- From the "Customization Projects" screen, select Import.
- Select Choose File and select the "Ramp.zip" file from your downloads.
- After selecting the Ramp.zip file, select Upload.
- Click continue in Ramp.
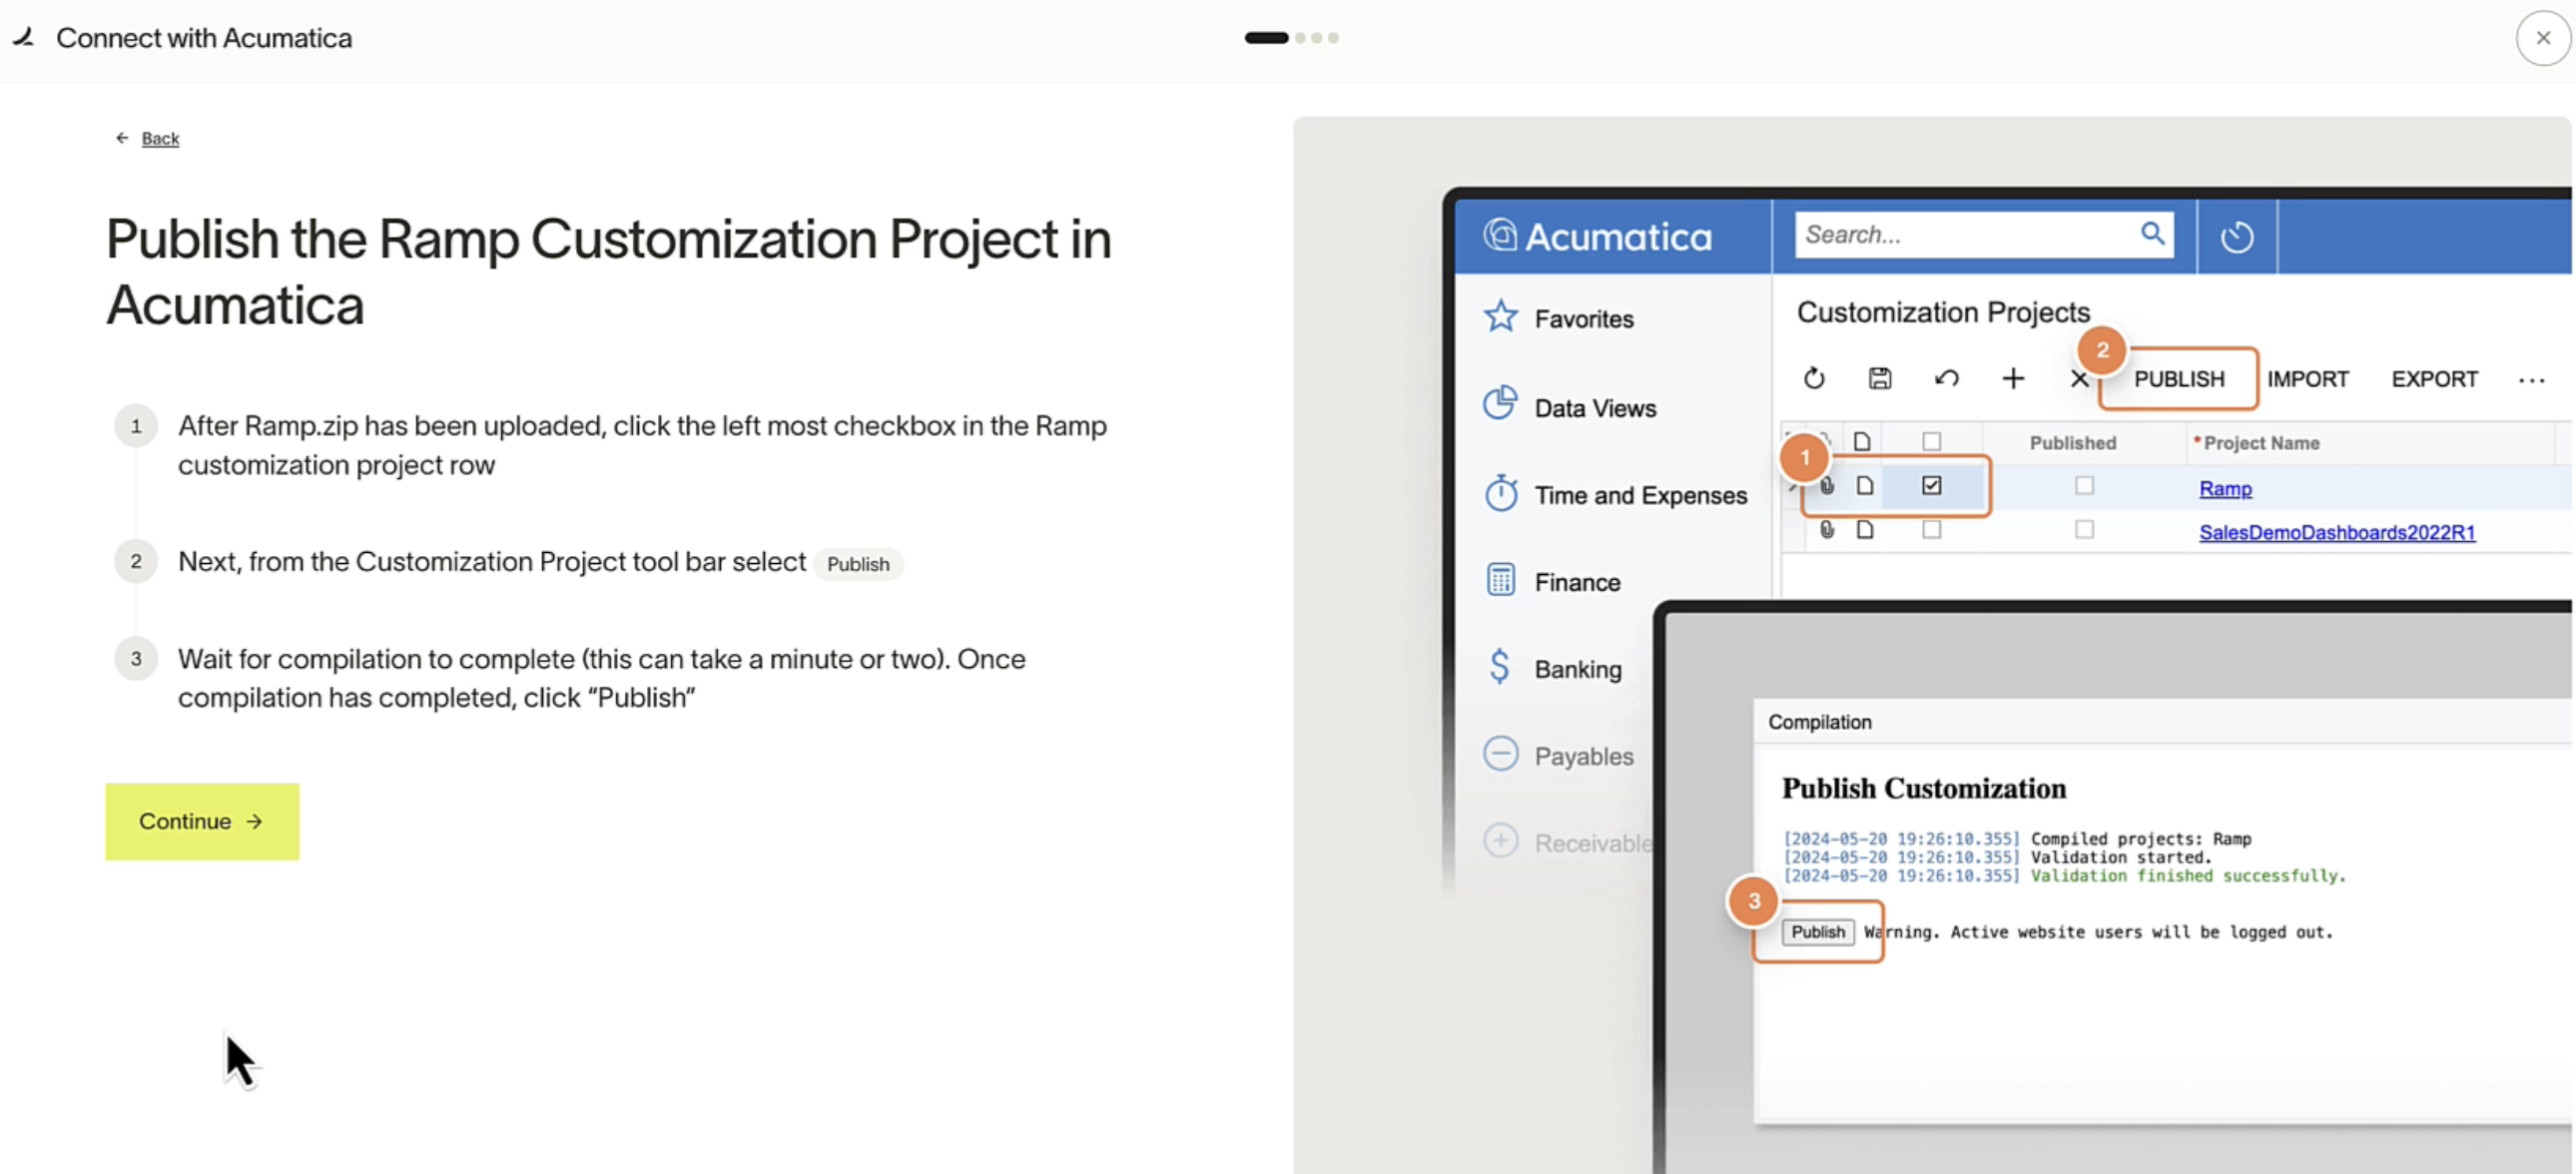
Step 5: Publish the Ramp customization project in Acumatica
- After Ramp.zip has been uploaded, click the left most checkbox in the Ramp customization project row.
- Next, from the Customization Project tool bar select Publish .
- Wait for the compilation to complete (this can take a few minutes). Once compilation has completed, click Publish .
- Click continue in Ramp.
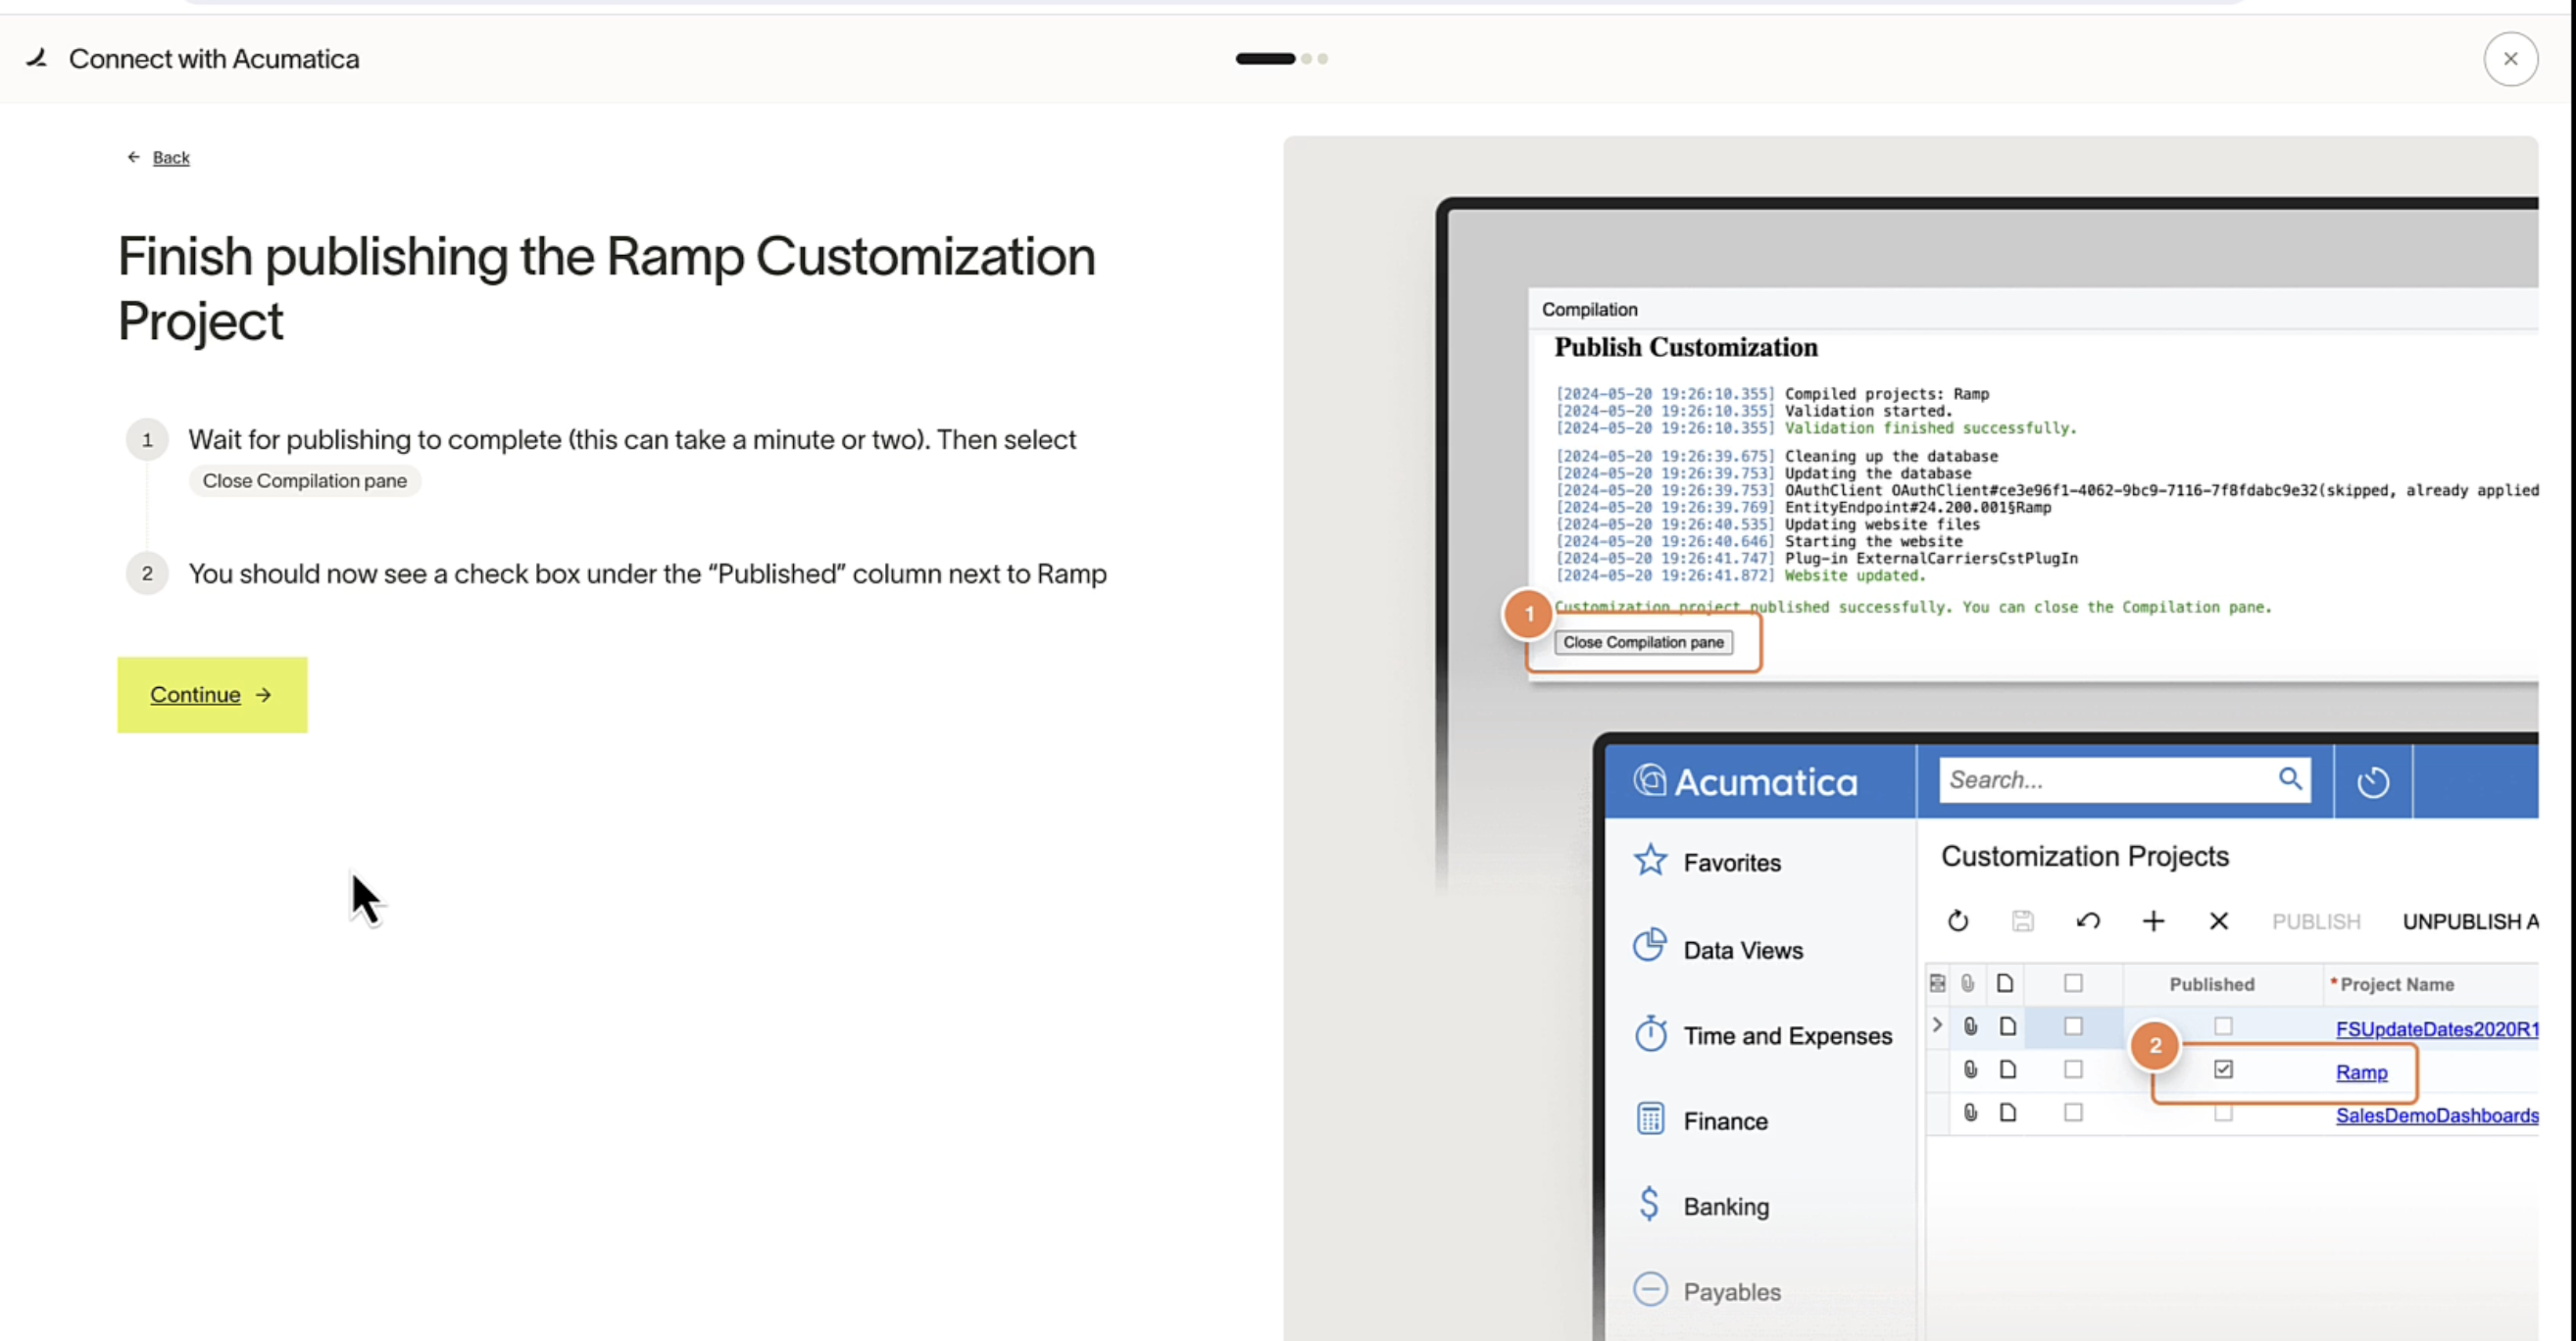
Step 6: Finish publishing the Ramp customization project
- Wait for the publishing to complete (this can take a few minutes). Then select Close Compilation pane.
- You should now see a check box under the " Published " column next to the " Ramp " project name.
- Click continue in Ramp.
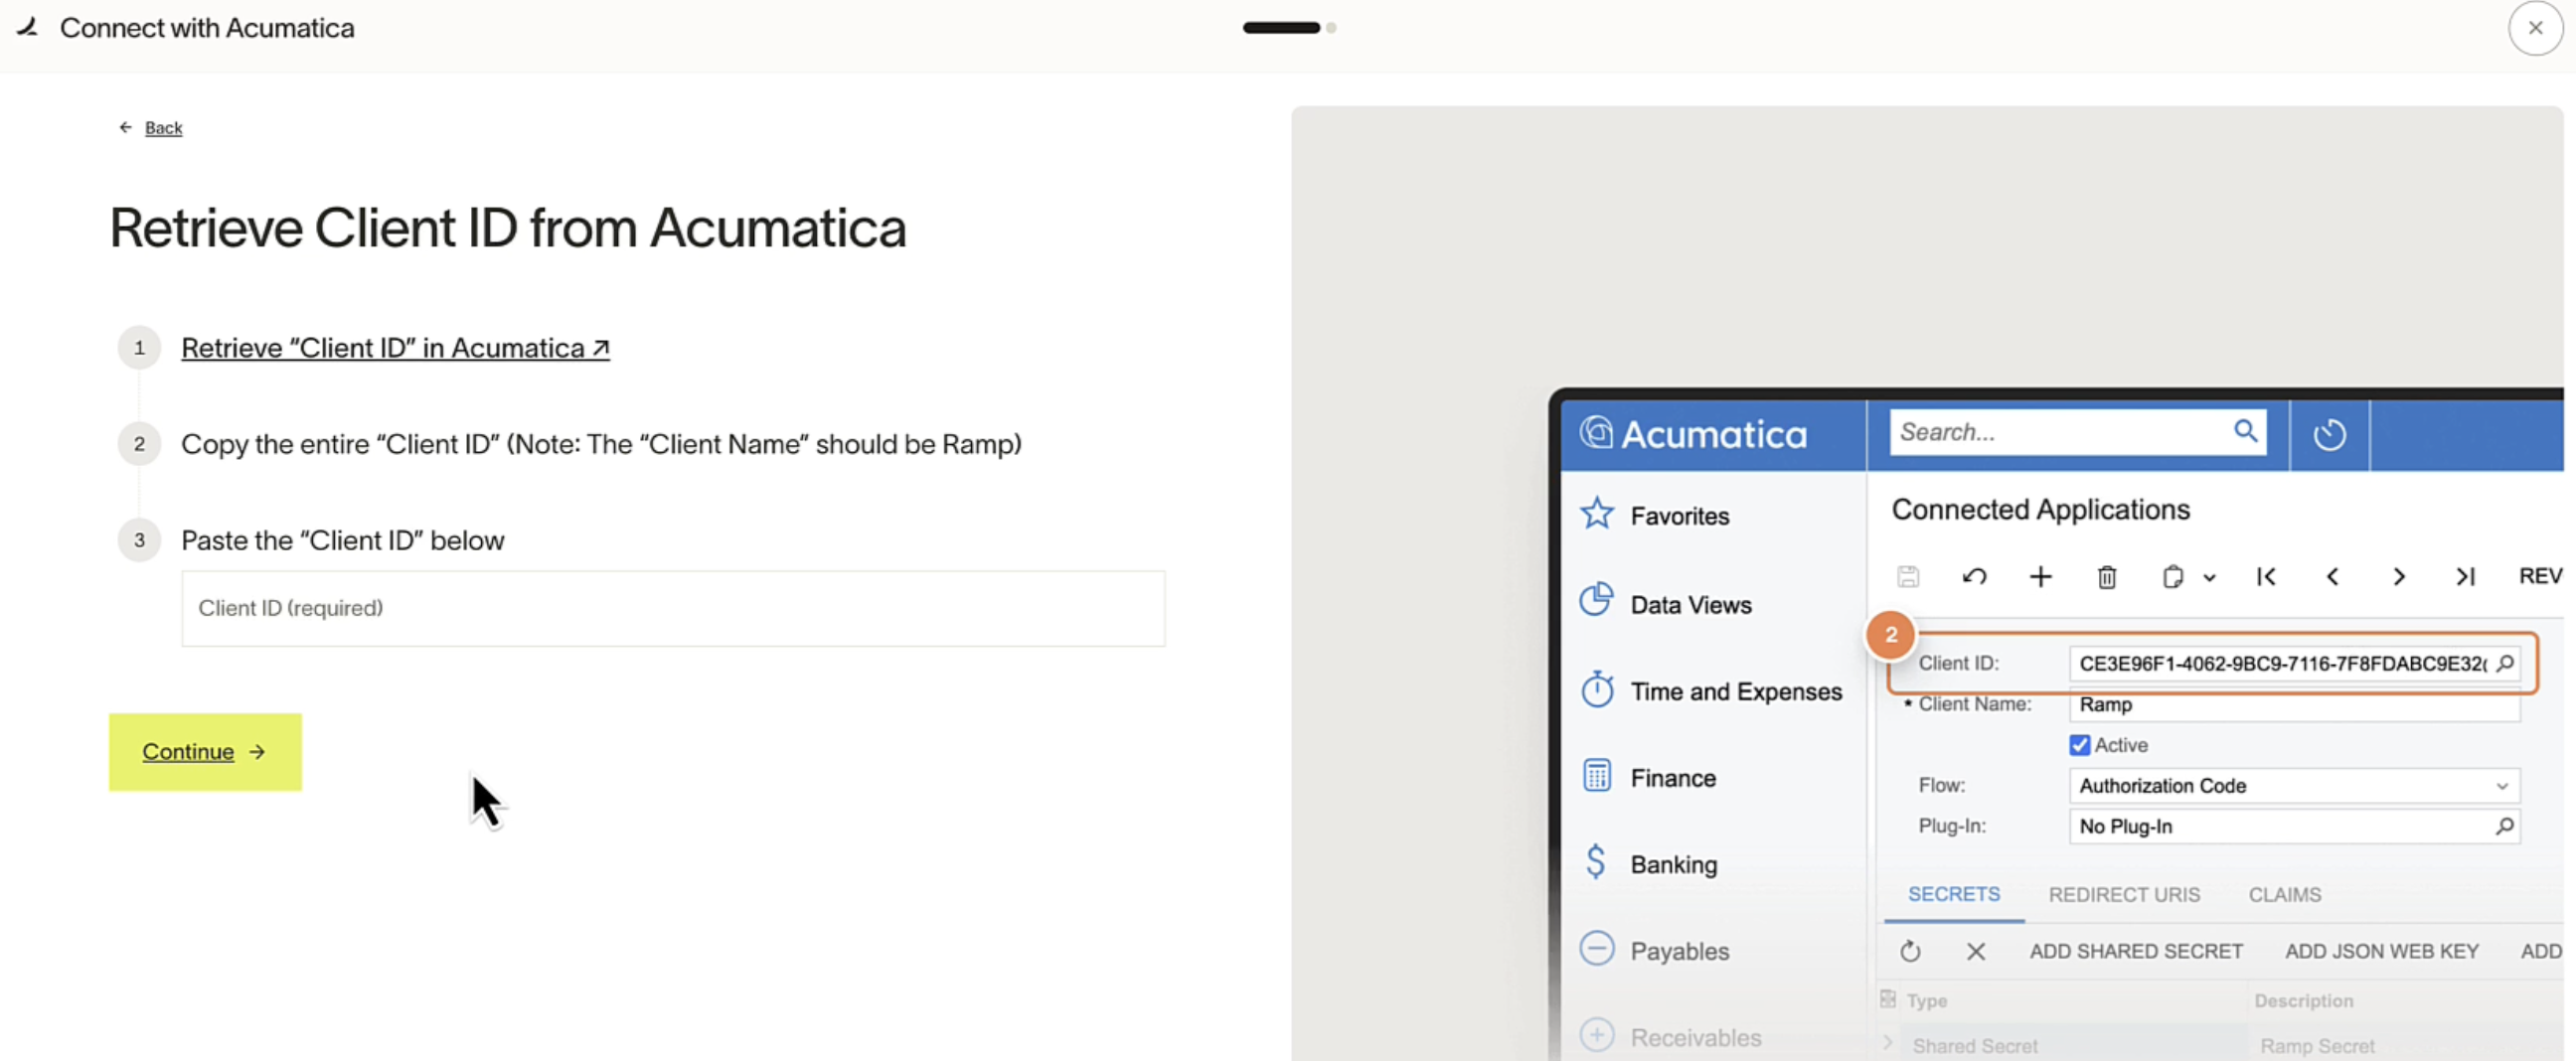
Step 7: Retrieve client ID from Acumatica
- Click the quick link provided in Ramp "Retrieve 'Client ID' in Acumatica."
- Copy the entire " Client ID " (Note: the " Client Name " should be Ramp ).
- Paste the " Client ID" into Ramp
- Click continue in Ramp.
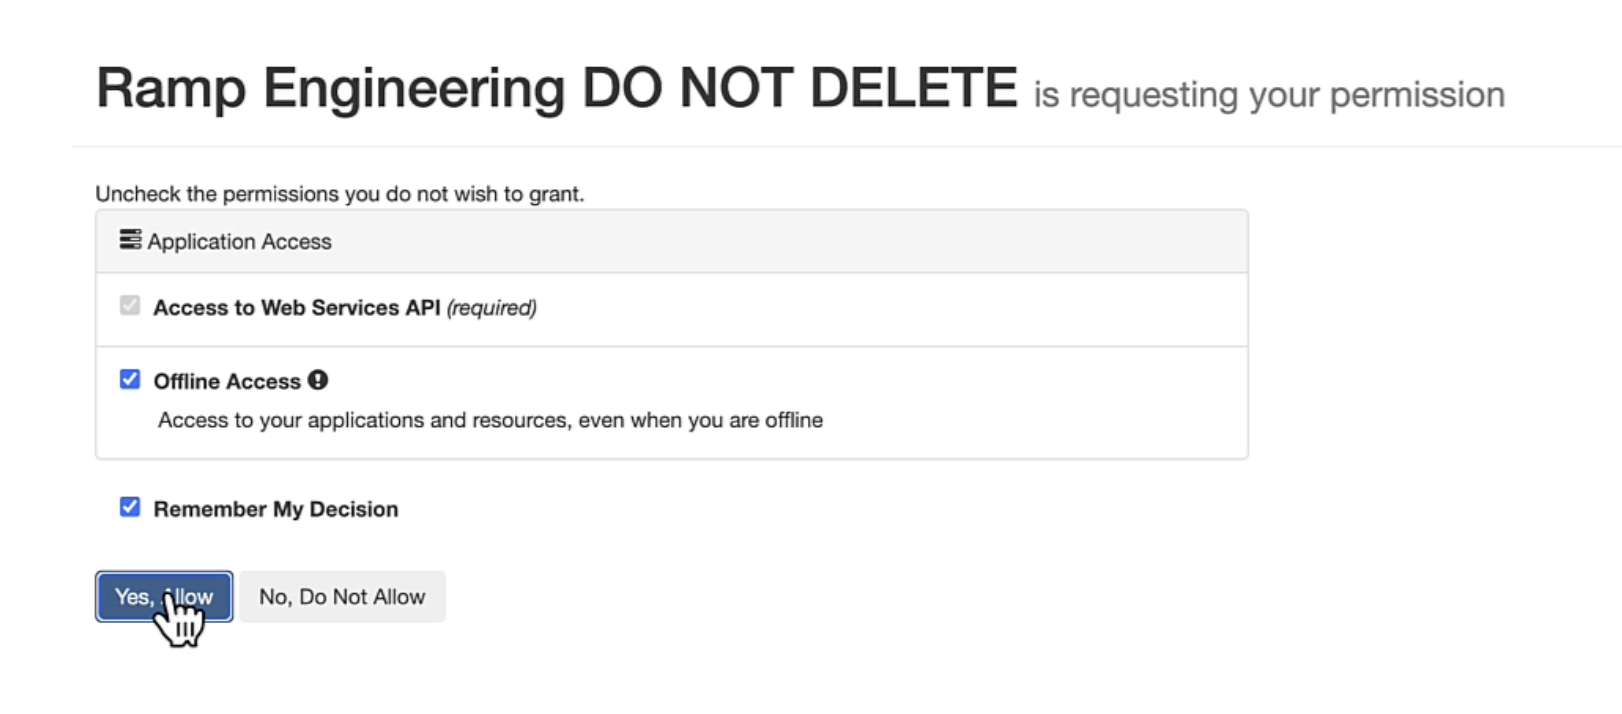
Step 8: Grant permissions in Acumatica
- In Acumatica, check the box to make sure " Offline Access " is selected.
- Next select " Yes, Allow " to be redirected back to Ramp.
Your Ramp and Acumatica accounts are now connected. Next, we recommend Creating a Liability Cash Account in Acumatica for Ramp.