Universal CSV overview
Overview
With Universal CSV, we support every provider that we don’t have a native integration with and provide automation tools to get all of your coding done quickly. Some of the powerful features that come with Universal CSV are below:
- Import any field: Import any field from your provider, such as a merchant, project, department, etc., to code within Ramp
- Open text field: Option to create a column or multiple columns of open text fields for Employee or Accounting roles to fill out in accordance with how your company does accounting
- Require a field for syncing: When you create a field (i.e. merchant, department, etc.), you can set that field as mandatory, which will require it to be filled out before you export the data
- Customize your export: You can customize your CSV export to show or hide columns, rename column headers, rearrange the column order, display refunds in single-line journal entries as negative numbers, and use your own header names. Please see the Customizable CSV tables article for more information.
Video walkthrough: Import and export your accounting data with Ramp's Universal CSV connection. Best if your accounting platform is not a direct integration and you still want to close the books with Ramp. Watch the playlist.
What it looks like
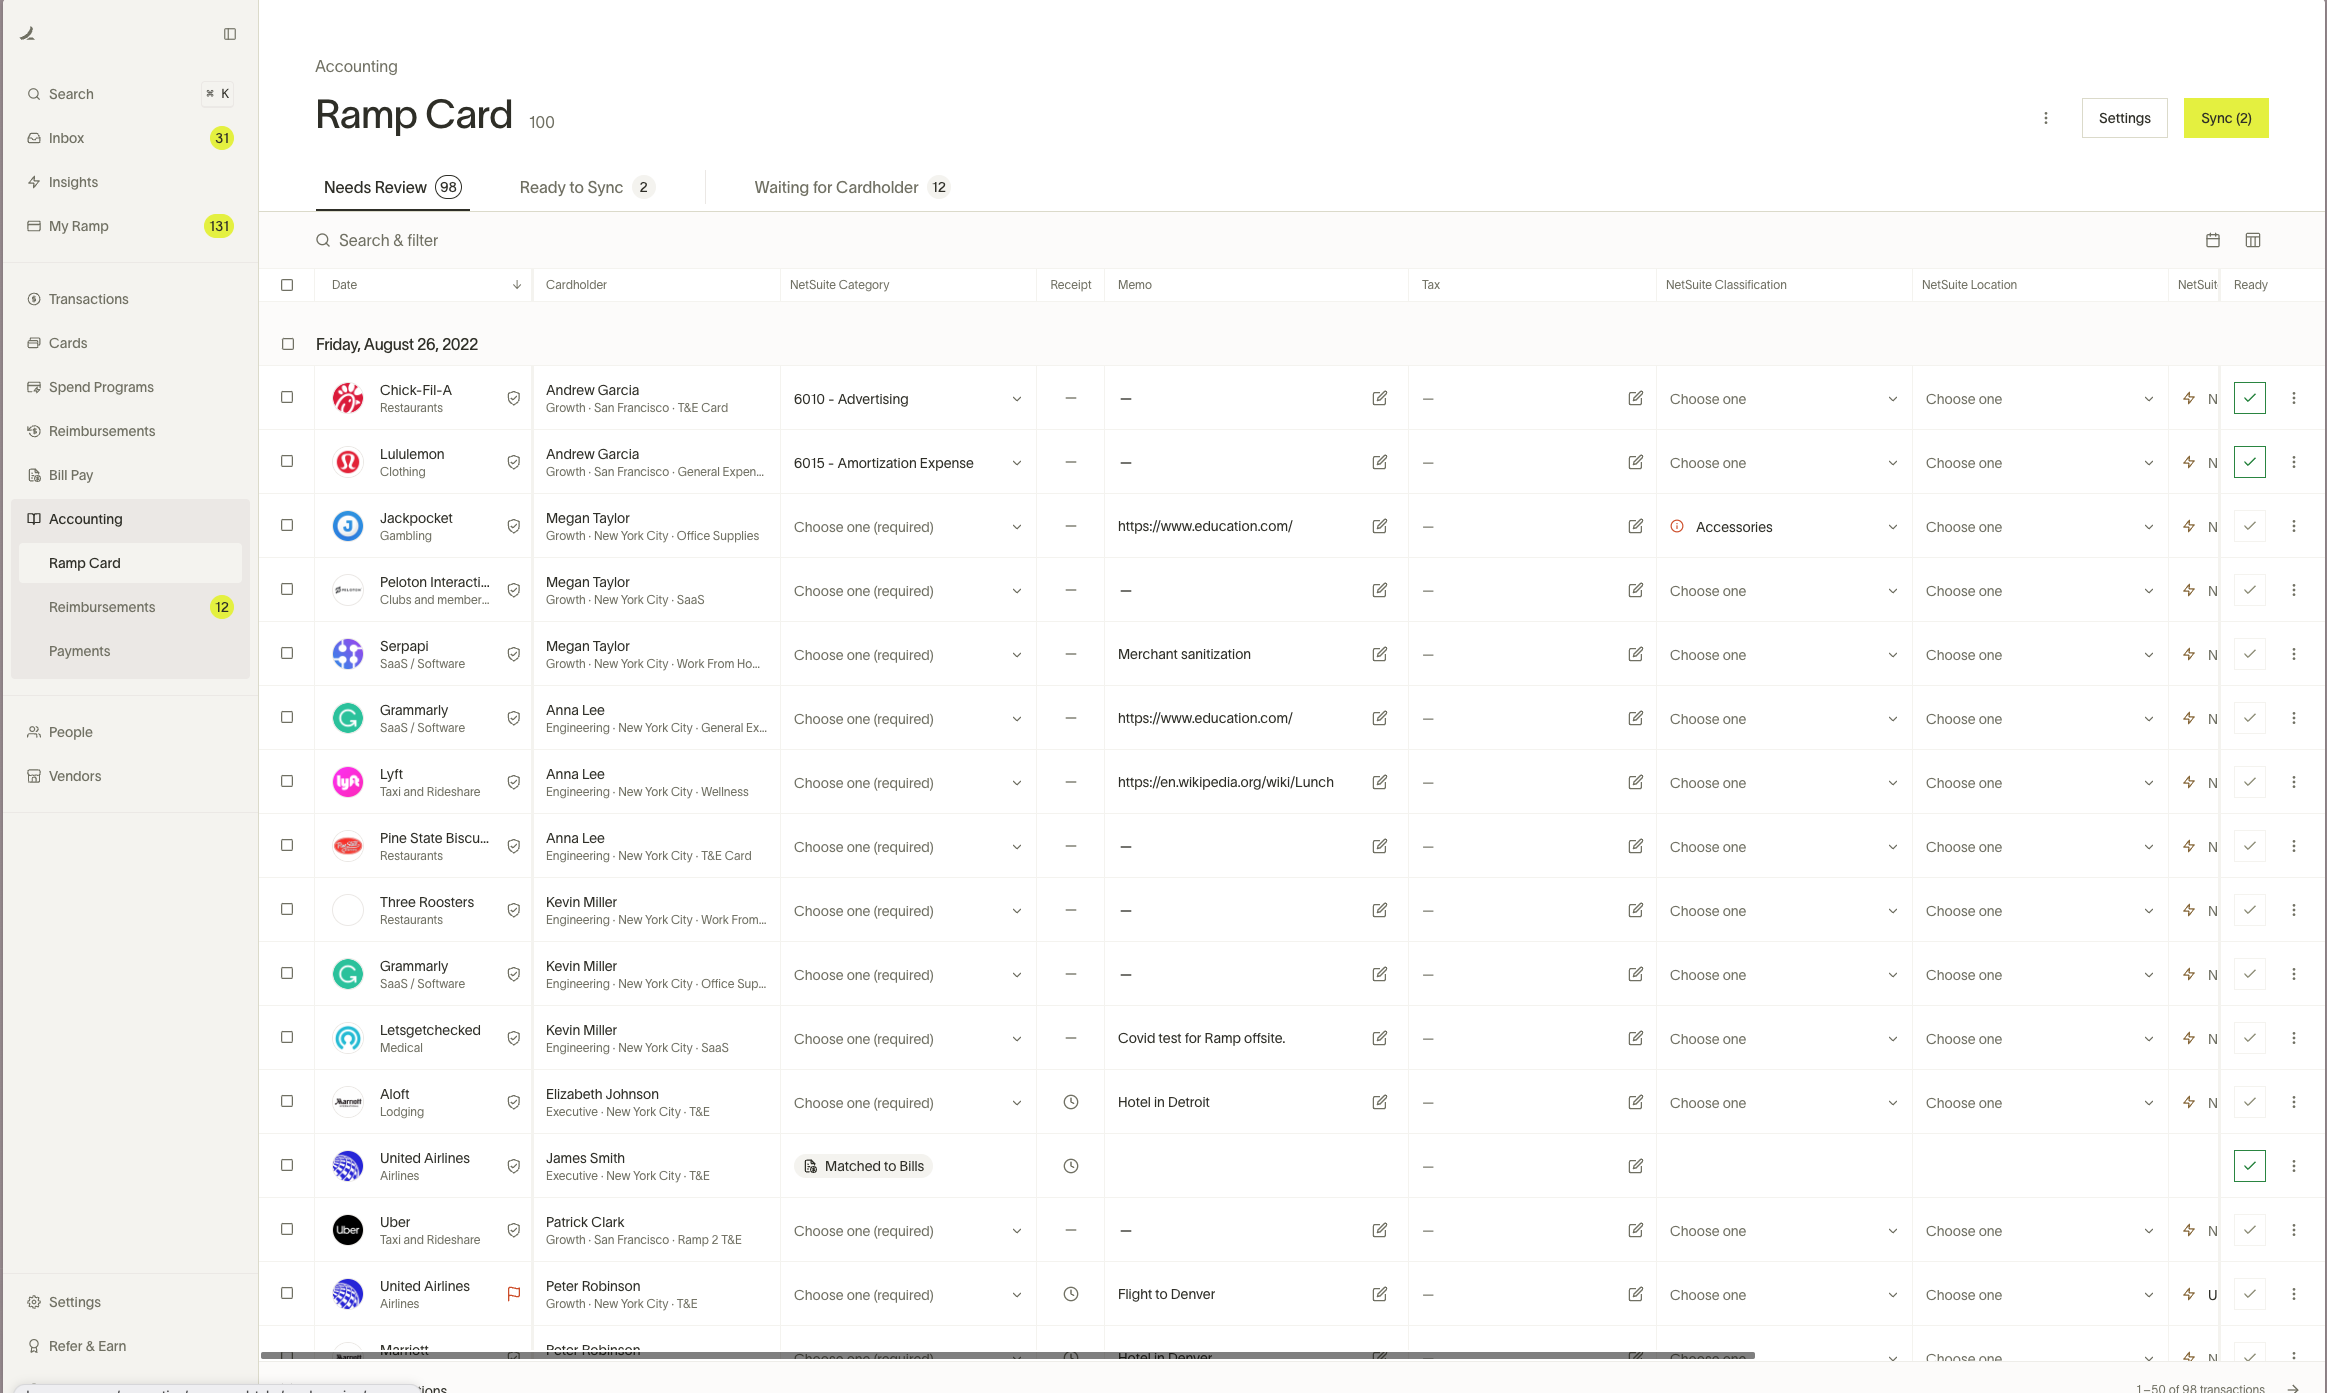
Once you connect accounting, the tab will look like the one below. We will pull in any cleared transactions and approved reimbursements for you to code with the fields you’ve set up.
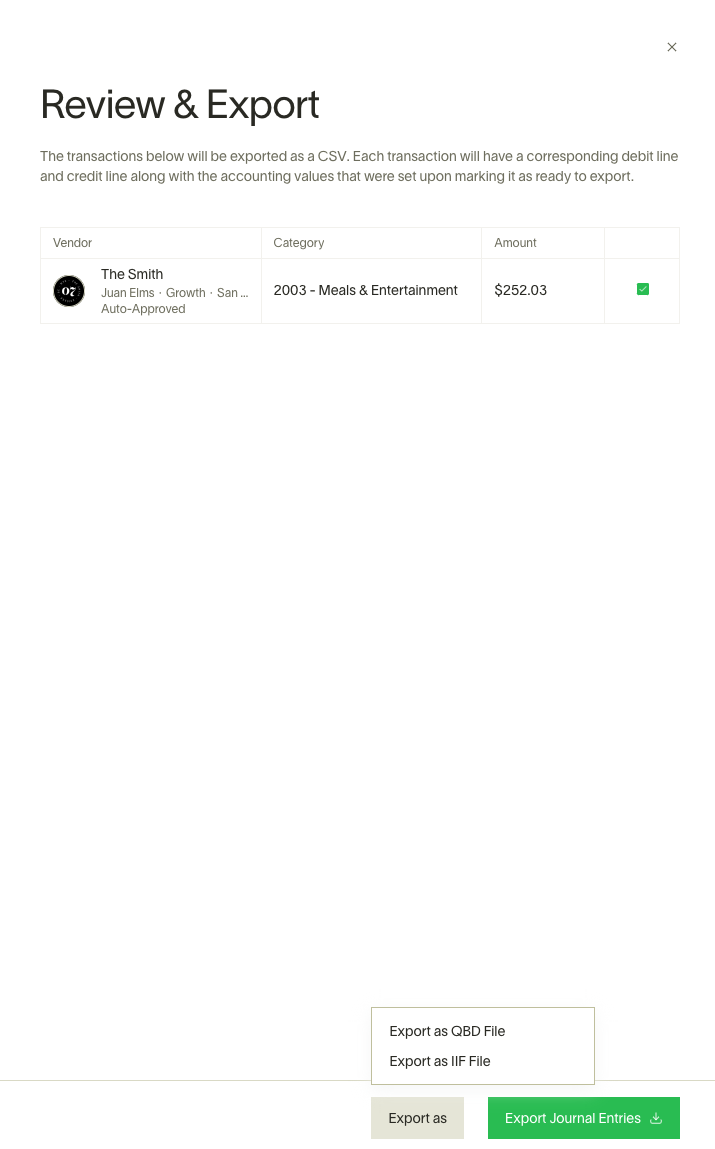
Once you’ve coded a transaction (or a few), you can mark them as ready and select “Export all” on the top right. You will then get a confirmation screen to export in the format you would like. When you export as Journal Entries, we will export a CSV with all the information you coded so you can easily import it into your Accounting Provider.
Note: you will have the option to download as a JE, QuickBooks Desktop file, or IIF file. The latter two refer to QuickBooks Desktop (please reference this article for a more in-depth view of QuickBooks Desktop)
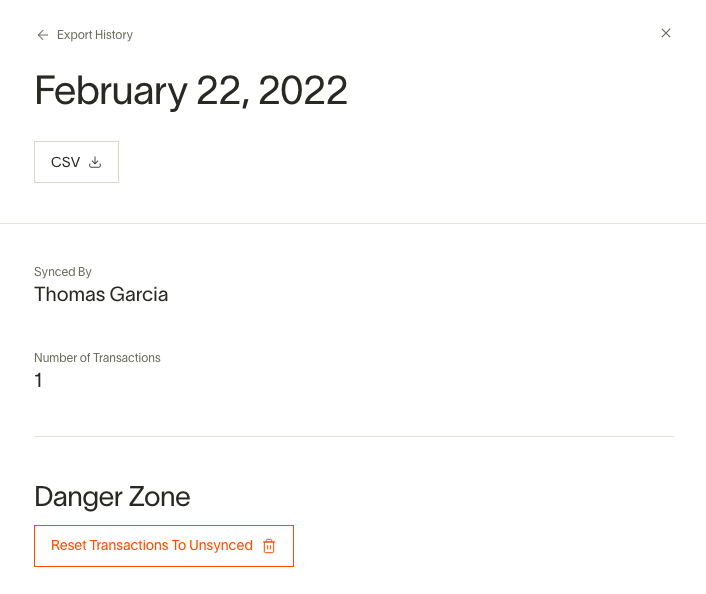
We will automatically remove these from the Accounting tab. However, if you mistakenly selected export or want to see them back in the Accounting tab, please navigate to the Export History button, select the relevant export, and Select “Reset Transactions to Unsynced.”
Setup
Step 1
Select a provider from the drop-down menu (or type it in if it is not currently available in the drop-down)

Step 2
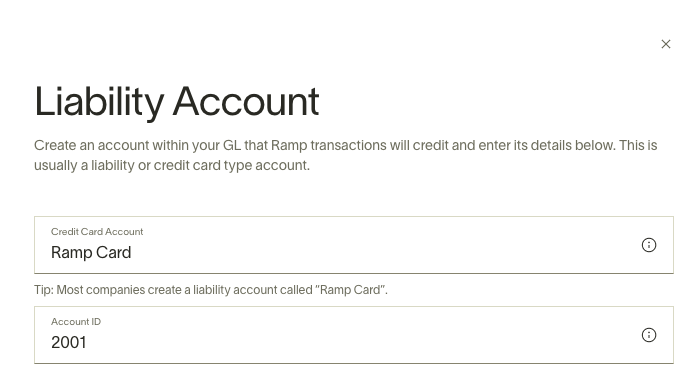
Choose a Liability Account
Make sure that this account is created within your Accounting Provider already
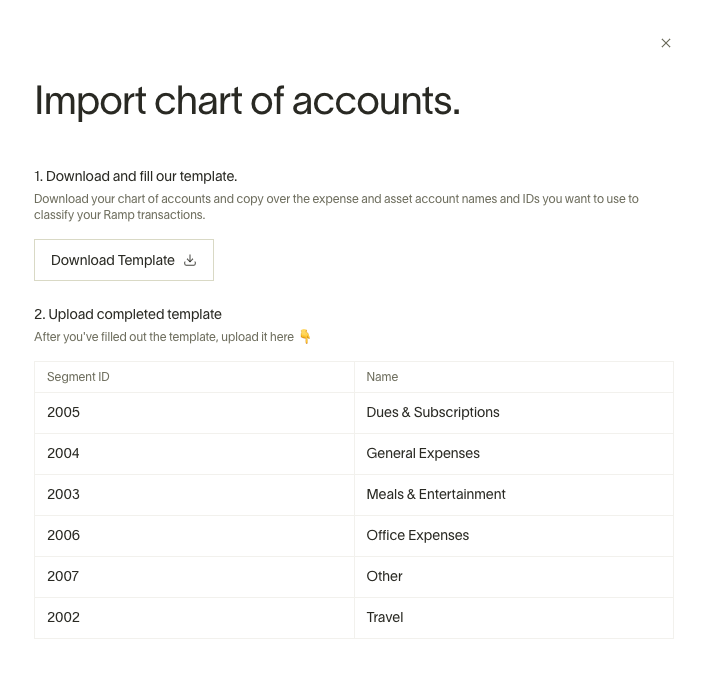
Step 3
Import Chart of Accounts
Import your accounts to seamlessly code them within Ramp
Step 4
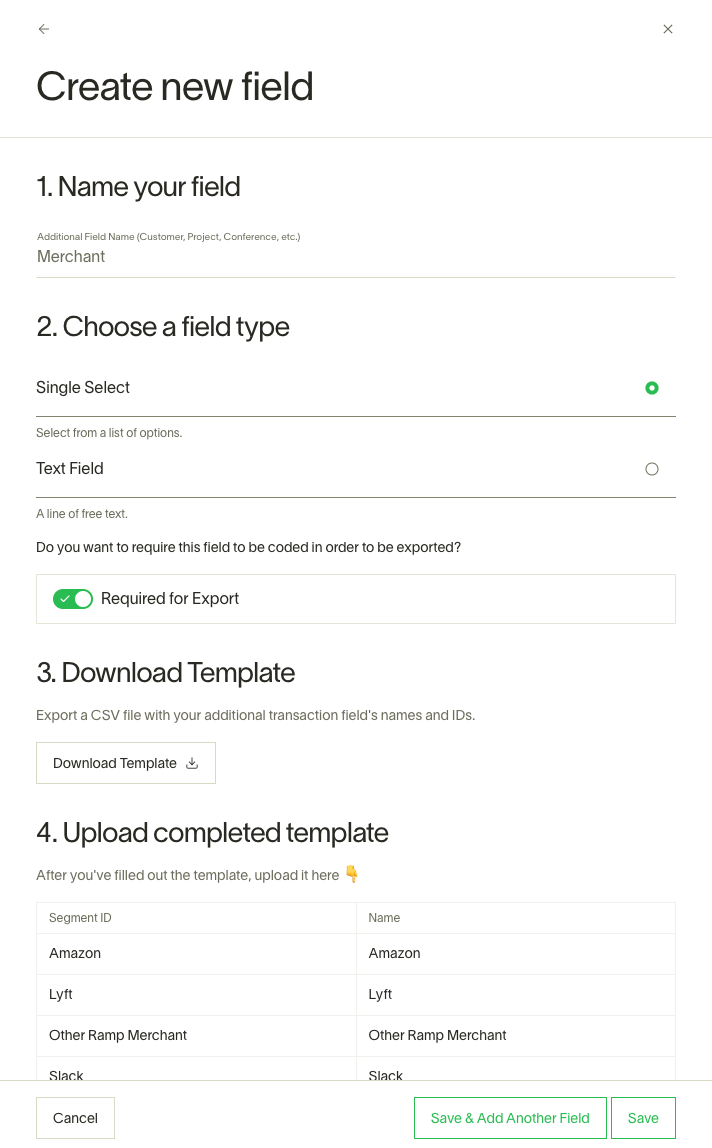
Add any additional fields that you would like to (you can always add more or remove any in the Accounting Settings tab)
You can choose whether any of these are mandatory during setup (note: if you want to either add or remove a mandatory setting, you will have to edit the field and reupload with the new setting)
Export transactions
Once you have fully coded the intended transactions and/or reimbursements, you can Mark as Ready and Export them. Once you export as Journal Entries, a CSV / Excel file will be downloaded with all the information that you coded within Ramp. Then, you can upload to your accounting provider to make sure that these transactions are properly accounted for.
For reimbursements, we will export both a bill and a bill payment (if paid via ACH on Ramp). If there are any additional questions, please reach out to our team by signing in to your account and clicking the "Help" button on the bottom left of the sidebar.
Export reimbursements
You can easily export your reimbursement data for your accounting software using a CSV file. This guide explains how to export reimbursements and how to undo an export if you make a mistake.
Understanding payment batches
Ramp groups all reimbursements that are paid on the same day into a Payment Batch.
When you export, you can export all items in a batch at once, or just a few at a time. The CSV file will look different depending on when you export.
- Partial Export: If you export only some items from a batch, your CSV file will only show the expense lines. It will not show the payment from your cash account yet.
- Final Export: When you export the last item from a batch, Ramp knows the batch is complete. Your CSV file will include the expense lines for that final item and the payment lines for the entire batch. This keeps your books clean and simple.
How to export reimbursements
- Go to Accounting → Reimbursements.
- Click on the Ready to export tab.
- Check the box next to the reimbursements you want to export.
- Click the Export button.
- In the pop-up window, review your items and click Export journal entries. A CSV file will download to your computer.
Once exported, the reimbursements will be marked as synced. If you have exported the entire payment batch, it will disappear from this tab.
How to undo or reset an export
If you need to re-export a reimbursement, you can easily reset it.
- On the Ready to export page, click the three-dots menu next to the Export button.
- Select Export history.
- Find the export you want to undo and click on it.
- Click the Reset payments to unexported button.
The reimbursements from that export will reappear in your Ready to export tab, ready to be synced again. If resetting an export causes a payment batch to be incomplete, the entire batch will show up again.
Standard reimbursement GL impact:
A reimbursement will generally consist of 4 lines (two for the bill, and two for the payment):
- Bill Debit (Debit the expense account)
- Bill Credit (Credit the AP account)
- Payment Debit (Debit the AP account)
- Payment Credit (Credit the cash account)
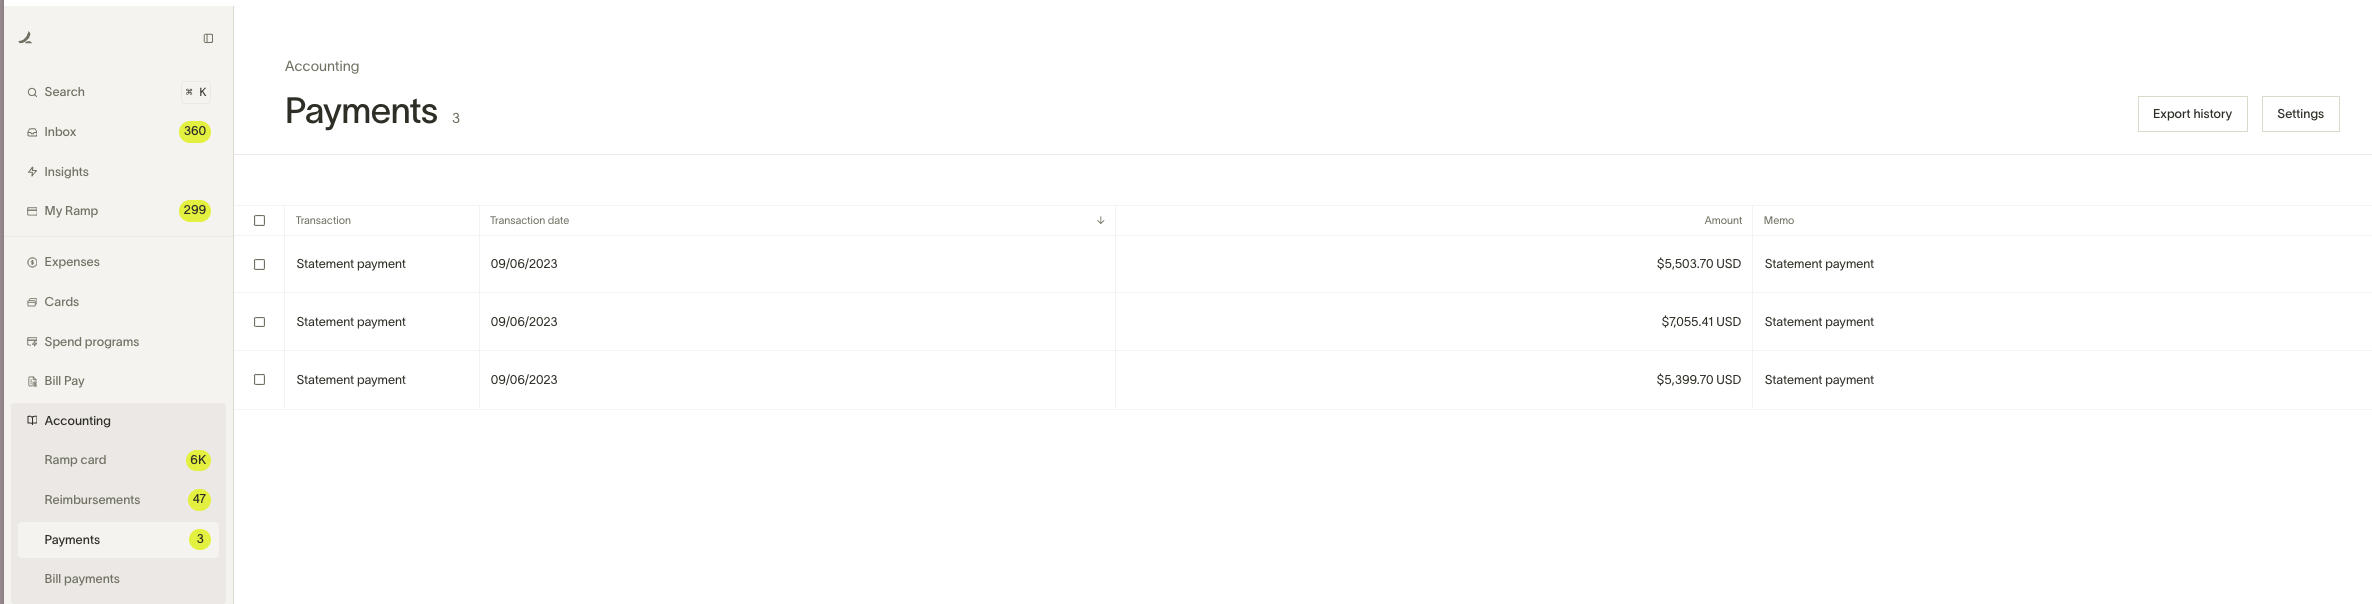
Export statement payments
With Ramp, you can export statement payments and upload them to your Accounting provider. This will appear in the Payments tab of the Accounting tab and only appears after it has cleared.
You will be getting a record of this transaction from two places - from your Checking Account's bank feed, which will have the credit side of the transaction, and from Ramp, which will have the debit side of the transaction.
Instead of independently classifying these transactions, e.g. allocating the checking account credit to a Ramp Card debit, and the Ramp Card debit to a checking account credit - we instead want tomatchthe two sides and create a single transaction. This will prevent us from making two duplicate transactions.In the below example, you can see where to find the statement payments to export from within Ramp.
I have already classified the Checking Account payment to the Ramp Card account, rather than doing a match. What should I do? In this case, you can safely delete the statement payment in the Ramp Card account from your accounting provider, as you have already recorded the transfer from the Checking account. Classifying the Ramp Card transaction would create a duplicate, so keeping the transaction is not necessary.
Bill Pay
Bill Pay for Universal CSV (all providers outside of QuickBooks Online, NetSuite, Sage Intacct, and Xero) is available. For more information, please reference this article.