Ramp Bill Pay OCR
Ramp uses Optical Character Recognition (OCR) to scan and parse invoices, extracting key details and automatically populating draft bills. For Ramp Plus customers, Smart OCR uses AI and historical billing patterns to extract invoice details with greater accuracy, and the auto-coding agent automatically sets accounting fields on each line item.
Bill Pay OCR overview
Once a PDF document is added to drafts - either via AP forwarding or via drag & drop, Ramp will begin scanning the document to pull relevant fields found on the invoice. OCR can typically take 30-60 seconds and will extract invoice, vendor, and payment details like vendor name, invoice number, due date, payment account numbers/routing numbers, and much more.
Note that Ramp will only OCR the document that's set as the “Invoice” document for the bill. Ramp won't run the OCR on the additional attachments — i.e. the email or the additional files. Also, Ramp won't re-run the OCR if a file is changed and set as the invoice as OCR is only run once per bill.
Smart OCR
Available on Ramp Plus. See Ramp Plus overview for plan details.
Smart OCR is Ramp's AI-powered invoice processing. It identifies the vendor on your invoice, references historical invoices from that vendor, and applies any saved custom instructions to extract data more accurately. The system learns from your corrections and improves over time as you process more invoices from each vendor.
Smart OCR extracts and auto-fills bill details (invoice number, date, due date, description), amounts (bill total, invoice currency), and line items (description, amount, quantity, unit price, type, tax rate). Accounting coding fields like GL category, department, and location are handled separately by the auto-coding agent.
Custom instructions
You can teach Smart OCR how to handle invoices from a specific vendor by saving custom instructions in plain language. For example, you can instruct the system to group shipping and handling into a single line item, or to extract a project code from the invoice description.
To add an instruction, click Add instructions at the bottom of the bill form, type your instruction, and save. The instruction applies automatically to future invoices from that vendor. You can also add field-specific instructions by clicking into a bill field and selecting Add instructions.
To review saved instructions, click View instructions in the bill header. In that panel, you can choose whether an instruction applies to this vendor or all vendors.
Field source tooltips
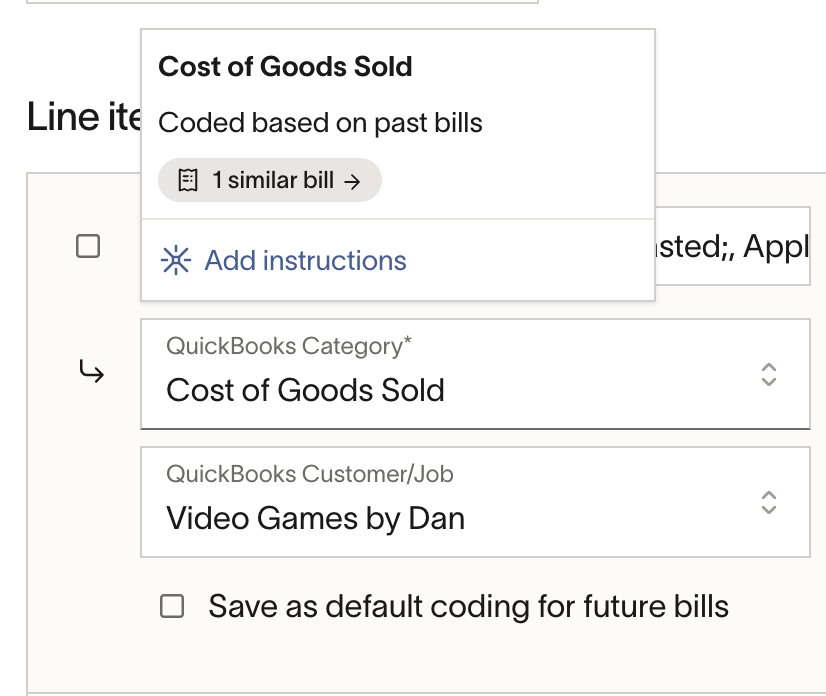
To see how Smart OCR determined a field value, hover over any auto-filled field on the bill. A tooltip shows the source, such as whether the value was extracted from the invoice, learned from past bills, or applied from a saved instruction.
Note: Tooltips appear only on fields that have an uploaded invoice backing the bill. If you manually entered a value, the tooltip displays "Manually edited" instead of a source attribution.
Bill Pay accounting auto-coding agent
Available on Ramp Plus. See Ramp Plus overview for plan details.
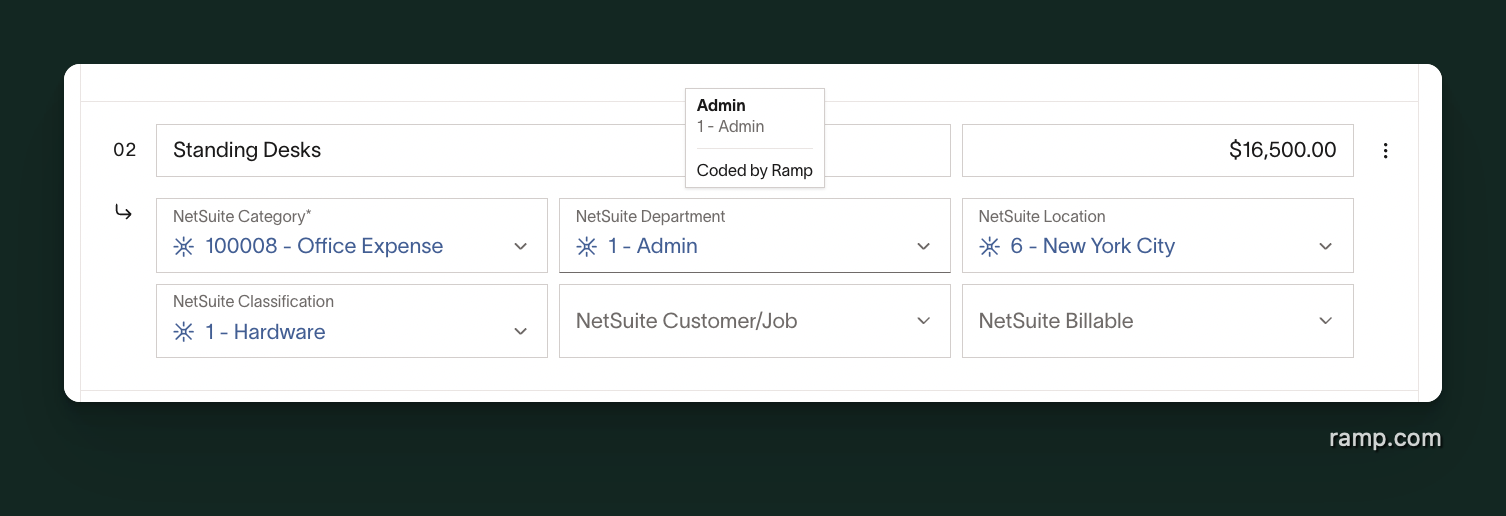
Using AI and historical data, Ramp's Bill Pay auto-coding agent will automatically set the accounting fields like GL category, location, department, etc. on the bill and its line items, further streamlining and simplifying drafting a bill. The auto-coding agent will assess the line item memo and amount and associate patterns from previous bills to predict coding for the bill at present with high accuracy.
Note, Ramp will only attempt auto-coding on accounting fields that don't have a vendor default preset. To identify how the accounting field was set, simply hover over the field.
Custom instructions
The auto-coding agent uses the same custom instructions flow as Smart OCR. To guide how a specific accounting field is coded, click into that field (e.g. location) and select Add instructions. Instructions can be set per vendor and per accounting field — for example, separate instructions for Location and Department on the same vendor. See Custom instructions above for the full workflow.