Purchase order bulk import
Overview
Purchase order bulk import lets admins bring existing purchase orders (POs) from other systems into Ramp — without engineering support. If you have active POs representing committed spend in a legacy system, this import flow helps you import them so you can manage everything in one place from day one.
The import flow walks you through downloading a CSV template, filling in your PO data, uploading and validating the file, and importing your purchase orders into Ramp.
This feature requires the procurement add-on.
Before you begin
- You must have admin permissions in Ramp.
- Your accounting provider (e.g., NetSuite, QuickBooks, Sage Intacct) must be connected to Ramp before starting the import. Accounting fields in the CSV template are pulled from your connected provider. If you haven't connected your accounting provider yet, see accounting integrations setup article.
- Only stable, committed POs can be imported — POs that have been issued or approved with a complete receiving status (open, fully received, or closed). Draft POs, POs pending approval, and POs with partial receiving are not supported.
How it works
Step 1 — Open the import drawer
Go to Manage spend > Purchase orders > Settings > Import.
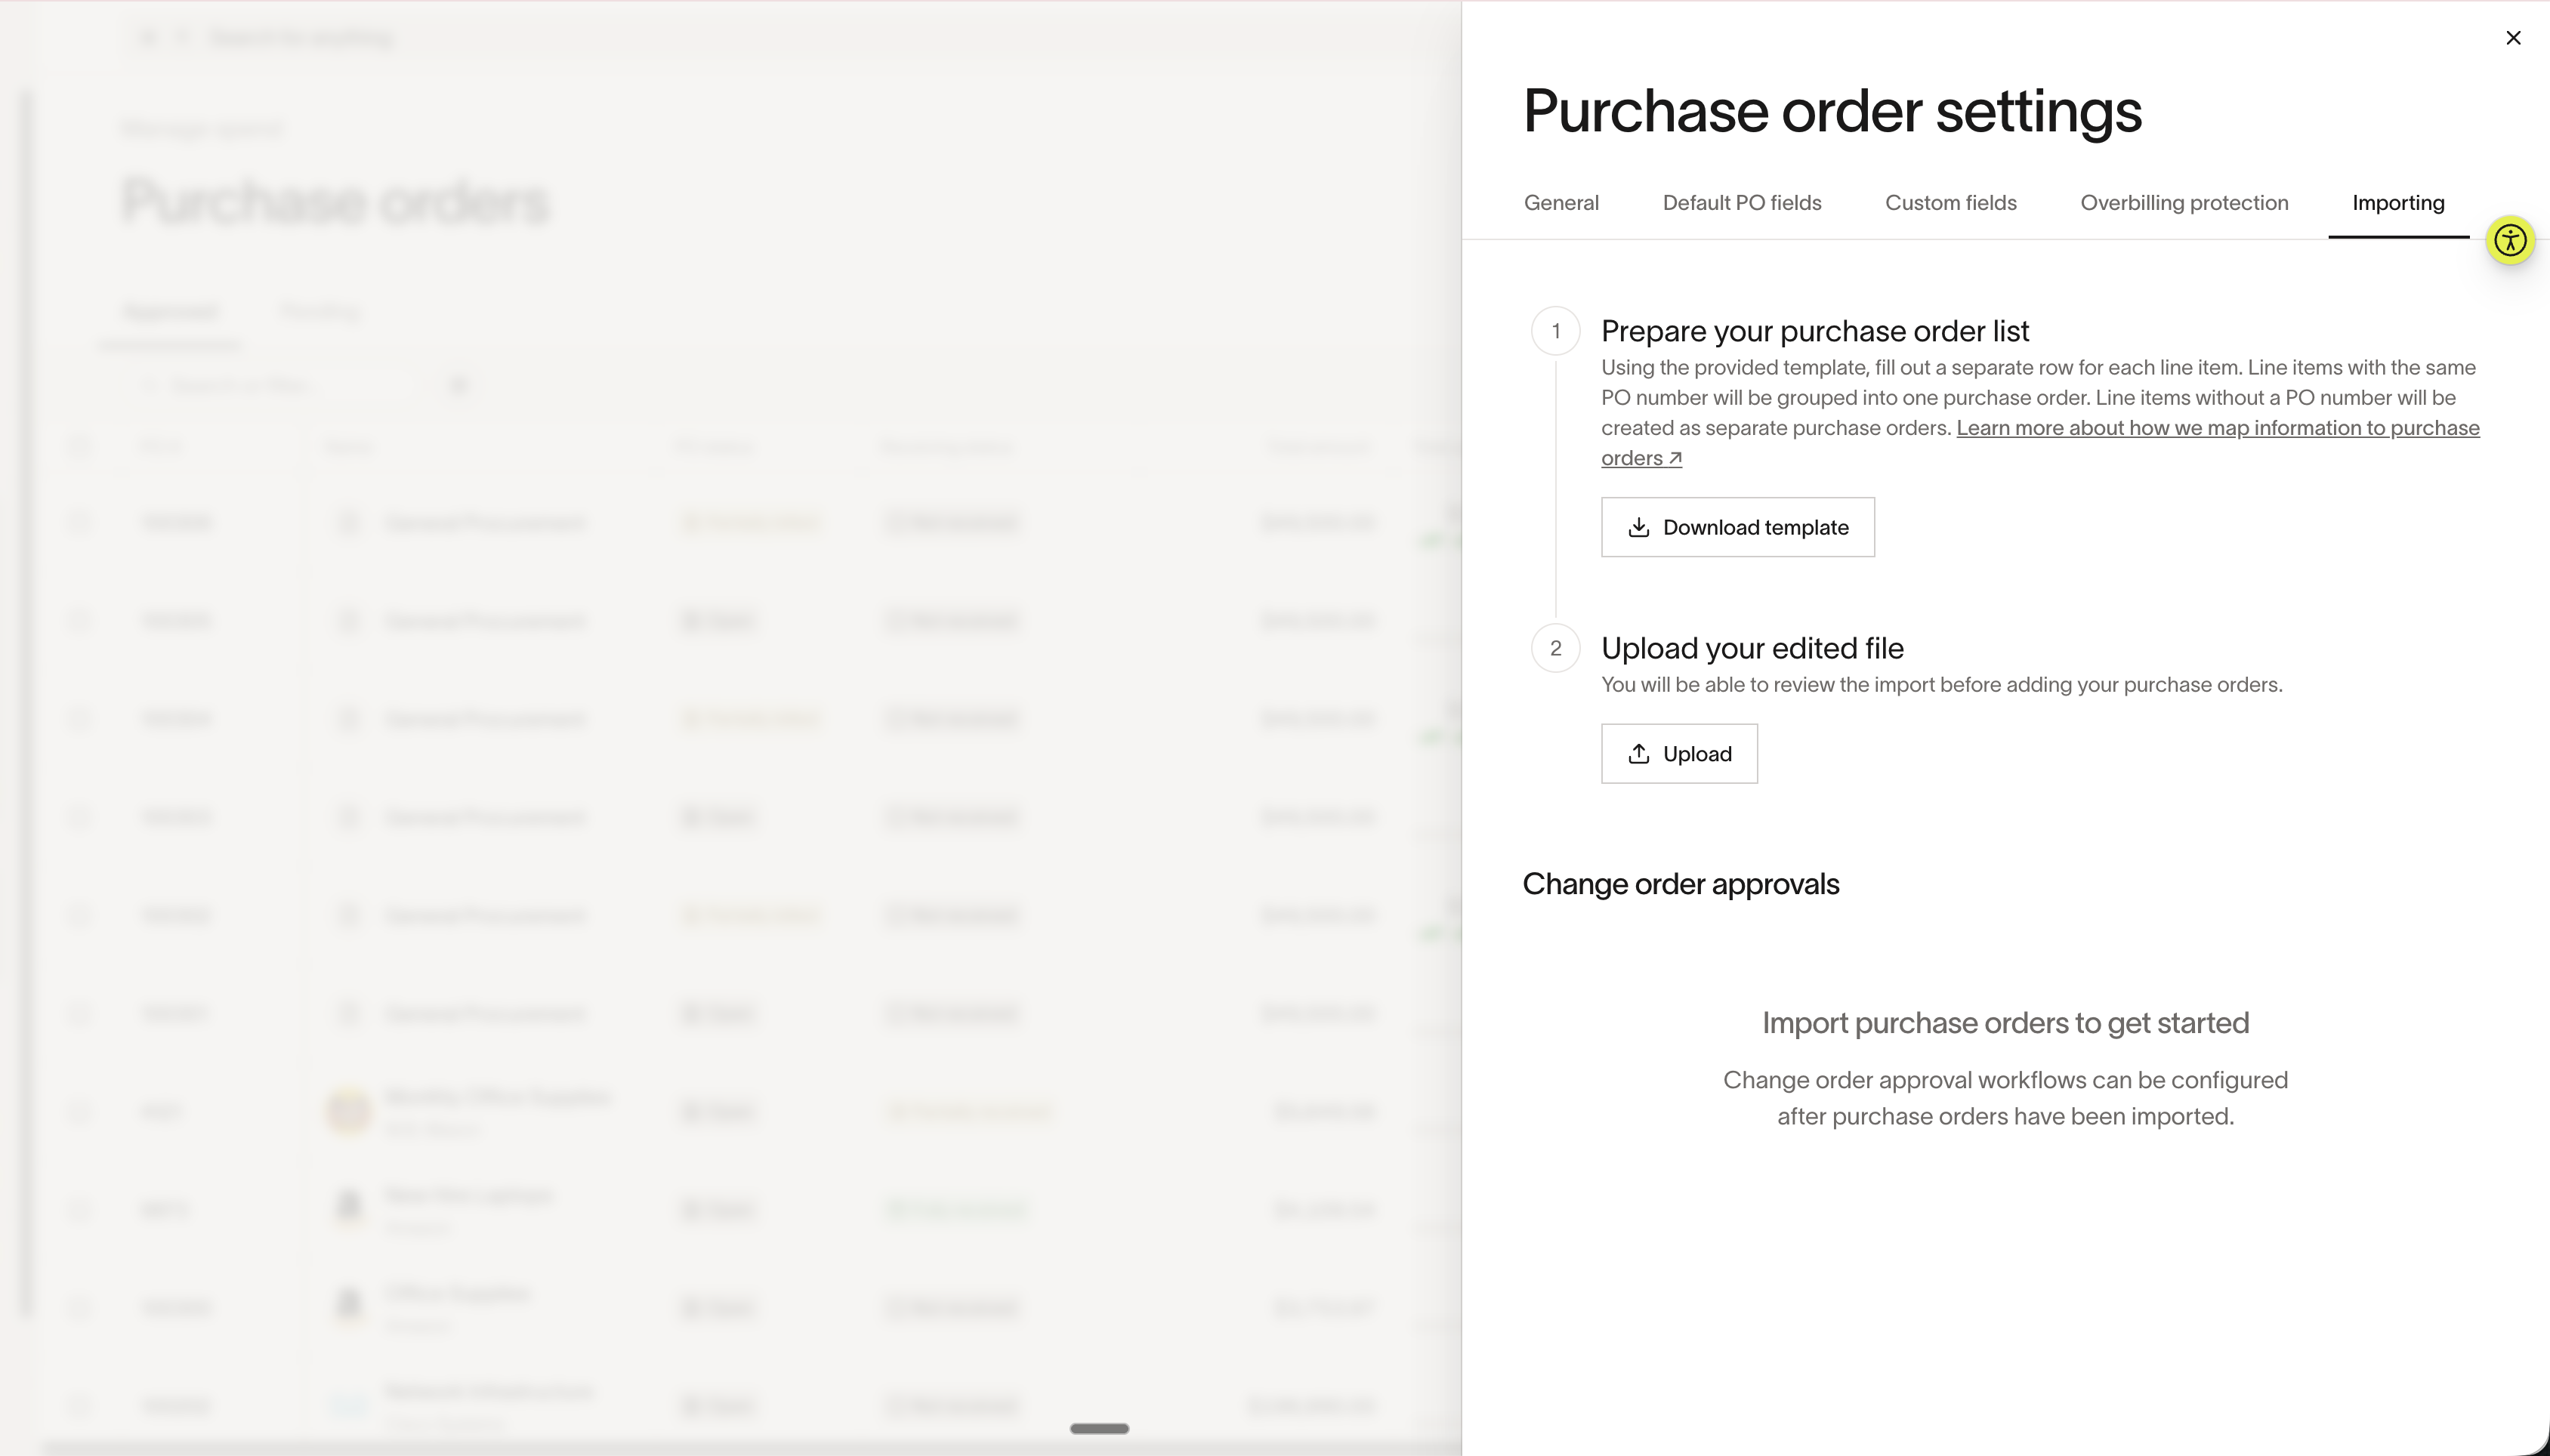
Step 2 — Download the import template
Download the CSV template. The template contains required, optional, and accounting fields. Each row in the CSV represents a line item, not a full PO. Rows with the same PO number are automatically grouped into a single purchase order.
Required fields
These fields must be filled in for every row.
| Field | Description |
|---|---|
Owner Email | Email address of the PO owner. Determines who the PO is attributed to in Ramp. |
Currency | Currency code for the PO and any linked bills (e.g., "USD"). |
Subsidiary Name | Name of the business entity (legal entity or subsidiary) in Ramp. Used to look up and link the correct entity to the PO. |
Unit Price | Per-unit price for the line item. Ramp uses this with Unit Quantity to calculate the line item amount. |
Unit Quantity | Number of units for the line item. Ramp uses this with Unit Price to calculate the line item amount. |
Optional fields
Include these fields if the data is available. If left blank, defaults are applied where noted.
| Field | Default | Description |
|---|---|---|
Vendor Name | — | Name of the vendor. If provided, must match an existing vendor in Ramp. The vendor is linked to the PO after import. If left blank, the PO is created without a linked vendor. Required if Paid Amount is provided — Ramp creates an internal bill for paid line items, and bills require a vendor. |
PO Number | Auto-generated by Ramp | Enter the full PO number with any prefix (e.g., "AMZ-001"). Rows with the same PO number are combined into a single PO. Leave blank to let Ramp generate it. Enter just a prefix (e.g., "AMZ-") to auto-generate with a custom prefix. |
Paid Amount | 0 | If greater than zero, creates a linked bill for the PO after import. |
Created At | Current time | Sets the PO creation timestamp. Also sets the issued date and due date on any linked bills. |
Start Date | Created At value | Sets the PO spend start date. |
End Date | — | Sets the PO spend end date. |
Payment Terms | — | Net payment terms — the number of days within which the next payment is due. |
Description | — | Sets the PO description. |
Request Coordinator Email | — | Email address of the request coordinator for the PO. |
Accounting fields
These fields are pulled from your connected accounting provider (e.g., NetSuite, QuickBooks, Sage Intacct). The specific fields available depend on your provider and configuration. The template includes both PO-level and line-item-level tracking category columns — for NetSuite, this can be up to 18 columns. Free-text tracking category values are supported.
| Field prefix | Description |
|---|---|
Accounting \* | Sets accounting dimensions at the line item level. Use when categories vary across line items (e.g., Accounting Department = Engineering on one line, Accounting Department = Marketing on another). |
PO Accounting \* | Sets accounting dimensions at the PO header level. Use when the same category applies to the entire PO rather than varying by line item. |
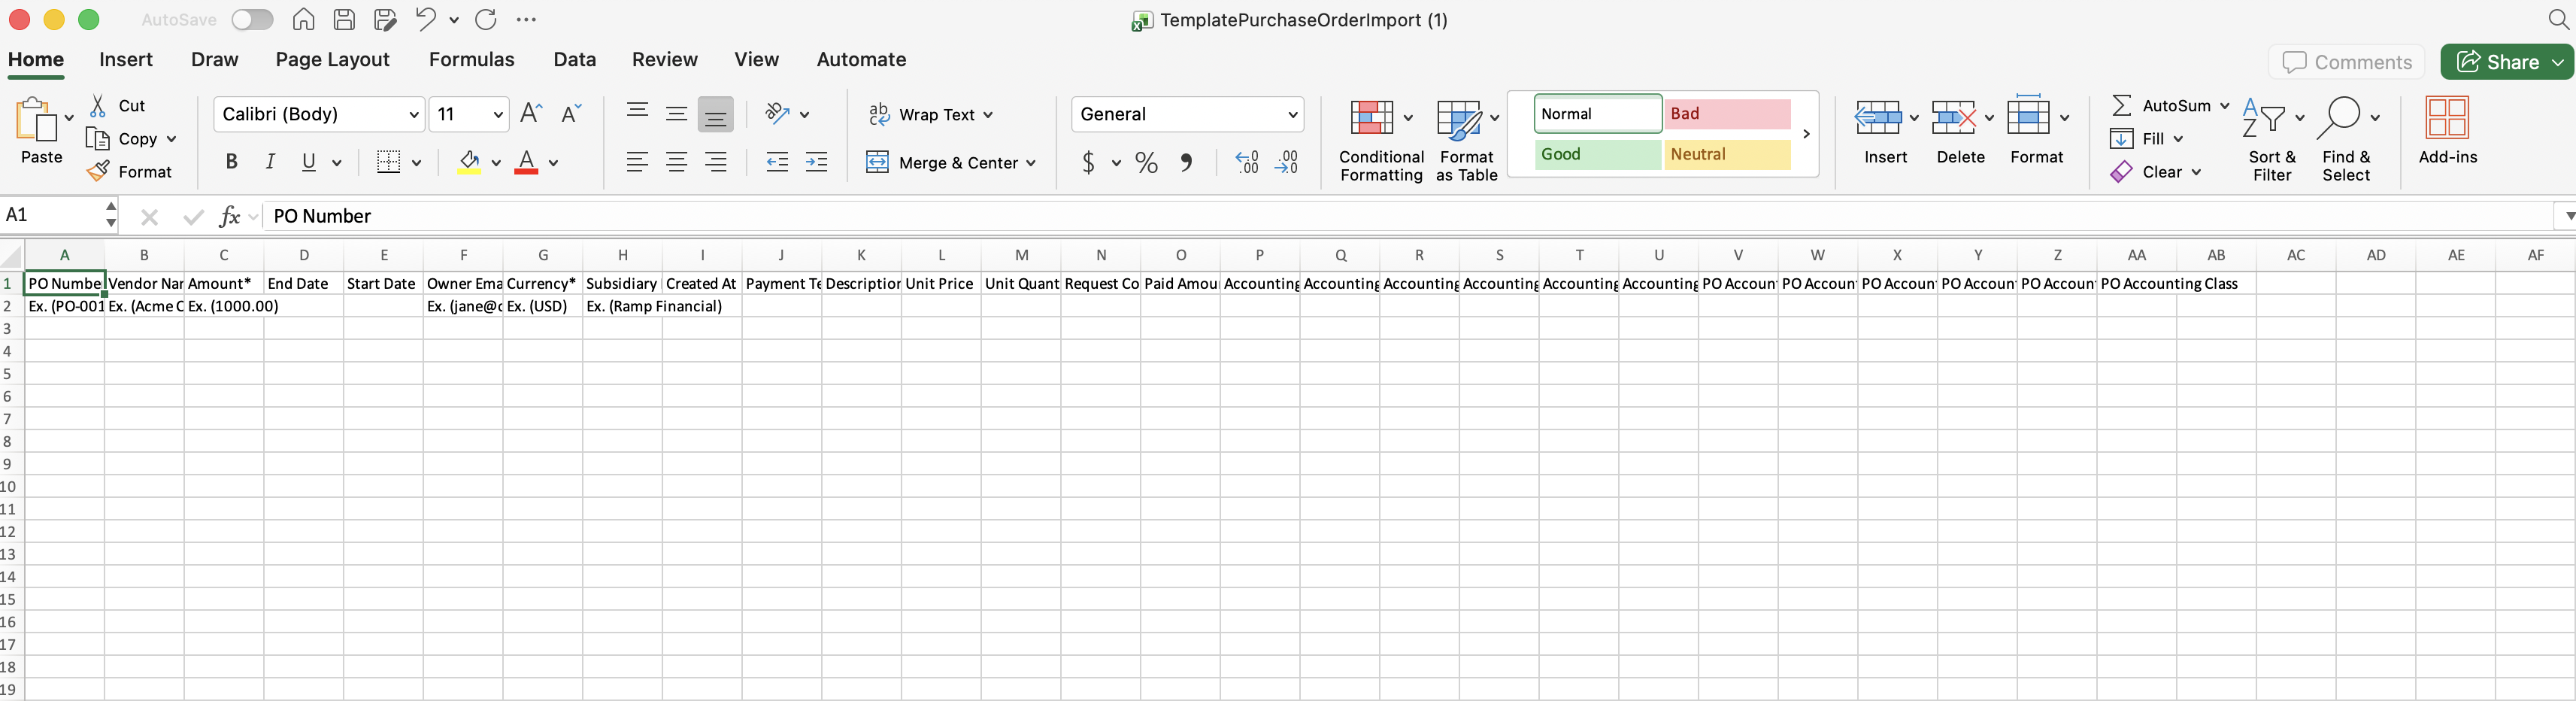
Step 3 — Fill in the template
Open the CSV template and enter your PO data. Keep the column headers exactly as they appear in the template — the system uses exact field name matching.
Note: Each row in the CSV represents a single line item, not a full PO. If you have an existing PO with multiple line items — for example, a PO with 12 lines — add each line as its own row in the CSV using the same
PO Number. Ramp groups all rows with the same PO number into a single purchase order. Each row should include its ownUnit Price,Unit Quantity, and any line-item-level accounting fields. Ramp calculates the line item amount from those values, so you do not need to enter a separateAmount. AddDescriptionif you want it included on the line item. Rows sharing the samePO Numbercannot have conflicting header-level values (e.g., the same PO number with two different vendors). See Step 4 below for what Ramp validates upon upload.
Save the file when you're done.
Step 4 — Upload and validate your file
Upload your completed CSV into the import drawer. Ramp validates your data row by row and surfaces any errors before import. You can fix errors directly in the validation interface without re-uploading, or export the errors to edit offline.
What Ramp validates
- Email addresses —
Owner emailandRequest Coordinator Emailmust belong to existing users in your Ramp account. - Field formatting — Values must match the expected format for each column (e.g.,
Created Atmust be a valid date/time, andUnit PriceandUnit Quantitymust be numbers). - PO number uniqueness — PO numbers that already exist in Ramp for your business are flagged as duplicates. Remove the duplicate from your CSV or use a different PO number.
- Subsidiary names — Must match a valid business entity in Ramp.
- Tracking categories — Accounting field values (e.g., department, class, location) must be valid options for each category in your connected provider.
- Currency — Must be a valid currency code.
- Vendor names — If a
Vendor Nameis provided, it must match an existing vendor in Ramp for your business. If a vendor is not found, you'll see an error instructing you to create the vendor in Ramp first. Leaving the vendor blank is allowed. - Vendor required for paid line items — If a line item includes a
Paid Amount, you must also include aVendor Namefor that line item. Ramp creates an internal bill for paid line items, and bills require a linked vendor. - Consistent PO header data — Rows sharing the same
PO Numbercannot have conflicting header-level values (e.g., the same PO number with two different vendors). Make sure all rows for a single PO use the same vendor, currency, subsidiary, and other PO-level fields. - Required line-item pricing — Every line item must include
Unit PriceandUnit Quantity. Ramp calculates the line item amount from those values during import.
Step 5 — Review and confirm the import
Once validation passes, confirm the import. Each import supports up to 5,000 line items. You'll see real-time progress as your POs are imported. When the import completes, Ramp shows a summary:
- Total POs successfully imported
- Total POs that failed, with reasons
If some POs fail, you can download a CSV of the failed rows, fix them, and re-import.
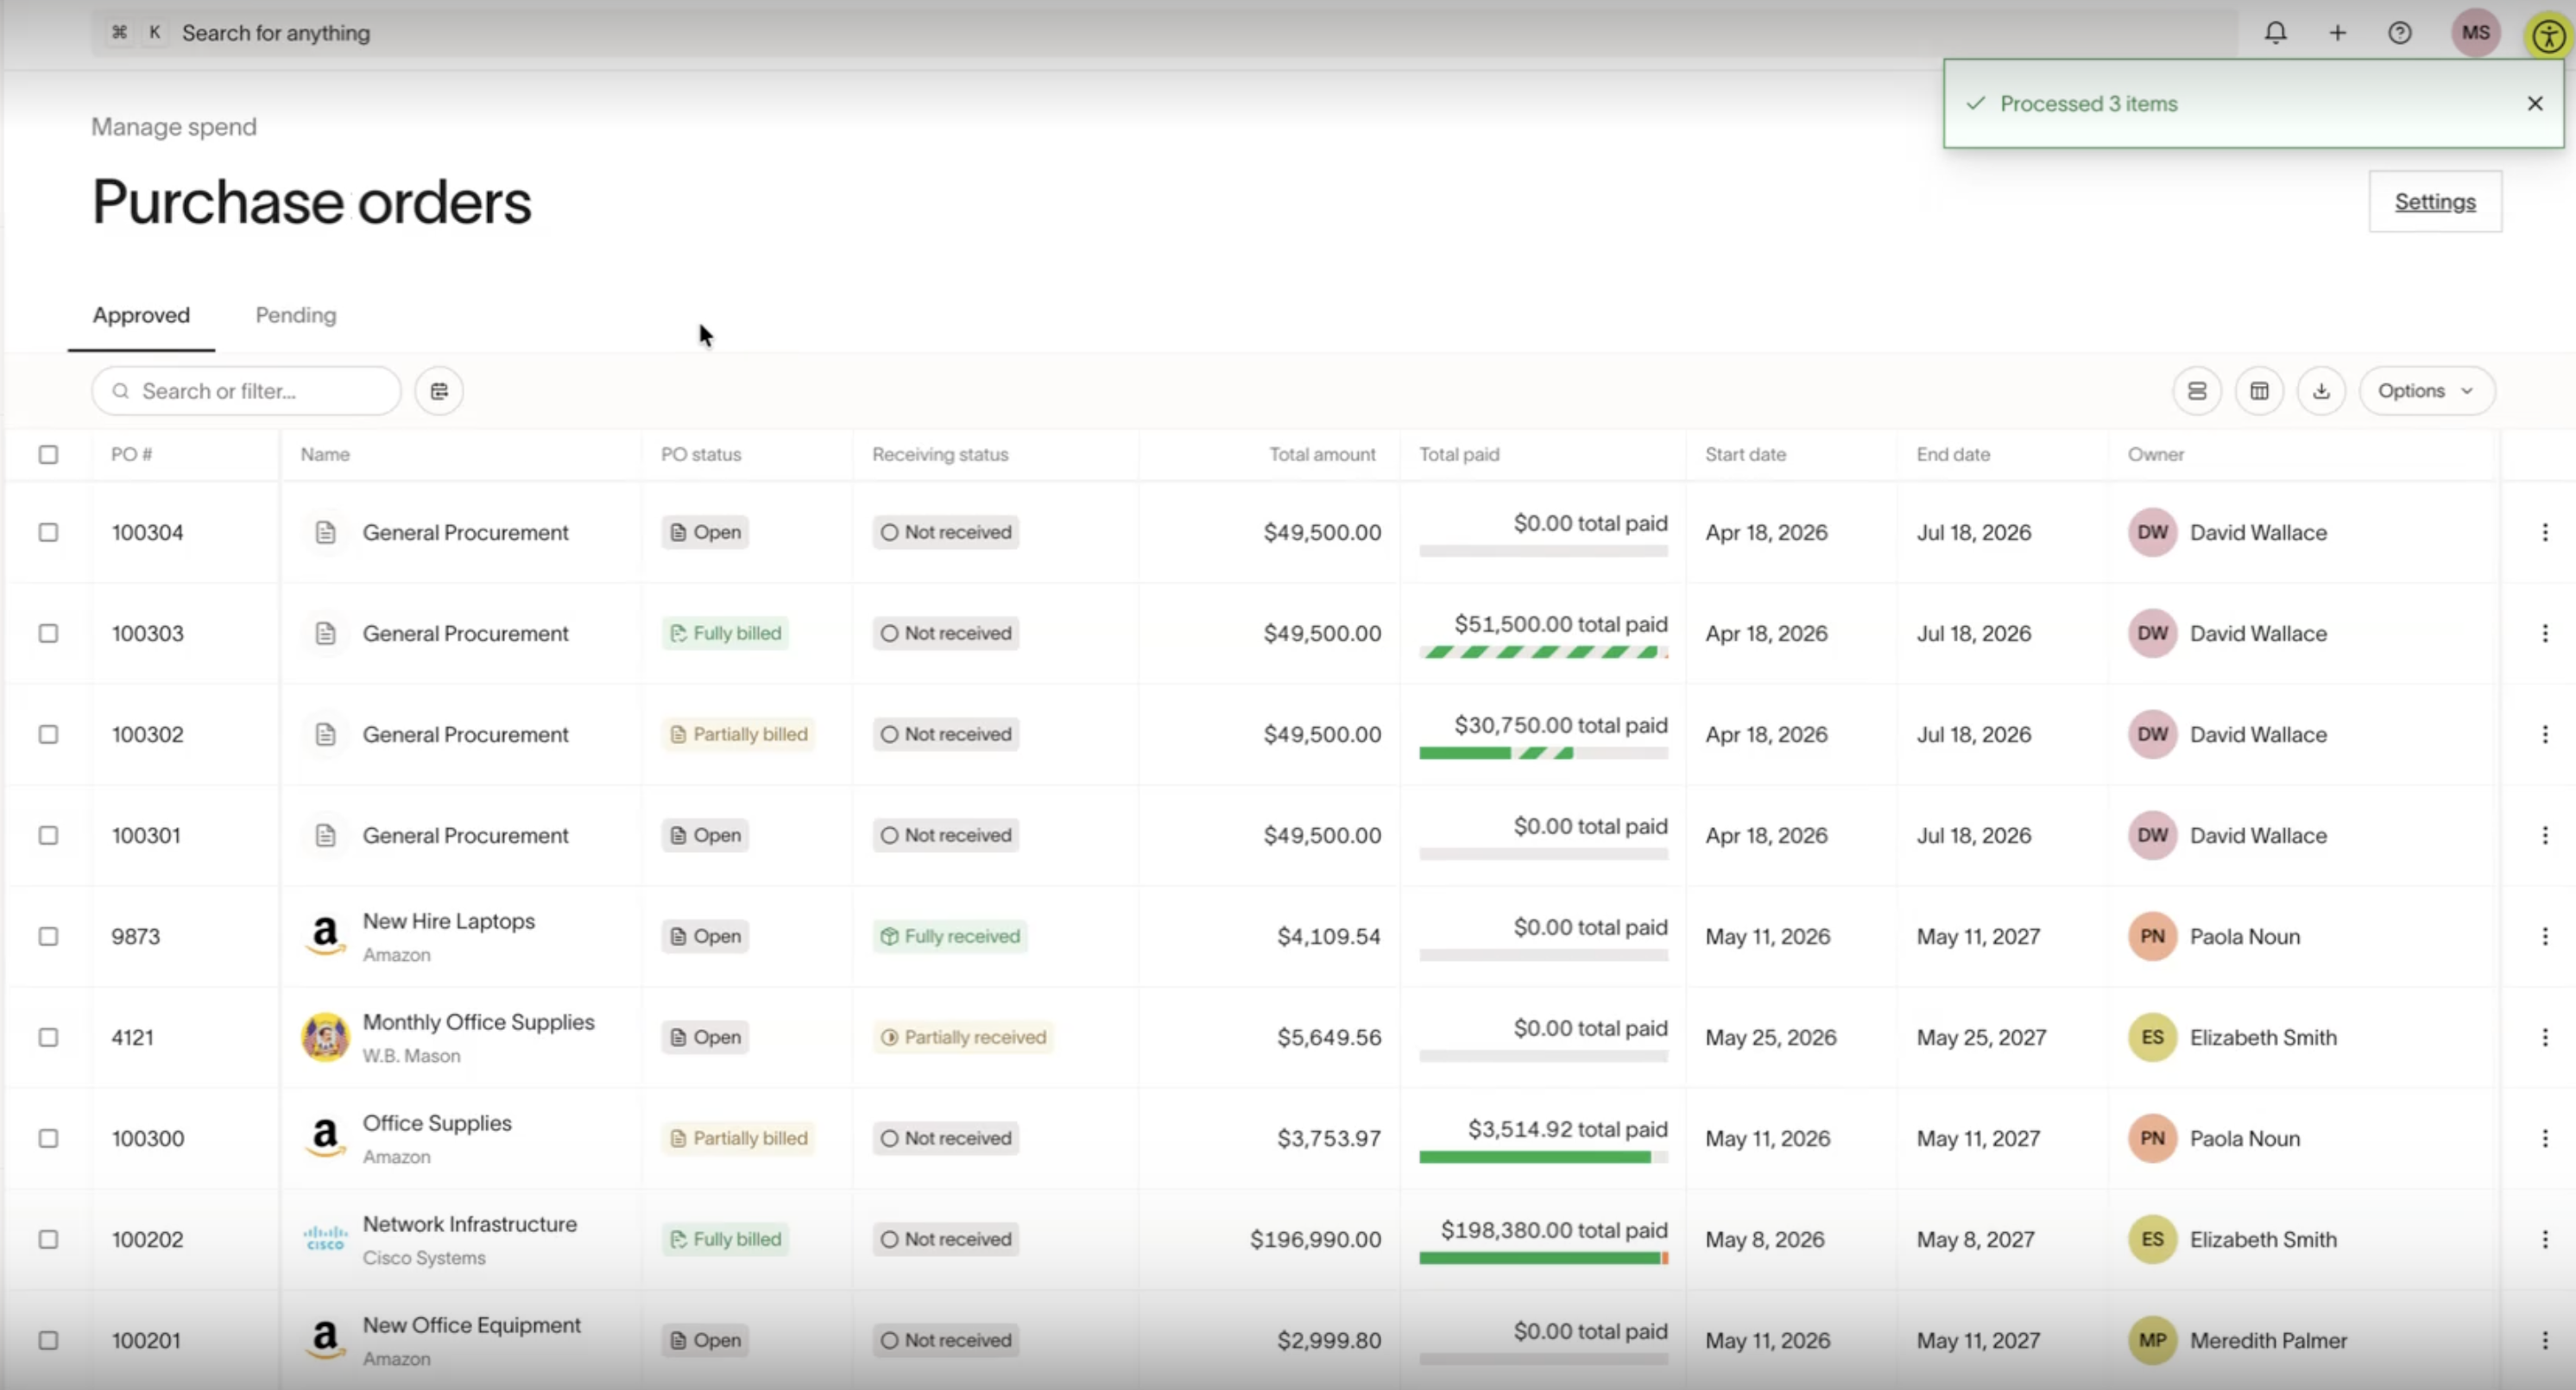
After import
Imported POs appear in your purchase orders list alongside Ramp-created POs. They have a few differences from POs created through Ramp's request flow:
- Imported POs are permanently assigned to the "Imported Purchase Order" Spend Program. This program is auto-created for your business when you run your first import. You cannot reassign imported POs to a different Spend Program after import.
- Imported POs are labeled "Imported purchase order" so you can identify them.
- The View request link and Request again option are not available on imported POs.
- Import-originated requests do not appear in the Requests table (change orders and renewals still appear).
- You cannot create new manual requests against imported POs — new POs can only be added via bulk import.
To configure change order approval settings for imported POs, click the upload button on the Purchase orders page to open the import pane. The "Change order approvals" section appears after your first successful import.
Configure invoice matching for imported POs
After your first successful import, the import pane also displays an Invoice matching setting. This controls whether imported POs use 2-way match or 3-way match for invoice verification:
- 2-way match — bills can be matched to imported POs.
- 3-way match — bills can be matched to imported POs and item receipts.
To change the invoice matching mode, click the upload button on the Purchase orders page to open the import pane, then expand the Invoice matching section and select your preferred option.
Note: Changing this setting applies to all imported POs for your business, including POs from previous imports — it is not limited to future imports. The Invoice matching setting does not appear until you have completed at least one bulk import.
Use cases and examples
Migrating from a legacy procurement system
Your company is switching from a legacy procurement tool to Ramp. You have 200 open POs representing committed spend across multiple vendors. Rather than recreating each PO manually, you export your PO data from your legacy system, map it into the Ramp CSV template, and import all 200 POs in one batch. Your team can track committed spend from day one.
Consolidating POs after an acquisition
After acquiring another company, you need to bring their existing POs under your Ramp account. You export their PO data, fill in the CSV template, and import the POs into Ramp. Imported POs are labeled "Imported purchase order" so you can clearly distinguish them from ones your team created in Ramp.
Tracking committed spend during onboarding
You're onboarding to Ramp Procurement and want your leadership team to see a complete picture of committed spend immediately — not just new POs created going forward. You import your existing POs so dashboards and reports reflect your full spend obligations from the start.
Best practices and tips
- Understand Spend Program assignment before importing. All imported POs are assigned to the "Imported Purchase Order" Spend Program. This assignment is permanent — you cannot move imported POs to a different Spend Program after import. If you need POs under a specific procurement Spend Program, create them through that program's intake form instead.
- Connect your accounting provider first. The CSV template pulls accounting fields (classes, departments, locations) from your connected provider.
- Multiple prefixes are supported. A single CSV can contain POs with different prefixes. All imported POs are grouped by PO number regardless of prefix
- Keep column headers unchanged. The system matches fields by exact column header name. Renaming or reordering headers causes validation failures.
- Check your vendor names before uploading. If you include a
Vendor Name, it must match an existing vendor in Ramp. Cleaning up vendor names beforehand saves you from having to fix validation errors later. If you don't need a vendor on a PO, you can leave the field blank. - Start with a small test batch. If you're importing a large number of POs, try importing 5–10 first to confirm your data formatting and field mapping are correct before running the full import.
- Fix errors inline when possible. The validation interface lets you edit cells and re-validate without re-uploading the entire file — this is faster than exporting, editing, and re-uploading.
- Keep header-level data consistent across line items. All rows sharing the same
PO Numbermust have identical values for PO-level fields like vendor, currency, and subsidiary. Mismatches cause validation errors. - Stay within the 5,000 line item limit. Each import supports up to 5,000 line items. If you have more, split your CSV into multiple files and import them separately — subsequent imports add to the same pool of imported POs.
- Large imports may take time to process. Imports with thousands of line items can take 10 or more minutes. The interface shows a loading indicator while the import runs.
- Configure invoice matching after your first import. After your first successful import, the import pane displays an Invoice matching setting where you can choose between 2-way match and 3-way match. Changing this setting affects all imported POs for your business, including those from previous imports.
Frequently asked questions
Can I import POs that are still in draft or pending approval?
No. Only stable, committed POs can be imported — those that have been issued or approved with a complete receiving status (open, fully received, or closed). Draft and pending-approval POs are not supported.
What happens if a PO number in my CSV already exists in Ramp?
The system flags it as a duplicate and blocks that PO from import. You can either remove the duplicate row from your CSV or change the PO number, then re-upload.
Can I import a PO without a vendor?
Yes. The Vendor Name field is optional. If you leave it blank, the PO is created without a linked vendor. You can add a vendor to the PO later in Ramp. However, if a line item has a Paid Amount, a Vendor Name is required for that line item because Ramp creates an internal bill for paid amounts, and bills require a vendor.
What if a vendor in my CSV doesn't exist in Ramp?
If you provide a Vendor Name that does not match an existing vendor in Ramp, you'll see a validation error instructing you to create the vendor first. Add the vendor in Ramp, then re-upload or fix the value in the validation interface. If the line item does not have a Paid Amount, you can also clear the vendor field — the vendor column is optional for unpaid line items. For line items with a Paid Amount, you must fix the vendor name to match an existing vendor in Ramp.
Can I import POs with different prefixes in one upload?
Yes. A single CSV can contain POs with different prefixes. Ramp groups rows by PO number, so each unique PO number — regardless of prefix — becomes its own purchase order.
Can I edit imported POs after import?
Yes, with some limitations. You can manage imported POs in most of the same ways as standard POs — for example, uploading invoices, matching bills, and tracking spend. To configure change order approval settings for imported POs, go to Manage spend > Purchase orders > Settings > Import. However, you cannot change the Spend Program on an imported PO. Imported POs are permanently assigned to the "Imported Purchase Order" program.
Can I change the Spend Program on an imported PO?
No. Imported POs are permanently assigned to the "Imported Purchase Order" Spend Program that is auto-created for your business. There is no way to reassign an imported PO to a different procurement Spend Program after import. If you need POs under a specific Spend Program, create them through that program's intake form instead of importing them.
Do I need engineering support to use this feature?
No. The bulk import flow is fully self-service for admins. No engineering involvement is required.
What's the maximum number of line items I can import at once?
Each import supports up to 5,000 line items. If you have more, split your data across multiple CSV files and import them separately.
Can I run multiple imports over time?
Yes. Each new import adds to your existing imported POs. You don't need to re-import everything in one batch.
Why don't I see a "View request" or "Request again" option on my imported POs?
Imported POs were not created through Ramp's request flow, so request-related actions are not available. You can still create change orders and manage the PO as usual.
What is the Invoice matching setting?
After your first successful bulk import, an Invoice matching section appears in the import pane. You can choose between 2-way match (bills matched to POs only) and 3-way match (bills matched to POs and item receipts). To access it, click the upload button on the Purchase orders page. This setting does not appear until you have completed at least one import.
Does changing the invoice matching setting affect previously imported POs?
Yes. Changing between 2-way match and 3-way match applies to all imported POs for your business, including POs from previous imports. The change is not limited to future imports.
Why don't I see the Invoice matching setting?
The Invoice matching setting only appears after you have completed at least one successful bulk import, which creates the auto-generated "Imported Purchase Order" Spend Program. If you have not yet imported any POs, complete your first import and the setting will appear.