Budgets overview and setup
Overview
Available on Ramp Plus. See Ramp Plus overview for plan details.
Ramp Budgets is designed to provide real-time visibility into your company's spending across all payment methods. It helps finance teams track plan versus actuals, set up automated alerts, and empower budget owners with the information they need to make informed decisions.
Designed in response to customer feature requests, Ramp Budget delivers these key capabilities:
- Unify spend data with one source of truth across cards, reimbursements, Bill Pay, and POs
- Track in real-time by importing your own budgets and monitoring vs. actual spend
- Give budget owners live visibility into their budgets for informed spending decisions
- Connect financial approval workflows to evaluate purchases against available budget
Only Admin, Owner, and Accounting roles can view budget information - once you assign budget owners they can view their portion of the budget as well.
Who is budgets for?
Ramp Budgets is designed for finance teams and budget owners in organizations of all sizes who need visibility into spending and improved budget control. It is particularly valuable for:
- Finance leaders who need real-time spending visibility across the organization
- Budget owners who want to make informed spending decisions
- Operations teams looking to streamline spending approval workflows
Features
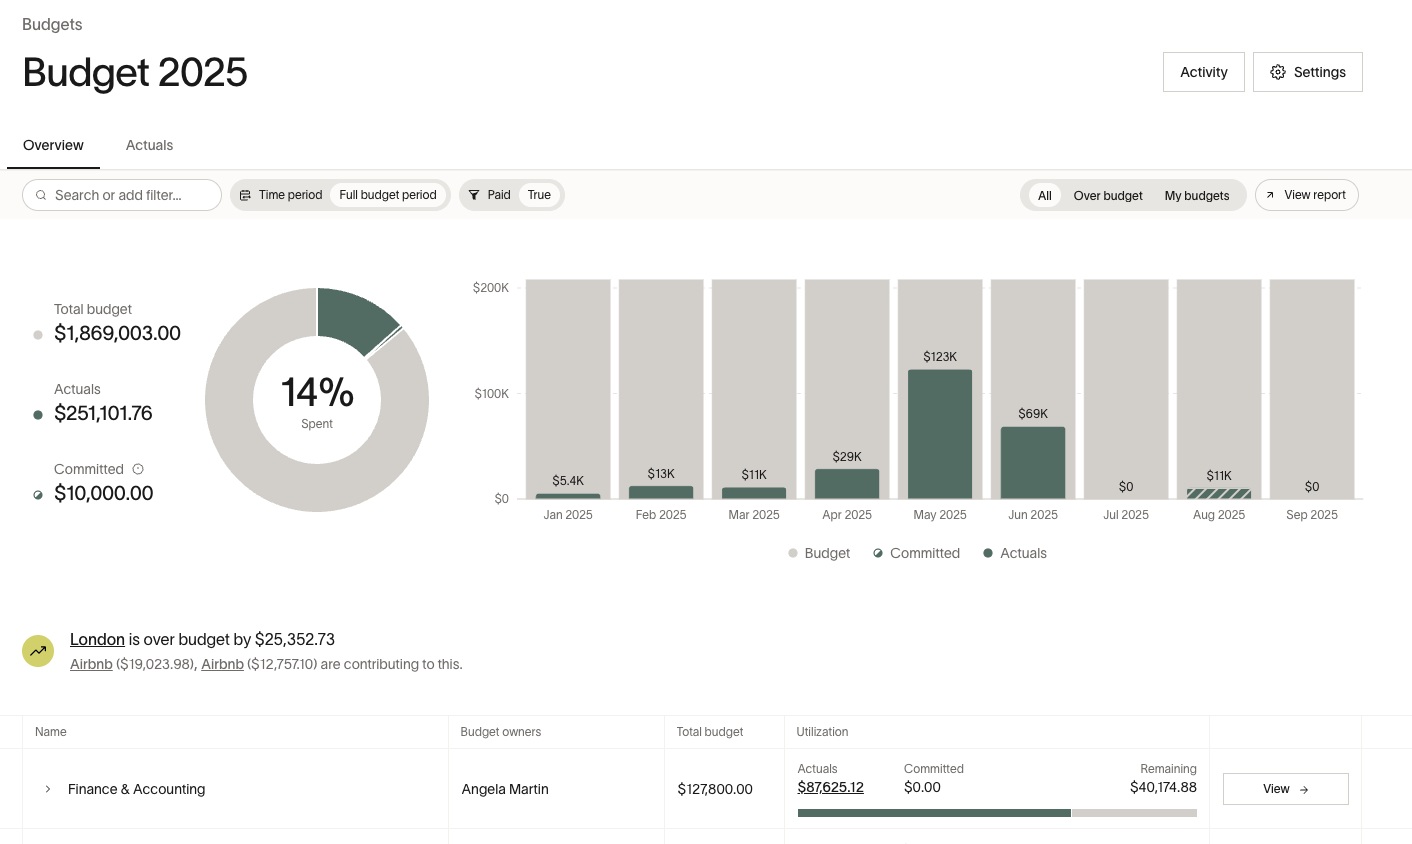
Automated budget vs. actuals analysis
Automatically track budgets in real time, surfacing over- and underspend so you can act during the month, not after. The dashboard provides clear visualizations of your spending patterns, budget utilization, committed expenses, and potential overruns.
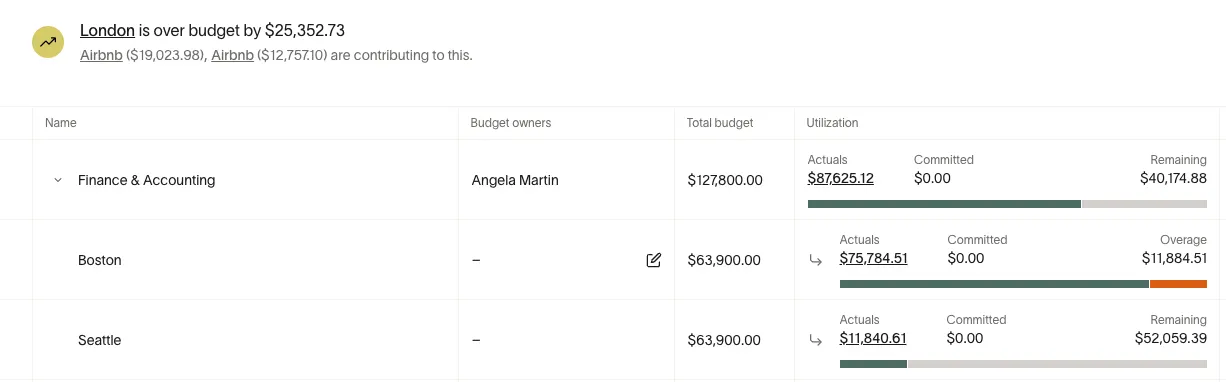
Assign and track budget Owners
Assign specific team members as budget owners for different departments, projects, or expense categories. Easily monitor who is responsible for each budget area and track how their spending compares to the allocated budget.
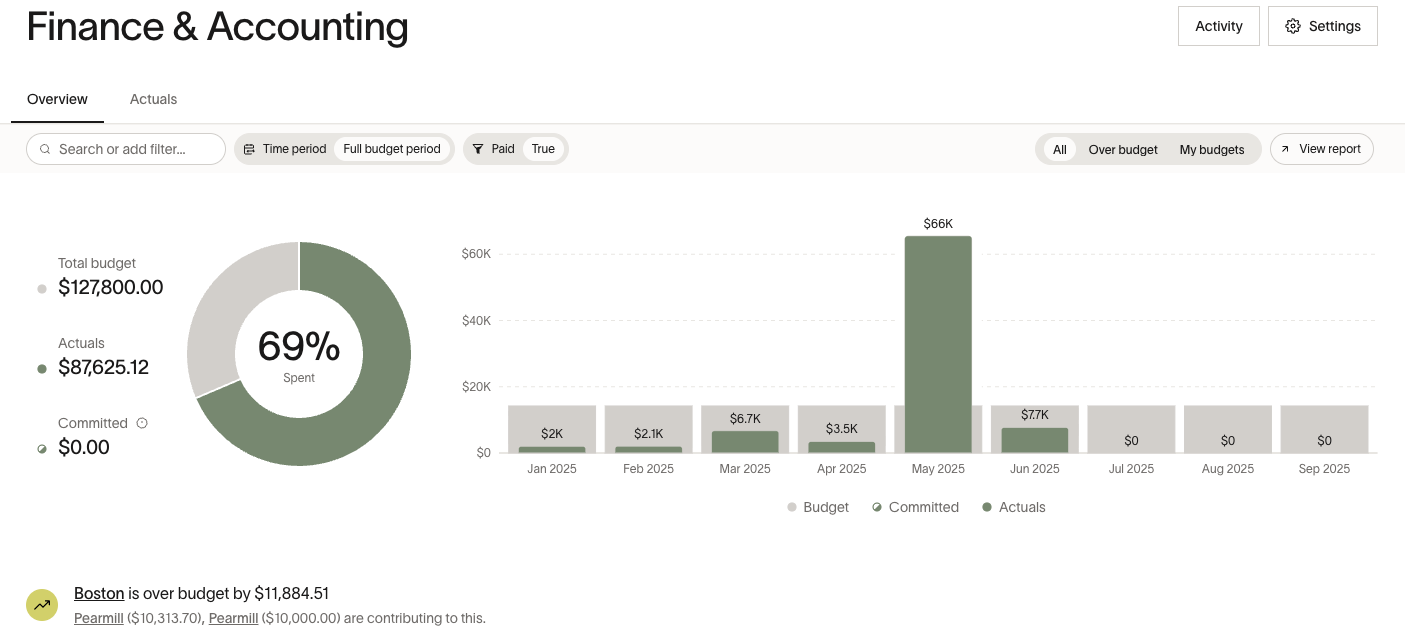
Provide tailored insights to budget Owners
Budget owners receive customized dashboards and notifications, creating clear accountability and enabling them to make informed spending decisions within their allocated resources.
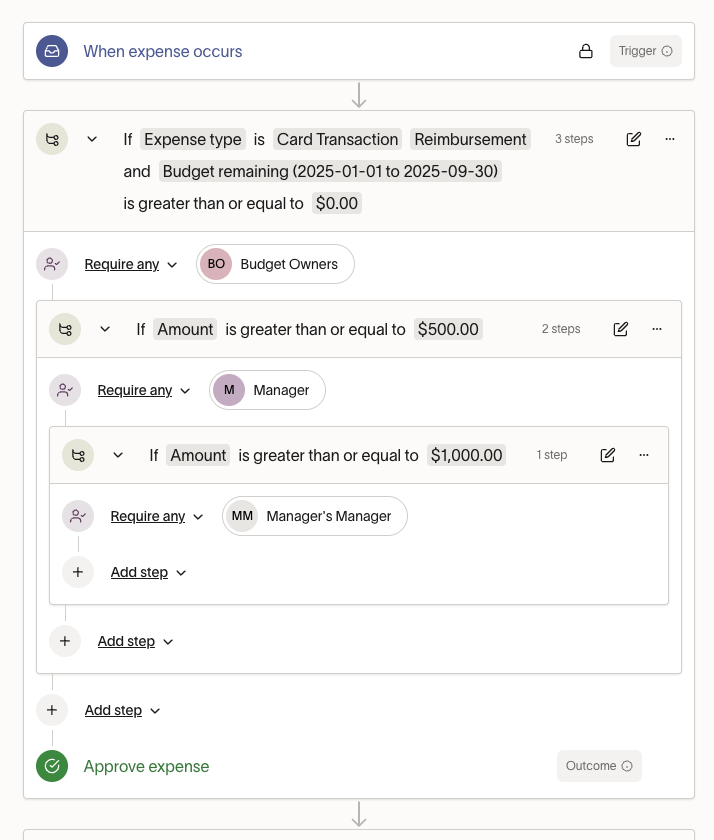
Add budget approval workflows
Allow creation of budget-based approval workflows to evaluate purchases against available funds. This enables routing to budget owners, automatic triggering based on remaining budget, and displaying budget status during the approval process.
Configure budget notifications
Set up real-time alerts for budget owners when spending approaches or exceeds set thresholds. This keeps teams informed and allows them to take corrective action before budgets are exhausted.

How to set up budgets
For a visual walkthrough, watch our Budgets setup tutorial that demonstrates each step in detail. Follow these steps to get started with Ramp Budget:
Step 1: Access budgets in Ramp
Go to Manage Spend > Budgets.
Step 2: Click 'set up budget'
- The first step will be to define your dimensions. Determine which fields you want to budget by (e.g., accounting department, accounting location, etc.) and add roll-up categories if needed for higher-level budget grouping. A single budget can include multiple dimensions, so you can track separate teams, locations, or other criteria within the same budget hierarchy. If you want one broader budget row instead of tracking every ERP category separately, use a parent roll-up category or custom field above the more detailed ERP dimension below it. For example, you can group multiple T&E categories under one parent budget line. Note: these fields will be nested, so the field that you put at the bottom in this step will be the most granular layer of your budget.
- Next, set your budget period. This just means what time period you want your budget to track. You can also adjust the interval (monthly, quarterly, yearly) to adjust the time granularity of your tracking.
- Next, you'll be prompted to download the template which will be pre-filled with the column names that you selected and the time range that you had previously defined. Do not adjust the column names (you can adjust the date range if needed) but changing the column names will yield an error. If you need to change the structure of your budget return to the first step to define your dimensions. Once you fill out these values, save the file as a csv and return to Ramp to upload it. You can view some examples of budgets here to give you an idea of what a budget sheet should look like.
Step 3: Map fields and validate
After uploading your CSV file, Ramp will highlight any potential inconsistencies of field names to confirm that we have the right information.
- Use the mapping interface to match your fields to Ramp’s dimensions clicking the down arrow next to the field
- Address any validation errors flagged by the system:
- Make sure all fields in your budget exist in Ramp
- Replace or correct any fields that don't match Ramp's system
Step 4: Assign budget Owners and configure alerts
After uploading your budget:
- Assign team members to budget lines
- Set notification thresholds for alerts
- Configure approval workflows based on budget status
Editing + maintenance
- You can edit your budget by using the 'Edit' button on the top RHS of the screen
- This is recommended for smaller edits like adding a row or changing cells
- All changes will be signed in the activity log
- You can also go into Settings -> Reupload. This is recommended for larger updates or structural changes to your budget hierarchy
- Once you confirm your budget hierarchy, you can re-download the template and make any adjustments and follow the same process as the original upload
- When you upload a new budget, it replaces the active budget in Ramp, although the previous file stays in your activity log. Ramp supports one active uploaded budget at a time. If you need separate budget lines for teams, locations, or other criteria, include them as dimensions in the same budget hierarchy. If you need multiple planning versions or scenarios, manage those outside Ramp and upload the version you want Ramp to track. If you would like visibility across multiple years, we recommend creating a rolling budget that includes both years.
Troubleshooting
| Issue | Cause | Solution |
|---|---|---|
| Fields don't match | Budget field names don’t align with Ramp’s | Use the mapping tool to match fields during upload |
| Invalid data format | Dates don’t start on the first of the month or budget amounts are non-numeric | Check formatting and ensure all values are numeric |
| Empty cells | Required fields are missing data | Fill in all required fields and avoid gaps in the middle columns |
| Missing spend data | Some spend is not coded to budgeted dimensions | Ensure spend is coded correctly and budget includes all relevant combinations |
Frequently asked questions
Can I have multiple budgets in Ramp?
Ramp supports one active uploaded budget at a time. That uploaded budget can still include multiple dimensions, such as department, location, or other criteria, so you can manage multiple budget lines within the same hierarchy.
What if tracking directly by GL account is too granular for the budget rows I want?
Add a custom field above the detailed accounting field in your budget hierarchy to group granular categories under broader budget lines. For example, you can group Meals, Transportation, and Lodging under one "T&E" parent category.
To create a custom roll-up level:
- In the budget hierarchy step, select Add level.
- Open the new level's dropdown and select Create custom field.
- Enter a name for the field — for example, "Budget Category."
- Drag the new field above the detailed accounting field (such as your GL code) in the hierarchy. The lowest level must be a Ramp accounting field — a custom field cannot be the lowest level because Ramp uses accounting fields to match spend to budget rows.
- Download the template and enter the same parent value (such as "T&E") for each related detailed-category row. After you upload the file, Ramp groups those categories under the broader parent budget line.
What happens if I upload a new budget file?
Uploading a new budget file replaces the active budget in Ramp. The previous file remains available in your activity log.
Can I keep multiple budget versions or scenarios active at the same time?
No. If you need different planning scenarios, such as base-case, best-case, or worst-case budgets, you'll need to manage those versions outside Ramp and upload the one you want Ramp to track.