Universal CSV integration: Tax support
Overview
This feature is enabled by default for Canadian businesses and may be requested for non-Canadian businesses.
If your business uses Ramp's Universal CSV (UCSV) integration to sync accounting data, you can enable tax support to automatically break out tax amounts as separate line items in your transaction exports. This ensures your exported CSV files include the correct tax postings mapped to the appropriate GL accounts in your accounting system.
How it works
When tax support is enabled, Ramp takes any tax applied to a transaction and generates additional rows in your CSV export — one for each tax component. Each tax line item is mapped to the GL account you specify during setup, so your accounting system receives properly categorized tax entries without manual adjustments.
Example: A $78.00 CAD transaction with 5% Canada GST applied would export as two line items:
| Line | Expense Account | Amount |
|---|---|---|
| Original expense | Meals | $74.29 |
| GST tax line | GST Receivable | $3.71 |
For transactions with multiple tax rates (e.g., GST + BC PST), Ramp generates a separate line item for each rate:
| Line | Expense Account | Amount |
|---|---|---|
| Original expense | Meals | $11.05 |
| GST tax line | GST Receivable | $1.00 |
| PST tax line | PST BC Paid | $2.00 |
Setup
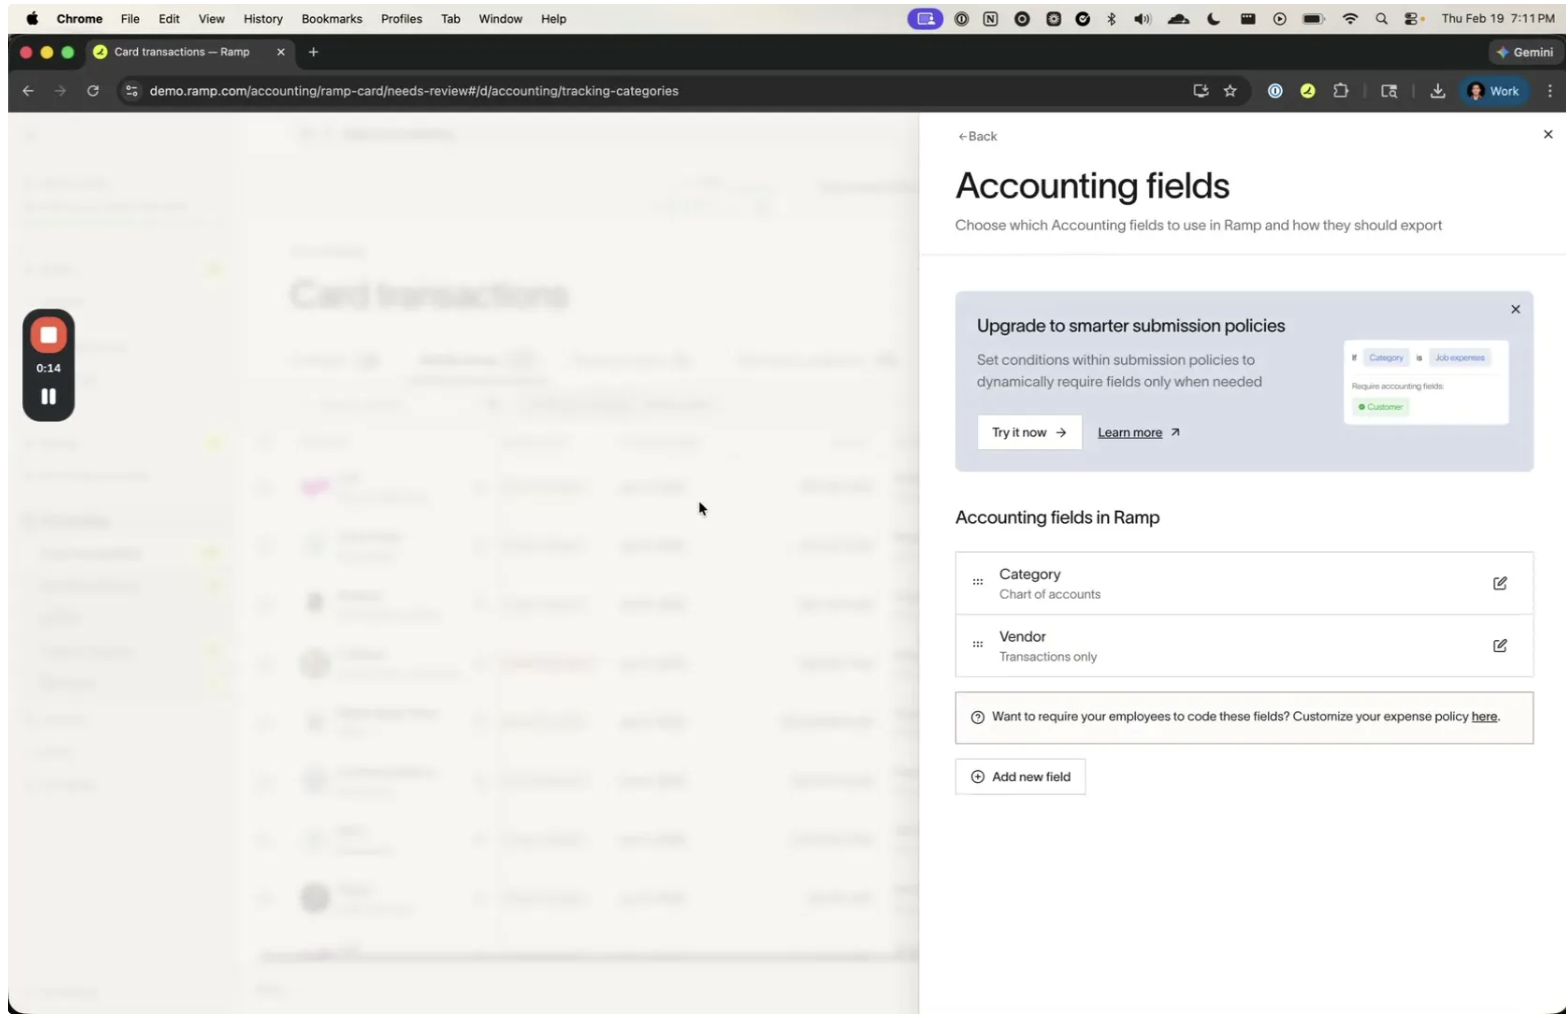
Setting up tax support is done through a single workflow that covers both tax rates and tax codes. Navigate to Accounting > Settings > Accounting fields, then click Add new field.
Step 1: Create a tax code field
-
In the Accounting fields panel, click + Add new field .
-
Enter a name for the field (e.g., "Tax Code").
-
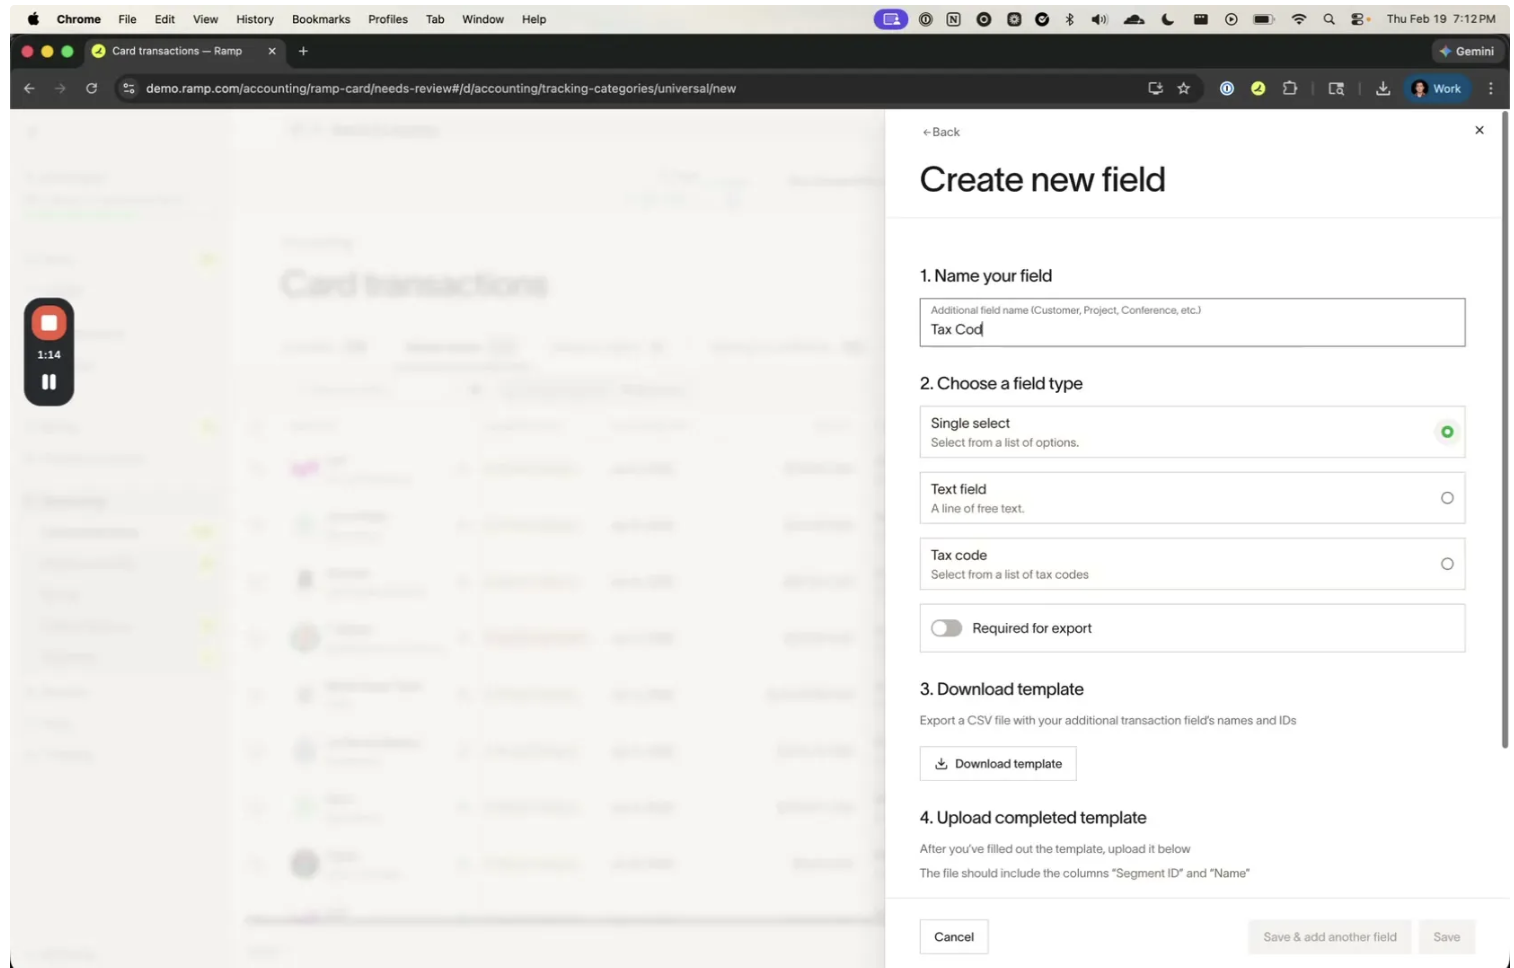
Under Choose a field type , select Tax code (this is a dedicated field type, distinct from "Single select" or "Text field").
-
Optionally toggle Required for export if you want to enforce tax code selection before transactions can be exported.
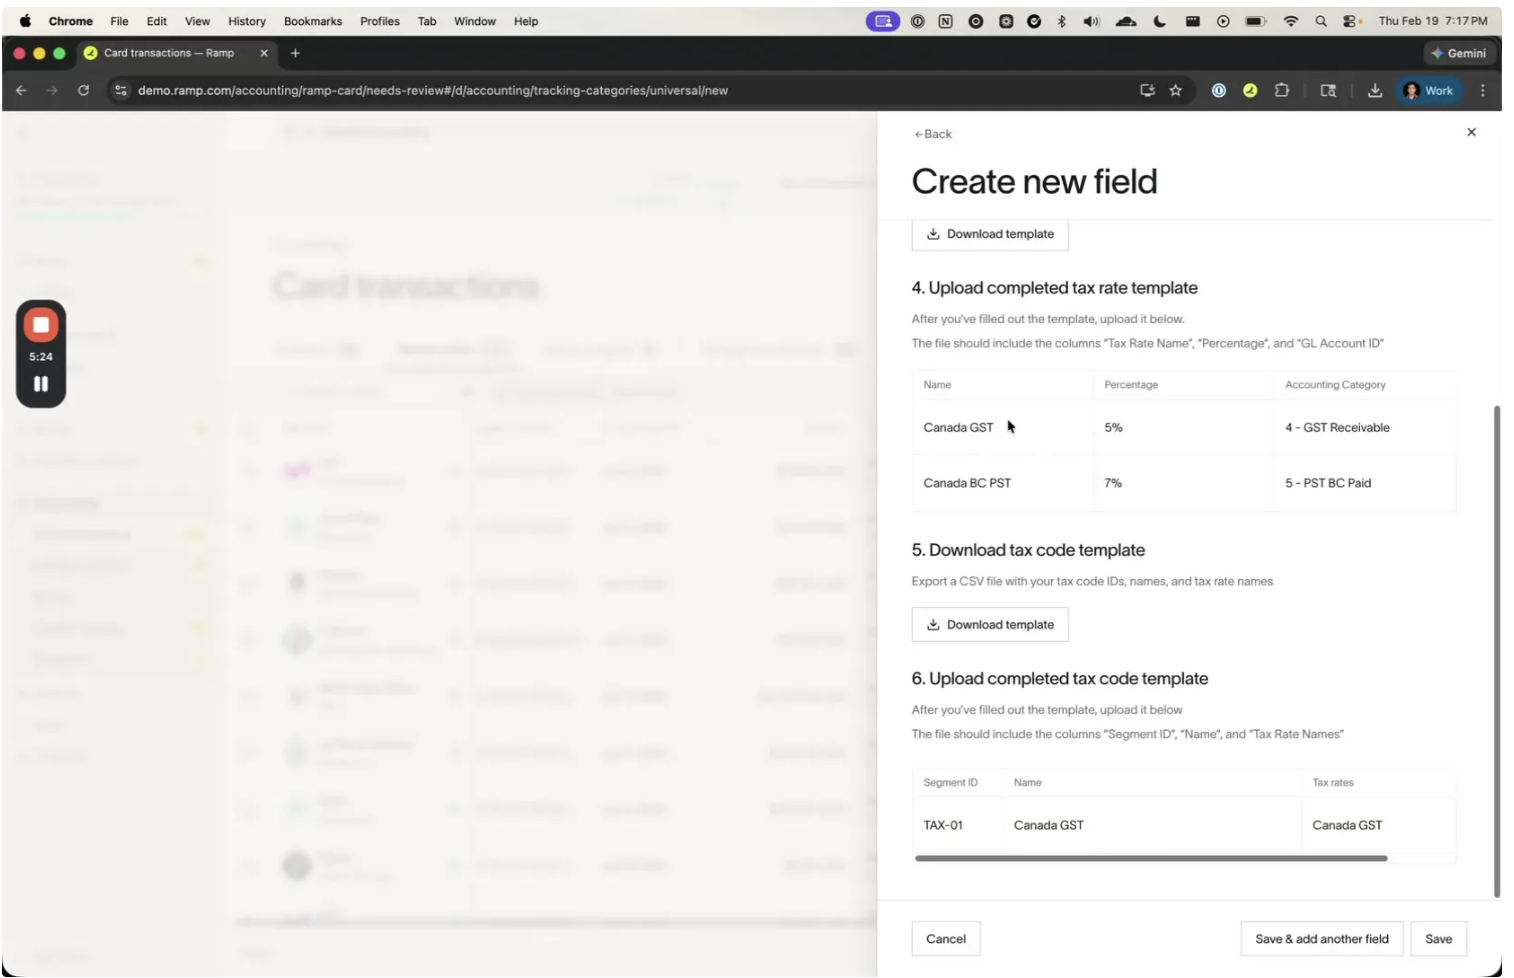
Step 2: Upload tax rates
Tax rates define the individual tax percentages and their associated GL accounts. After selecting the Tax code field type, the drawer expands to show template download and upload sections.
- Click Download template under "Download tax rate template" to get a pre-formatted CSV.
- Open the downloaded CSV and fill in your tax rates with the following columns:
| Column | Description | Example |
|---|---|---|
| Tax Rate Name | Display name for the tax rate | Canada GST |
| Percentage | The tax percentage (as a number) | 5 |
| GL Account ID | The ID of the GL account where the tax should be posted | 4 (maps to GST Receivable) |
Example CSV:
Tax Rate Name,Percentage,GL Account ID
Canada GST,5,4
Canada BC PST,7,5
-
Upload the completed CSV in the Upload completed tax rate template section.
-
After upload, Ramp displays a confirmation table showing your tax rates with their mapped GL accounts.
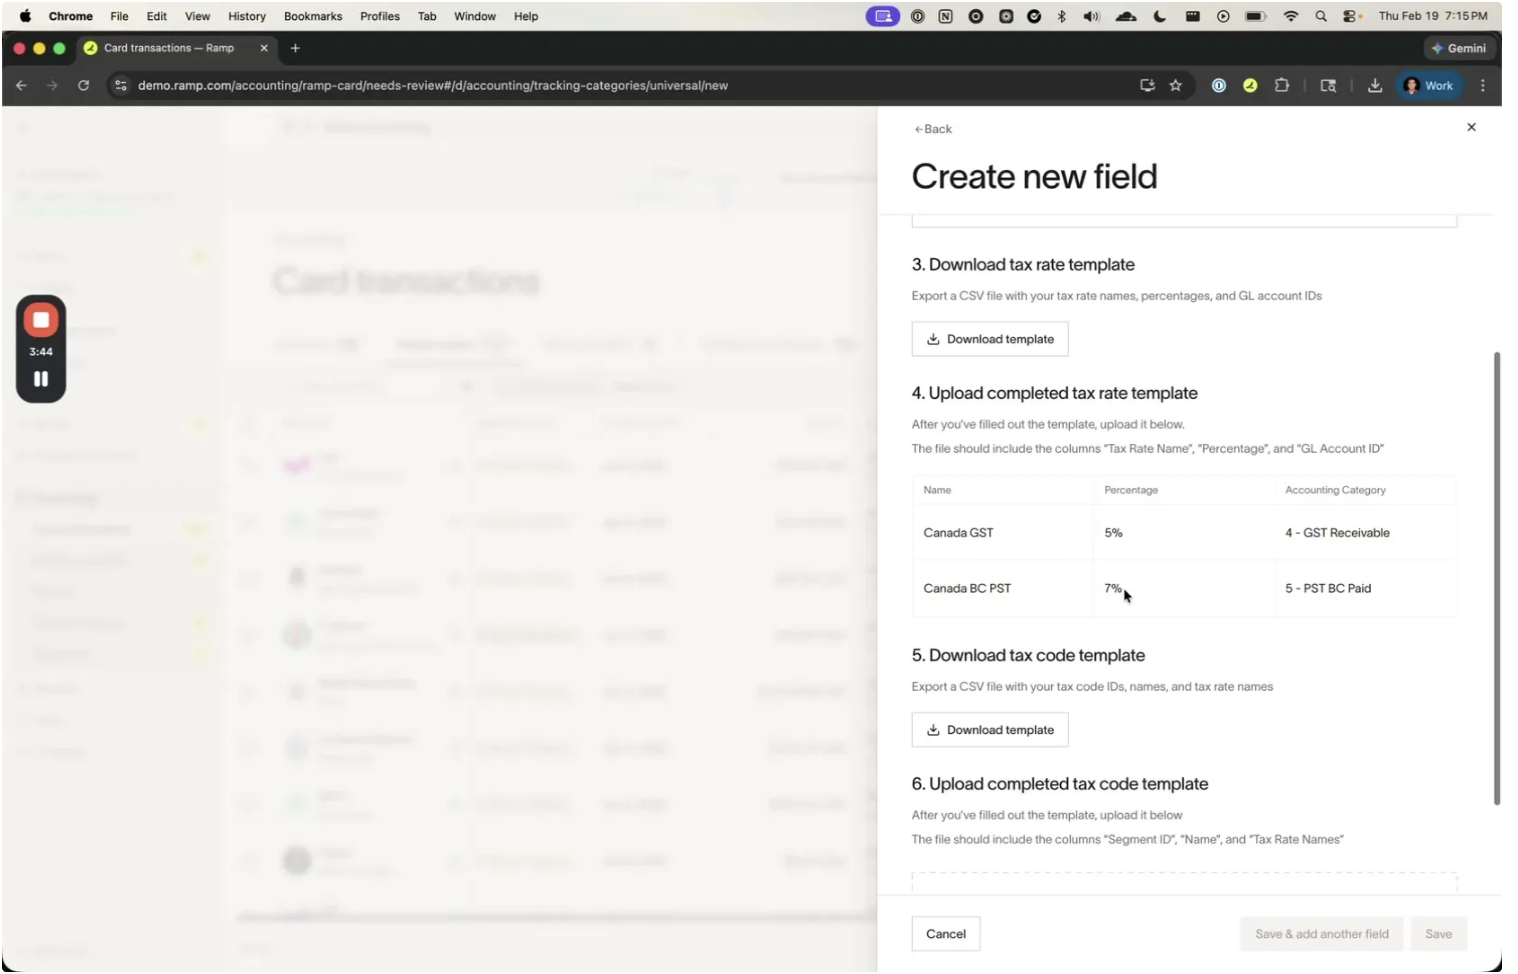
Requirements:
- Tax rate names must be unique within your organization.
- Percentages must be non-negative numbers.
- GL Account IDs must match existing, active GL accounts in your Ramp accounting settings.
Step 3: Upload tax codes
Tax codes group one or more tax rates into a selectable option that users can assign to transactions. For example, a "Canada BC GST/PST" code might combine Canada GST and Canada BC PST.
After uploading tax rates, the drawer shows additional sections for tax codes.
- Click Download template under "Download tax code template".
- Fill in the CSV with the following columns:
| Column | Description | Example |
|---|---|---|
| Segment ID | A unique identifier for the tax code | TAX-01 |
| Name | Display name shown to users when coding transactions | Canada GST |
| Tax Rate Names | Comma-separated list of tax rate names to include | Canada GST |
Example CSV:
Segment ID,Name,Tax Rate Names
TAX-01,Canada GST,Canada GST
TAX-002,Canada BC GST/PST,"Canada GST,Canada BC PST"
-
Upload the completed CSV in the Upload completed tax code template section.
-
Click Save to finalize the field setup.
Requirements:
- Segment IDs must be unique.
- Every tax rate name listed must exactly match a tax rate uploaded in Step 2 (including capitalization).
- Tax code names cannot use the reserved name "Category."
⚠️ Important: Tax rate names in your Tax Code CSV must exactly match the names from your Tax Rate upload. For example, if you uploaded "Canada GST" as a tax rate name but reference "GST" in your tax code CSV, the upload will fail with an error: "Tax Rate GST not found for Tax Code Canada GST."
Verifying your setup
After saving, your tax codes appear in the Accounting Tax Code options panel. You can view all configured tax codes, their Segment IDs, and the tax rates they reference.
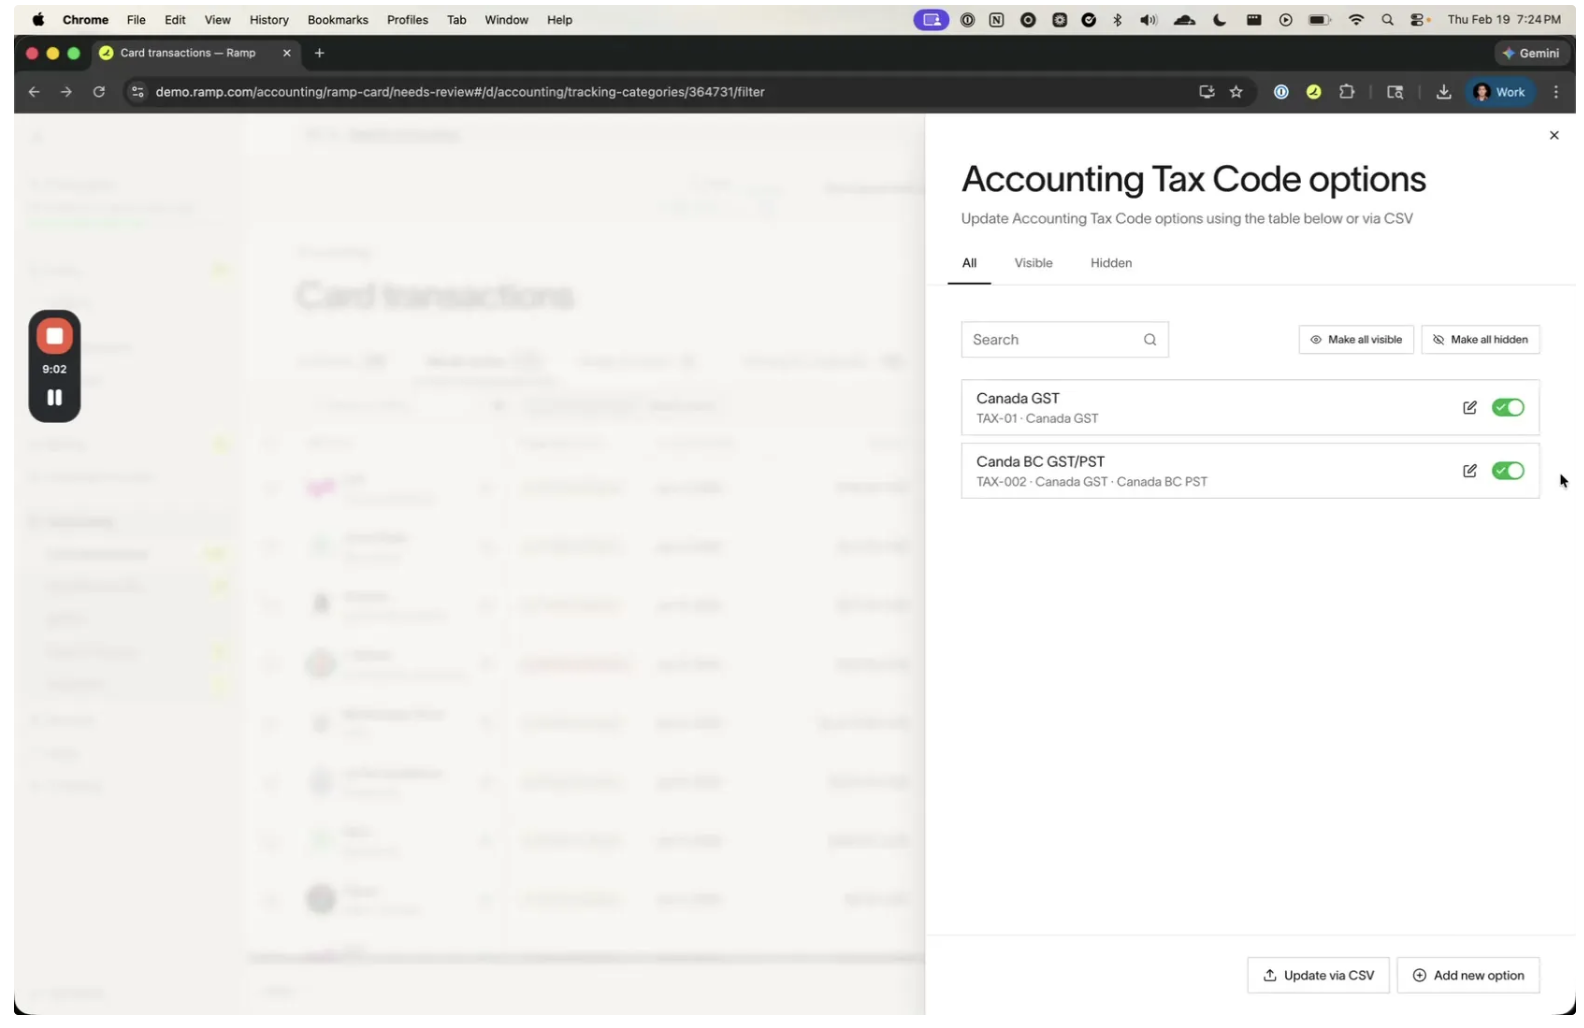
You can also add tax codes individually using the Add new option button, which provides a form to enter the Tax code name, ID, and comma-separated tax rate names.
Using tax codes on transactions
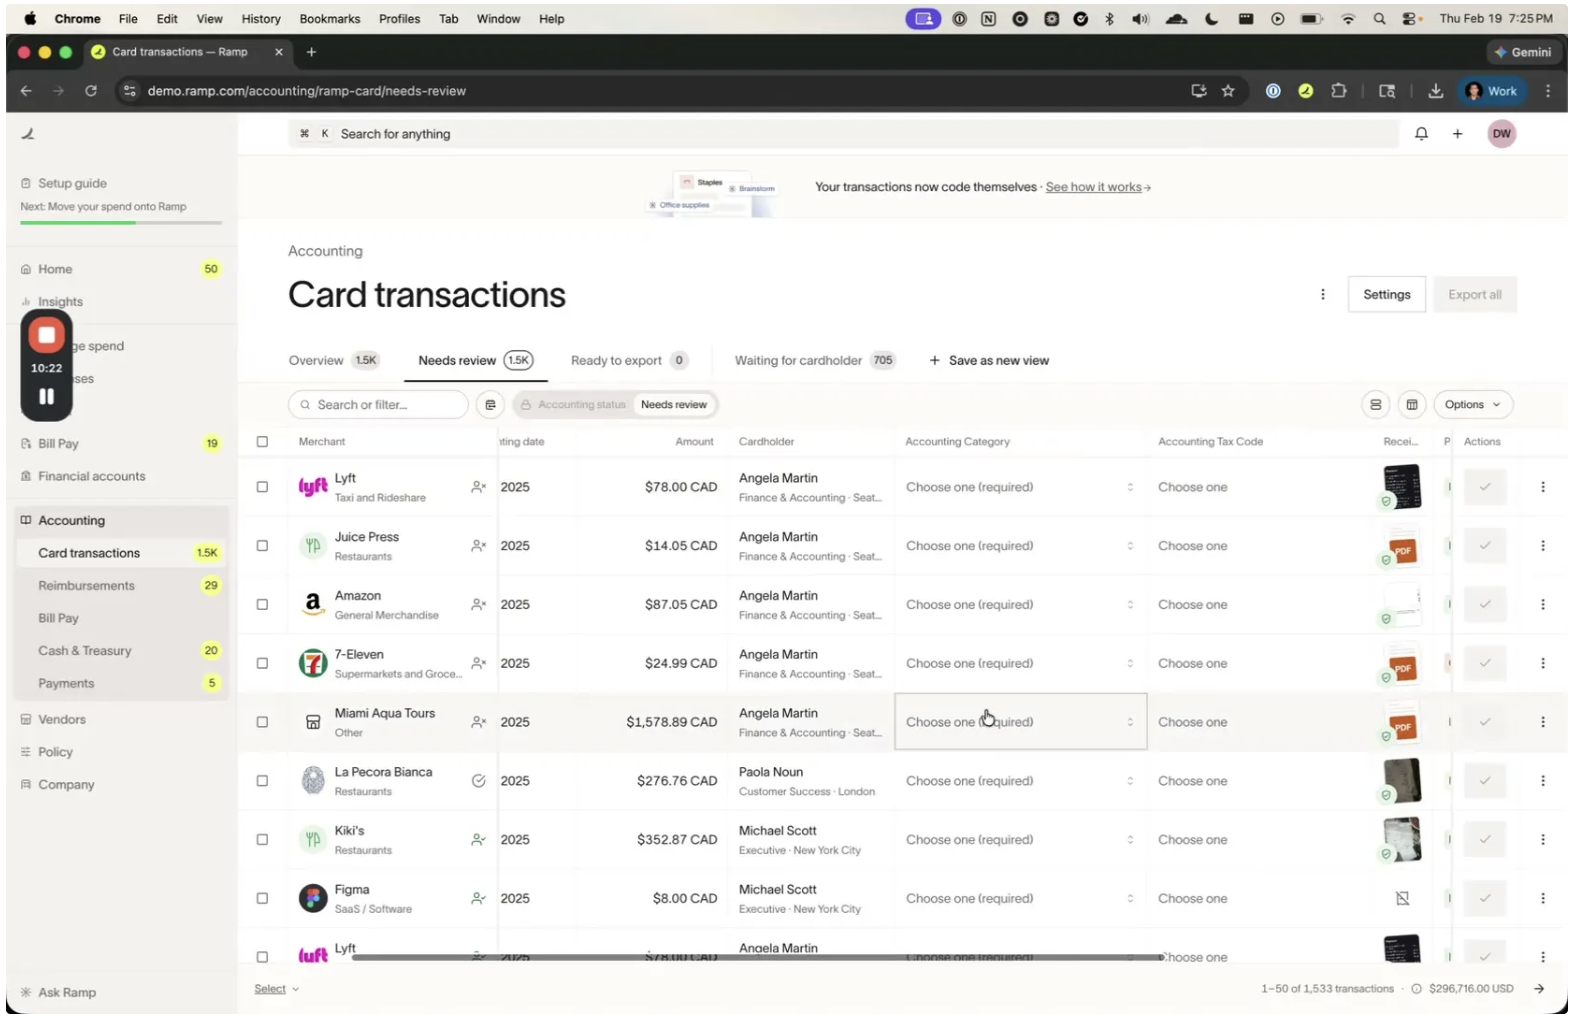
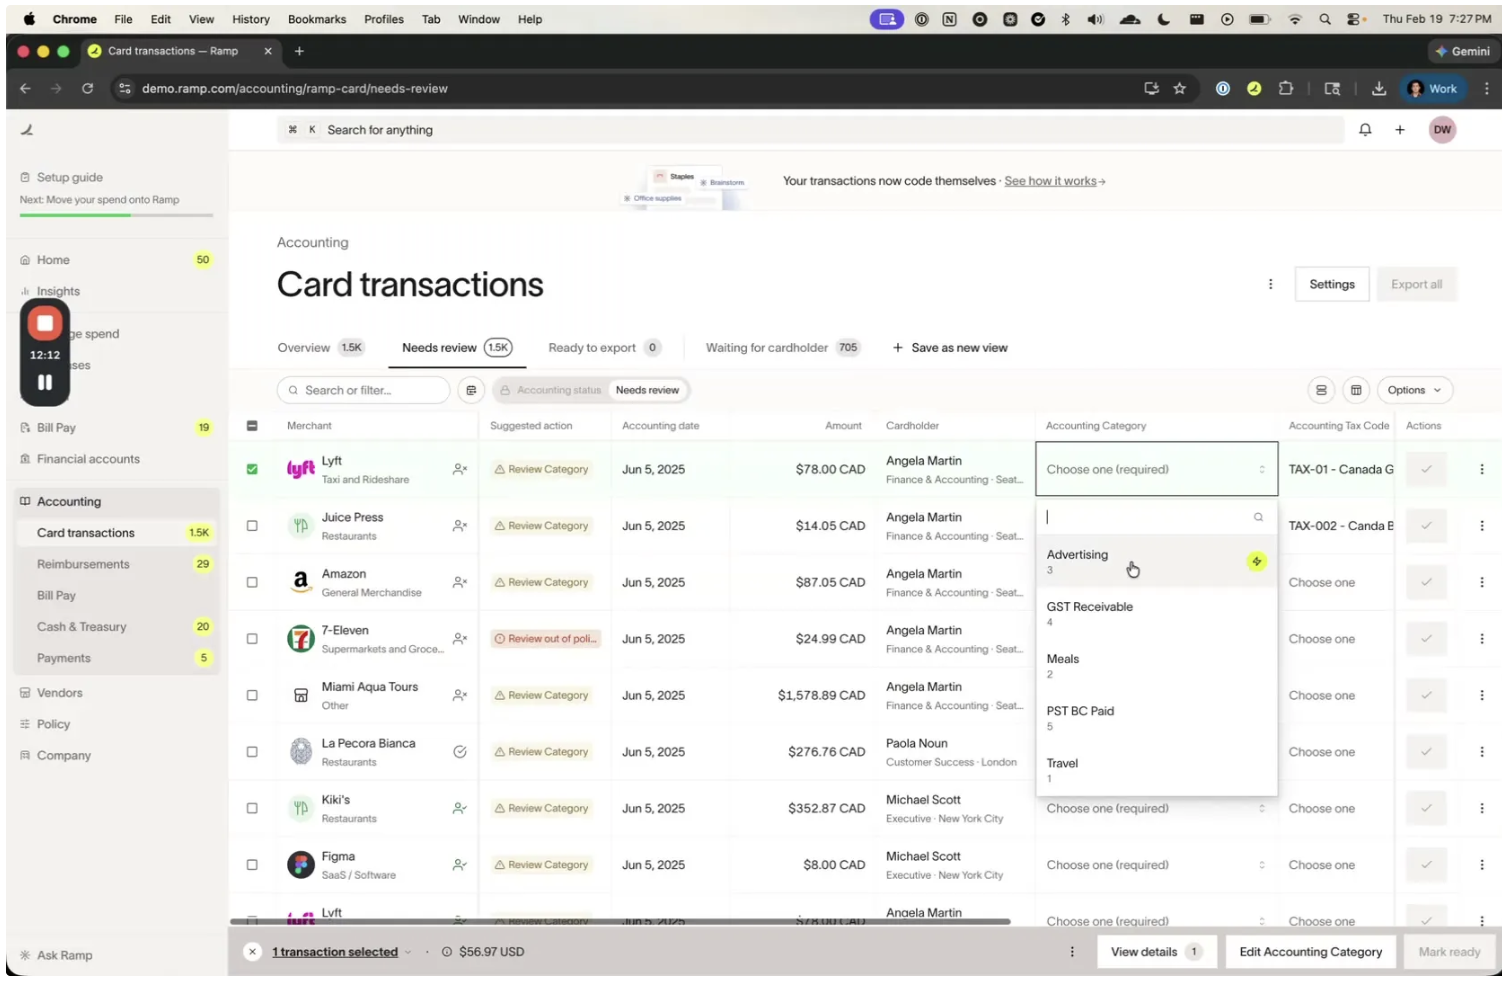
Once tax codes are configured, they appear as a selectable field when coding transactions.
From the transaction list
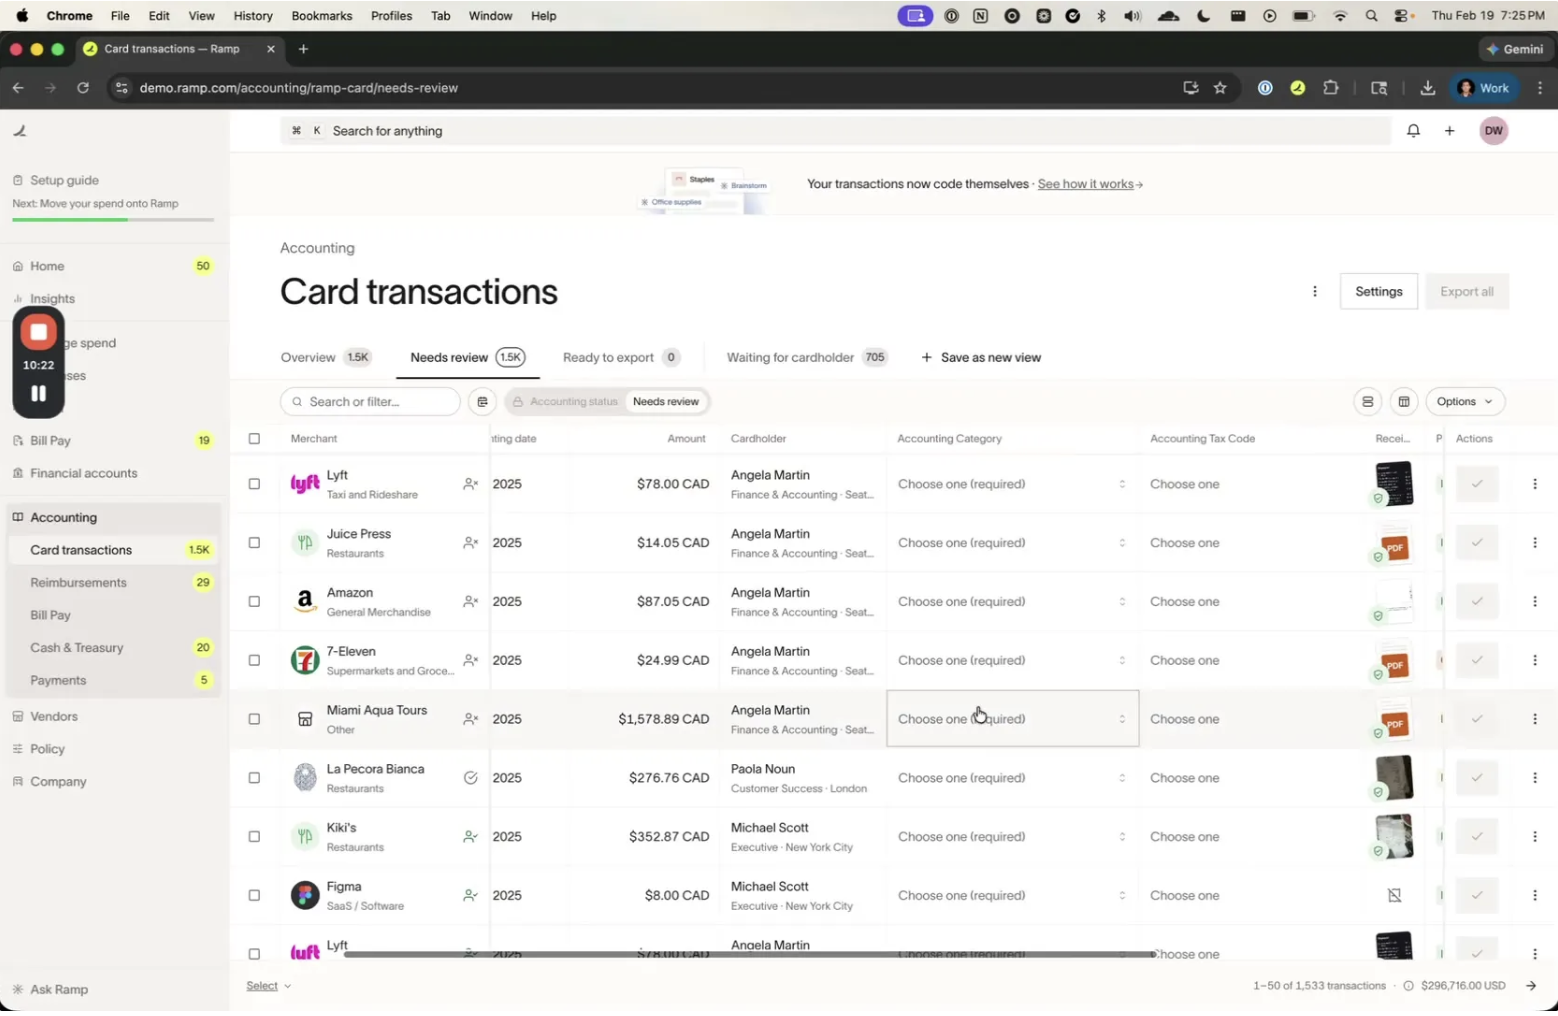
The Accounting Tax Code column appears alongside other accounting fields (like Accounting Category) in the Card transactions table. You can select a tax code directly from the dropdown in the list view.
From the transaction detail
-
Open any transaction from the Transactions page.
-
In the Accounting section of the transaction detail panel, find the Accounting Tax Code field.
-
Select the appropriate tax code from the dropdown (e.g., "TAX-01 – Canada GST").
-
If the tax code includes a single tax rate, the computed tax amount appears below (e.g., "Canada GST paid (CAD): CA$3.71").
Configuring the CSV export
Before exporting transactions, you may want to configure your CSV export settings to include tax-related columns.
- Navigate to Accounting > Settings and open CSV export settings .
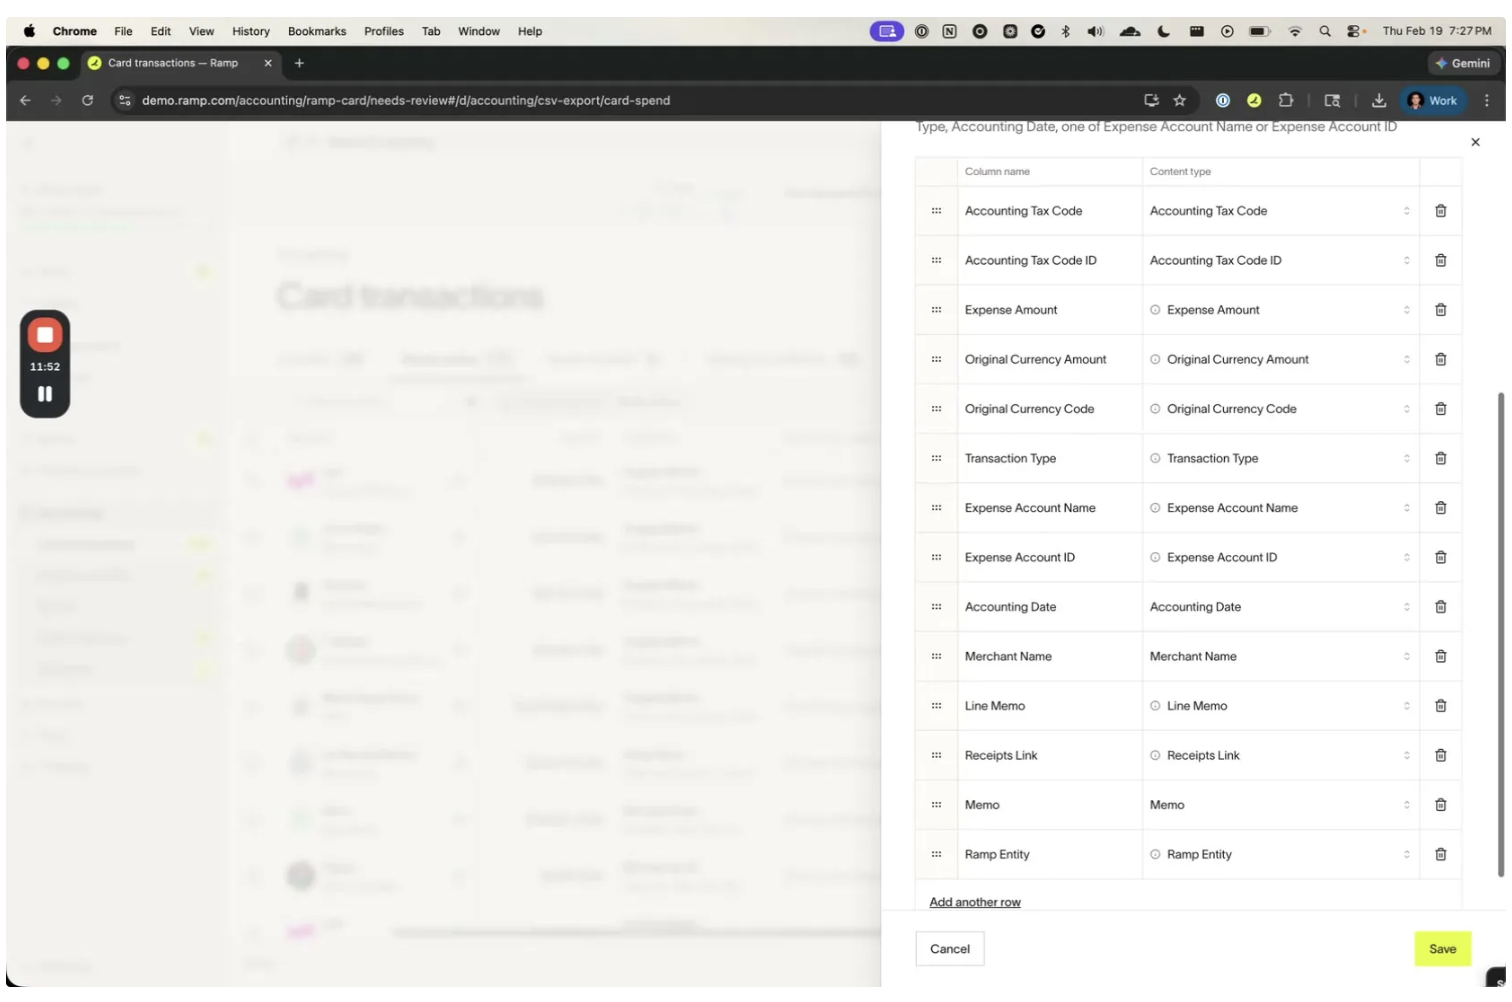
- The export template includes mappable columns. Ensure the following columns are included:
- Accounting Tax Code — the tax code name
- Accounting Tax Code ID — the tax code Segment ID
- Expense Amount — the line item amount (including tax breakout rows)
- Expense Account Name — the GL account name for each line
- Expense Account ID — the GL account ID for each line
-
Click Save to apply your export configuration.
Exporting transactions with tax
When you export transactions to CSV, Ramp automatically generates separate line items for each tax component:
- Navigate to Accounting and select the transactions you want to export.
- Click Export all (or select individual transactions and export).
- Ramp generates additional rows in the CSV for each tax component, posted to the GL accounts you configured.
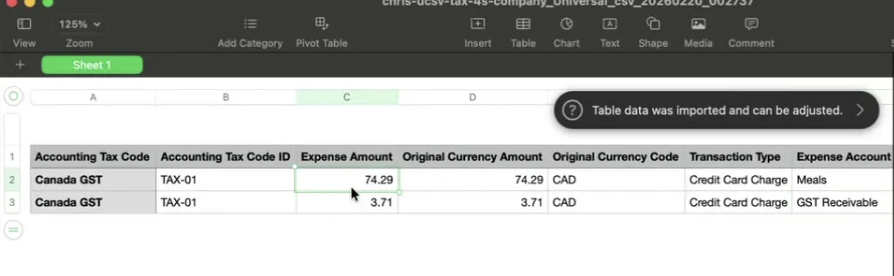
Example: single tax rate (Canada GST only)
For a $78.00 CAD Lyft transaction with Canada GST (TAX-01):
| Accounting Tax Code | Tax Code ID | Expense Amount | Expense Account Name |
|---|---|---|---|
| Canada GST | TAX-01 | 74.29 | Meals |
| Canada GST | TAX-01 | 3.71 | GST Receivable |
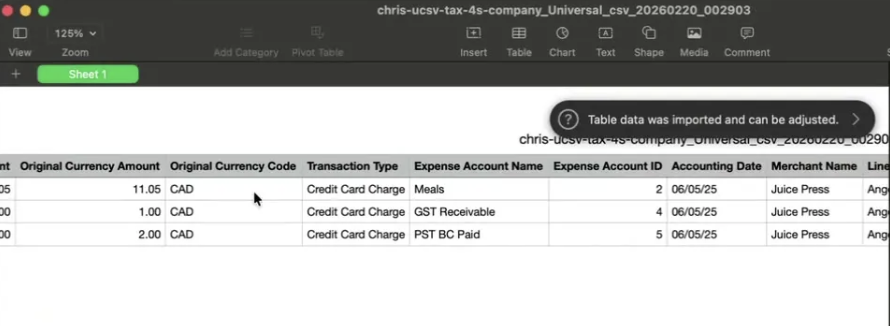
Example: multiple tax rates (Canada GST + BC PST)
For a $14.05 CAD Juice Press transaction with Canada BC GST/PST (TAX-002):
| Accounting Tax Code | Tax Code ID | Expense Amount | Expense Account Name |
|---|---|---|---|
| Canada BC GST/PST | TAX-002 | 11.05 | Meals |
| Canada BC GST/PST | TAX-002 | 1.00 | GST Receivable |
| Canada BC GST/PST | TAX-002 | 2.00 | PST BC Paid |
Updating tax rates and codes
You can update your tax configuration at any time:
Download existing configuration
-
Navigate to Accounting > Settings > Accounting fields .
-
Click the edit icon next to your Tax Code field to open the Edit Tax Code options panel.
-
Click Update via CSV to access the bulk edit screen.
-
Use the Download buttons to export your current tax rates and tax code options as CSV files.
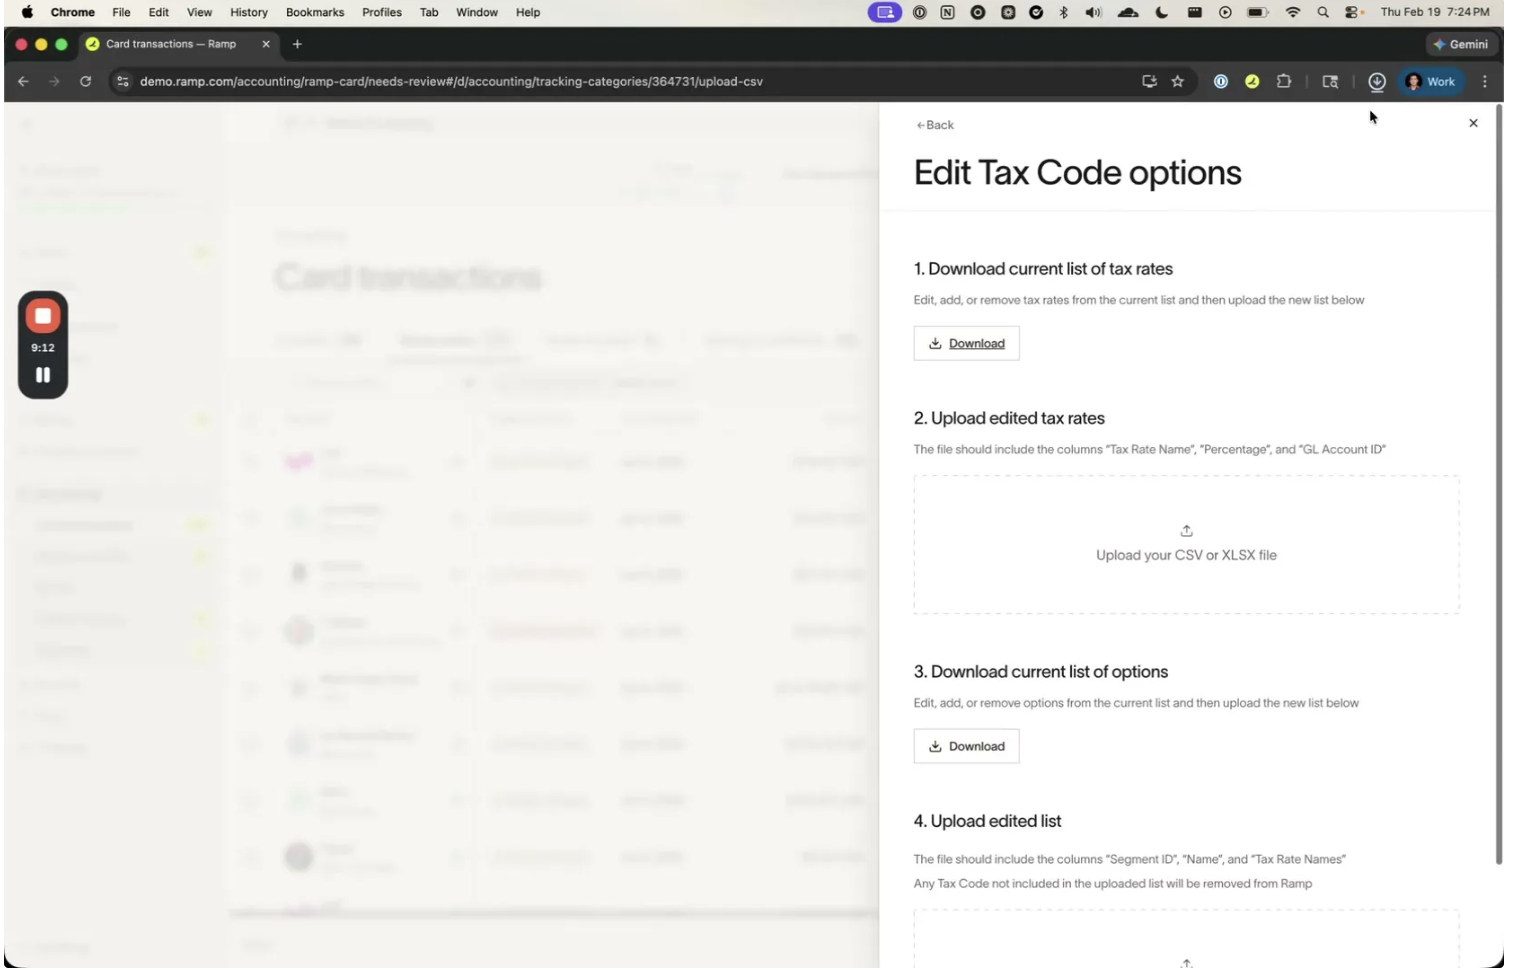
Upload updated configuration
- Edit the downloaded CSVs with your changes.
- Upload the updated tax rates CSV in the "Upload edited tax rates" section.
- Upload the updated tax codes CSV in the "Upload edited list" section.
- Review the changes and click Confirm changes .
⚠️ Note: Any Tax Code not included in the uploaded list will be removed from Ramp. Make sure your uploaded CSV contains all tax codes you want to keep.
Troubleshooting
"Tax Rate [name] not found for Tax Code [name]"
The tax rate names in your Tax Code CSV do not match any existing tax rates. Make sure your tax rates are uploaded first and that the names match exactly, including capitalization. For example, "GST" will not match "Canada GST".
"Tax Rate MEJdf not found for option Bad Tax"
This error appears when adding a tax code (via UI or CSV) that references a tax rate name that doesn't exist. Verify the tax rate names are correct.
Missing required fields in CSV
Your uploaded CSV is missing one or more required columns. Verify that your CSV includes all required headers exactly as specified:
- Tax Rates: Tax Rate Name, Percentage, GL Account ID
- Tax Codes: Segment ID, Name, Tax Rate Names
GL account not showing during tax rate upload
GL accounts must be active (visible) in your Ramp accounting settings. Check that the account hasn't been hidden or deactivated, and that the GL Account ID in your CSV matches the remote ID exactly.
Large file uploads
If your CSV contains a large number of rows, it may be processed asynchronously. You'll see an "Uploading..." indicator and will be notified when the upload is complete.
Frequently asked questions
Which accounting integrations support this feature?
Tax support with separate line items is available exclusively for the Universal CSV integration. Businesses using direct ERP integrations (e.g., NetSuite, QuickBooks Online, Xero) use their ERP's native tax handling instead.
Can I update my tax rates after uploading?
Yes. Navigate to the Edit Tax Code options panel and upload a new Tax Rate CSV with the updated information. The new rates will apply to future exports.
What happens if I don't assign a tax code to a transaction?
The transaction exports normally without any tax line items. Tax line items are only generated when a tax code is selected on the transaction.
How does Ramp handle rounding for tax amounts?
Ramp uses the largest remainder method to distribute amounts. This guarantees that the sum of all line items (expense + tax) exactly equals the original transaction amount, with no rounding discrepancies.
Can I use multiple tax codes on a single transaction?
No. Each transaction can have one tax code assigned. If you need a combination of tax rates, create a tax code that groups all the relevant rates together (e.g., "Canada BC GST/PST" combining both Canada GST and Canada BC PST).
What if my GL account isn't showing up during Tax Rate upload?
GL accounts must be active (visible) in your Ramp accounting settings. Check that the account hasn't been hidden or deactivated, and that the GL Account ID in your CSV matches the remote ID exactly.
Can I add tax codes one at a time instead of via CSV?
Yes. In the Accounting Tax Code options panel, click Add new option to create tax codes individually through a form interface. Enter the tax code name, ID, and comma-separated tax rate names.