Migrating to an ERP with a Direct Ramp Integration
Ramp’s ERP Migration Tool helps you transition from one accounting provider to another — like QuickBooks to NetSuite — in under an hour. This guide walks you through the process.
What to expect
Switching ERPs is often complex. But Ramp automates the hardest part — preserving your:
- Sync settings
- Expense and approval policies
- Card rules, accounting rules and conditional workflows
- Vendor mappings and accounting fields
Historical codings from your prior ERP connection will not be preserved
- Transactions that have not been synced to your old ERP will be automatically coded based on the mappings you provide from your new ERP
- In-flight bills will not automatically be transferred to the new accounting provider
Estimated time using ERP migration tool: 15–60 minutes
Steps before you use Ramp’s migration tool
Step 1: Choose a transition date
- When moving to a new system, most firms will keep and export financial statements from their old system and start fresh at the beginning of a new period in their new system. This’ll usually be timed around a month, quarter, half-year, or full-year end.
- You will perform a close on your transition date. Then, you’ll generate final financial statements for dates and periods up to that date on your old system. From that date forward, you will generate new financial statements in your new accounting provider.
- Choose the date you will use to switch to your new system and give yourself enough time to prepare. Two or three months is not unreasonable.
Step 2: If you can, pay off any bills in Ramp prior to the transition date and wait on creating any further bills until after the transition
- Ramp syncs your bills with your accounting system when they are processed, but if you have a bill in your old system that remains unpaid when you switch to your new system, you’ll likely run into issues matching the bill payment with the original bill, which won’t be present on the new system.
- The easiest thing to do is to approve and pay all Ramp-managed bills prior to the transition date. Once you’ve switched over to the new system, you can start entering, approving, and paying bills in Ramp again. You may need to manage vendor expectations to handle this.
Note: In flight bills will not automatically be transferred to the new accounting provider. Therefore, you will have two options for inflight bills:
- Manually add the payments to their old ERP and remove the bills from Ramp by marking them as synced.
- Resync the inflight flight bills to their new ERP by clicking retry bill and bill payment sync.
Step 3: Finalize and close out procurement activity prior to the transition date
If utilizing Procurement in Ramp, it's important to review and resolve any outstanding procurement activity. Since Ramp's procurement workflows are tightly integrated with bill creation, any in-flight requests or open purchase orders can result in incomplete or incorrectly coded transactions if processed after the transition date.
Review all open purchase requests and purchase orders. Complete and close out as many as possible before your transition date. This ensures that related bills can be approved, paid, and synced to your old accounting system as part of your close.
Avoid initiating new purchase requests in Ramp during the final days leading up to the transition. If necessary, pause procurement workflows or manage approvals outside of Ramp until your new ERP connection is live and fully configured.
- For any in-flight procurement items that won't be completed before the transition:
- Cancel and re-submit them after the transition date, once Ramp is connected to your new ERP, or
- Export the requests and track them manually, then re-enter the associated bills and purchase data after your ERP connection is established.
Clean up vendor data in Ramp. Consolidate duplicate vendor records and ensure vendor names and metadata are standardized. The migration tool will use these records when mapping historical data to your new ERP structure, and inconsistencies can lead to failed or misrouted bill syncs.
Step 4: Sync all of your card transactions to your old accounting system up until the transition date, and leave any transactions dated after the transition date as unsynced
Within your old accounting system, you want to perform a close to get the final account values as of the transition date. Therefore, you should sync all expenses incurred up to the transition date over to your accounting system. You may need to wait a few days after the transition date for any uncleared card transactions that occurred in the previous period to clear. Once they’re cleared, sync everything up to that date and then hold off syncing anything else until the transition is done.
Step 5: Sync all of your approved reimbursements to your old accounting system up until the transition date, and leave any reimbursements dated after the transition date as unsynced
As with cards, you want to sync across any reimbursements and repayments dated in the period prior to the transition date into the old accounting system before closing your books.
Step 6: Perform a final close on your old accounting system, generate trial balances, and import them into your new system
- You are now done with your old accounting system. Make sure you have captured all your Ramp transactions for the pre-transition date in your old accounting system and that you have performed any other close tasks on your old accounting provider. You can then generate your final financial statements, and you can get ready to move to your new system.
- At this point, you should import trial balances into your accounting provider as of the date of the switchover so your accounts are correct in the new system.
Note: If you don’t have a lot of transaction history, it may be beneficial to transfer all of your historical transactions to the new system rather than importing trial balances. When you import trial balances, you lose the ability to generate financial statements that occur within or span a period prior to the transition date. The mechanics of importing all historical journals are too complex to fully cover here - it is worth contacting your new accounting provider to discuss which approach is right for you.
Step-by-Step migration guide
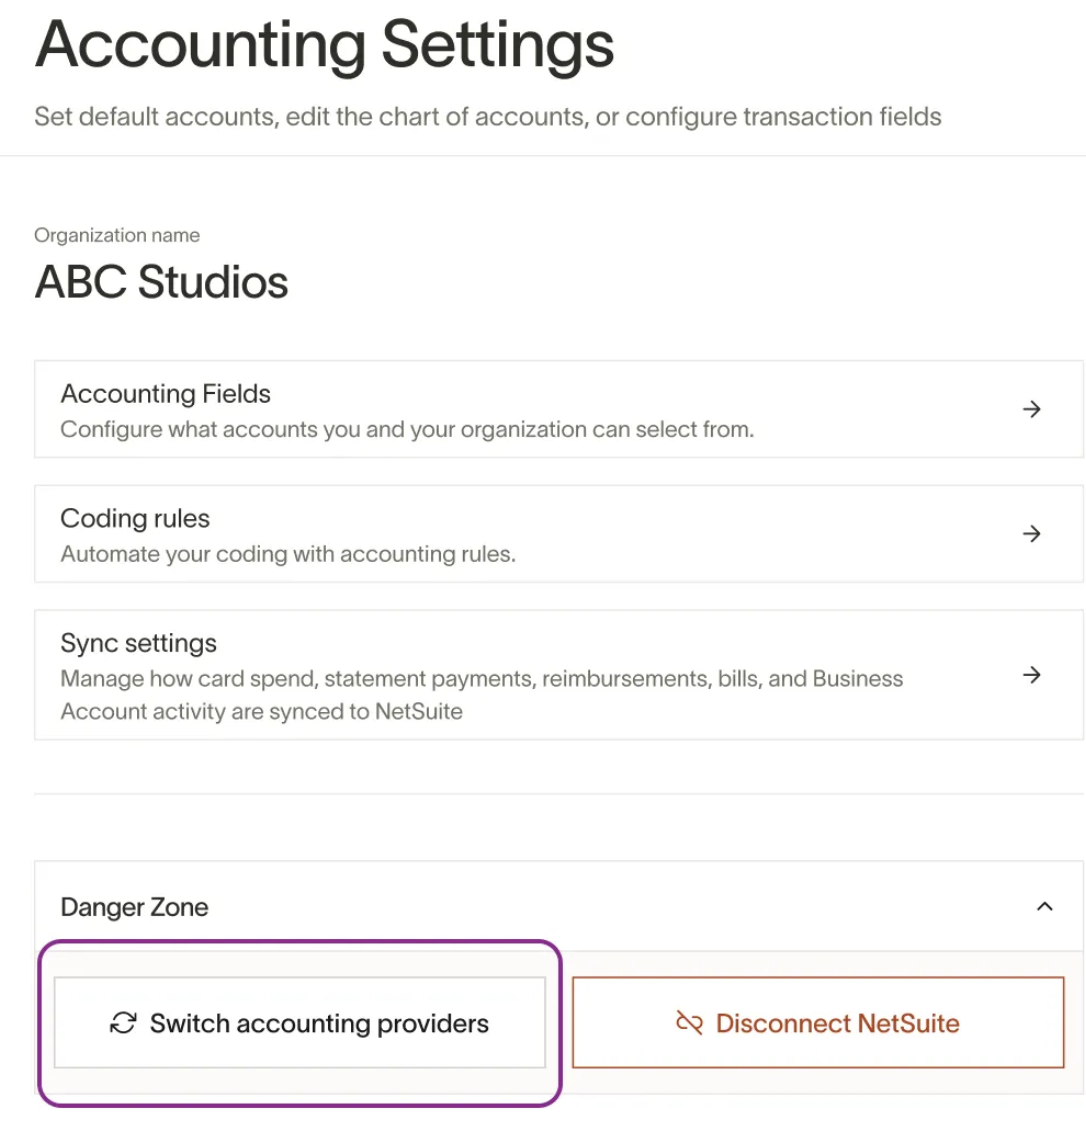
Step 1: Go to accounting settings
Navigate to Accounting Settings in your Ramp dashboard. Click switch accounting providers.
Step 2: Start the migration process
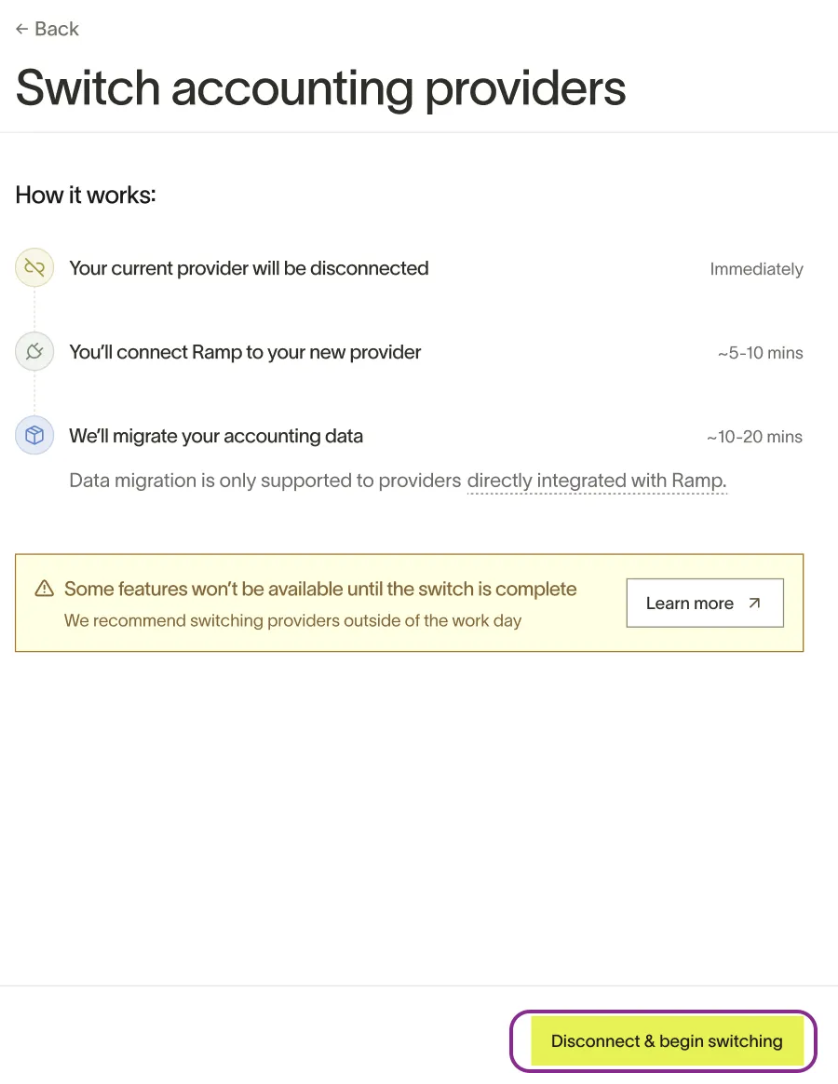
Click Switch accounting providers in the “Danger Zone” section. You’ll see a preview of the process:
- Disconnect your current provider
- Connect a new provider
- Migrate existing data
Click Disconnect & begin switching to proceed.
Step 3: Connect your new provider
Before you proceed: Note that many accounting providers have very stringent pre-configuration steps that must be completed before you can successfully integrate with them. Please make sure you've reviewed the Ramp setup guide that pertains to your new provider. Steps pertaining to roles, versions, and permissions are of utmost importance and the migration will stall if these are not completed.
Find your setup guide here and keep it open in another tab. Then, select and authenticate your new accounting provider.
Once authenticated, Ramp will take a few moments to prepare the necessary information for you to review and complete the migration.
Note: For large businesses, this process can take a significant amount of time, so Ramp allows you to leave and come back once we've finalized gathering the data.
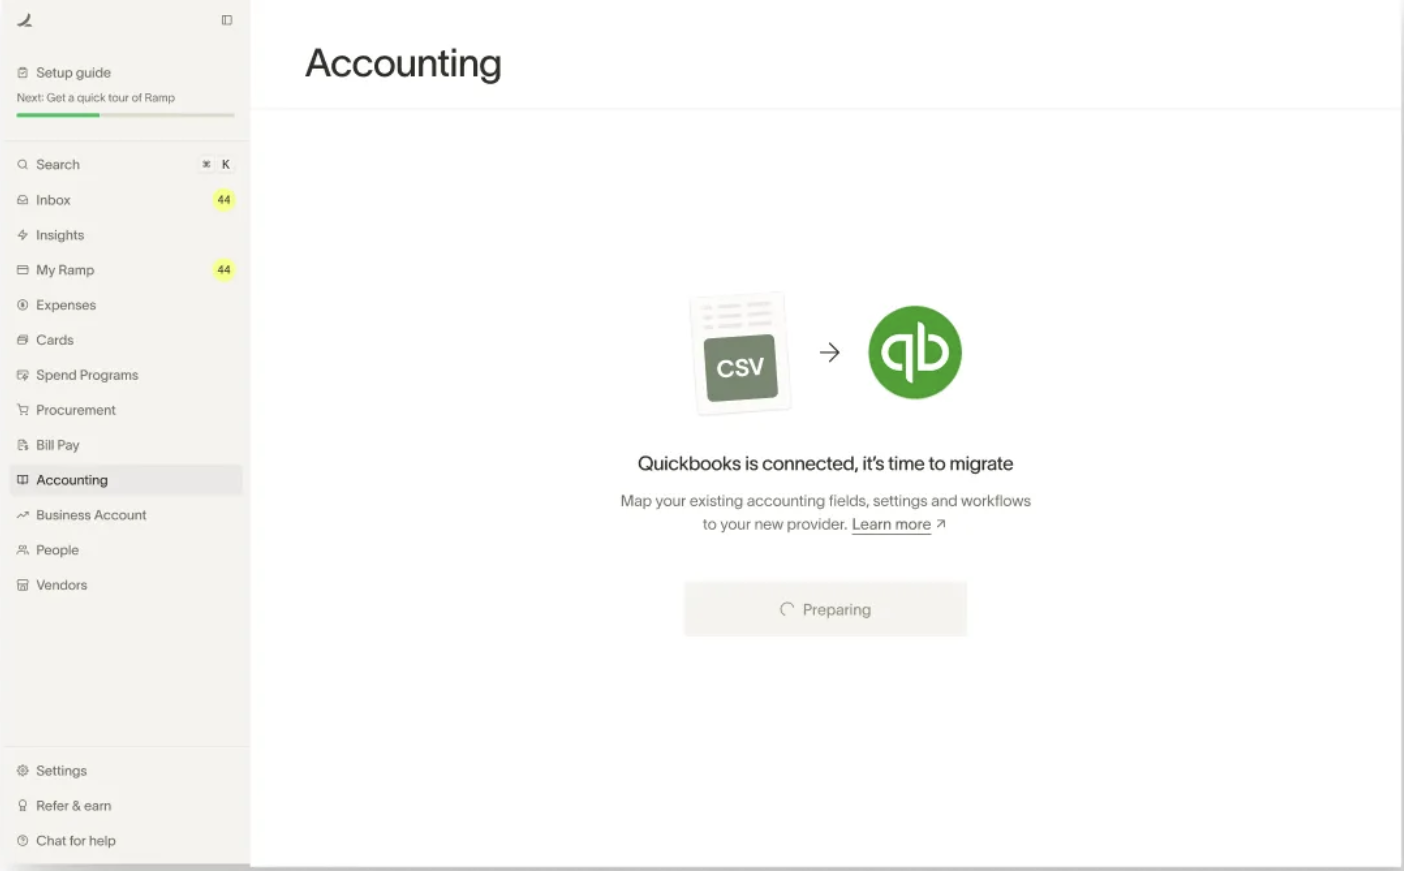
Once prepared Ramp will ask you to get started and review the information.
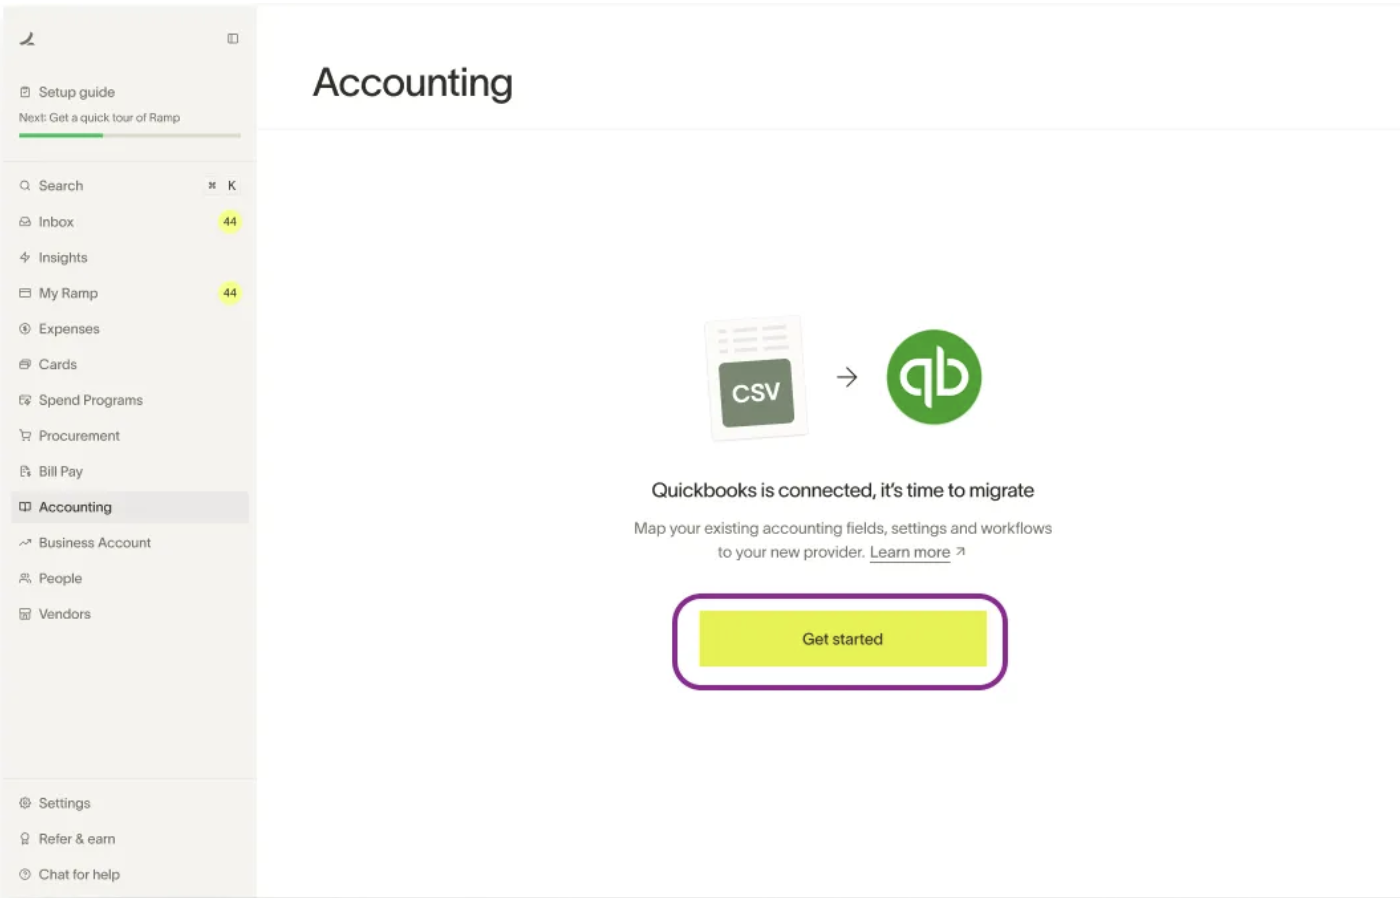
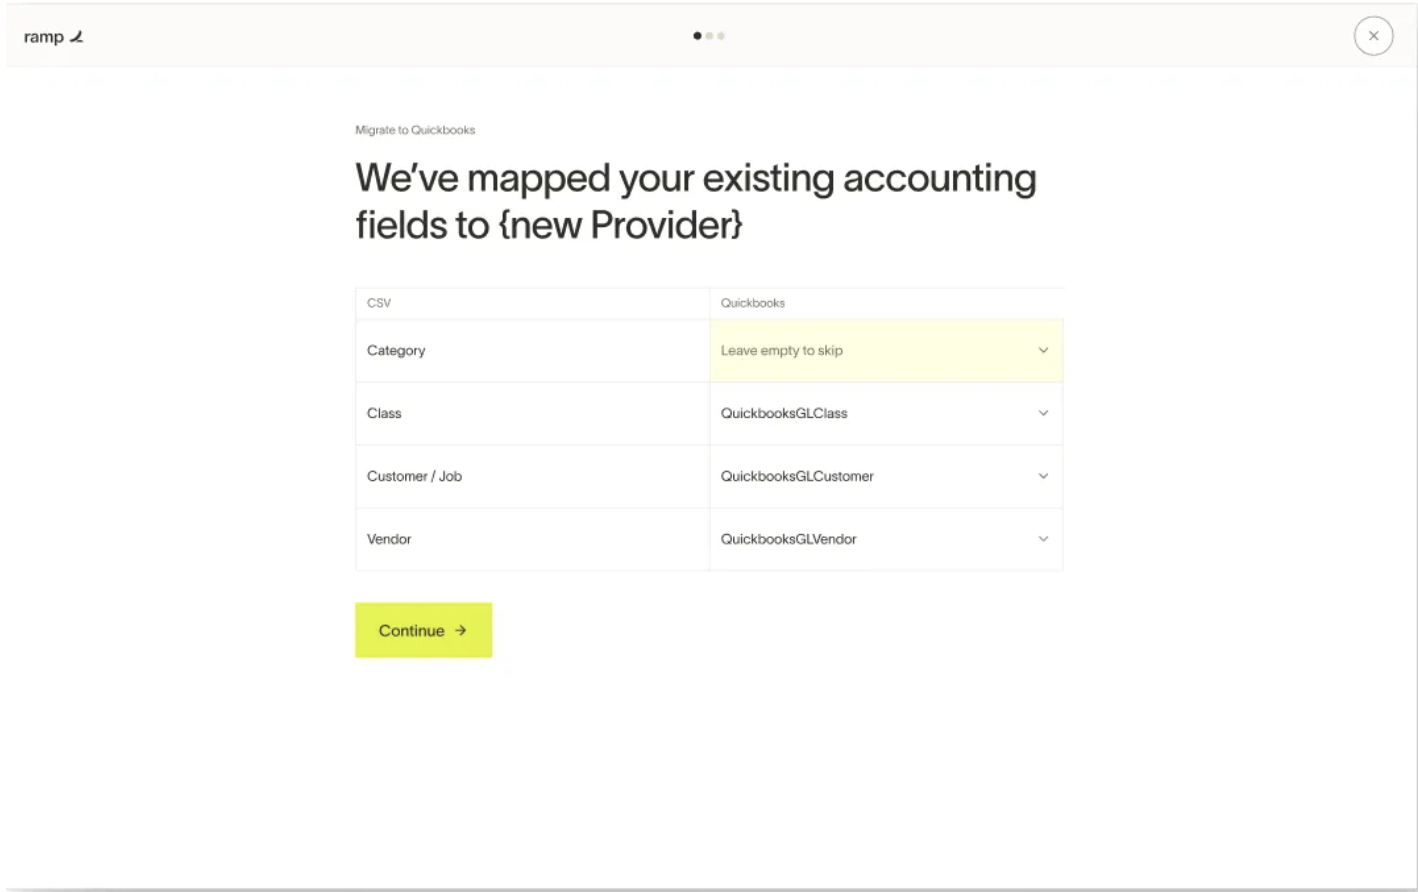
Step 4: Map your accounting fields
Ramp automatically maps your existing accounting data to your new ERP. You’ll see a preview of field matches — like Category, Class, Customer/Job, and Vendor.
Click Continue once fields are mapped.
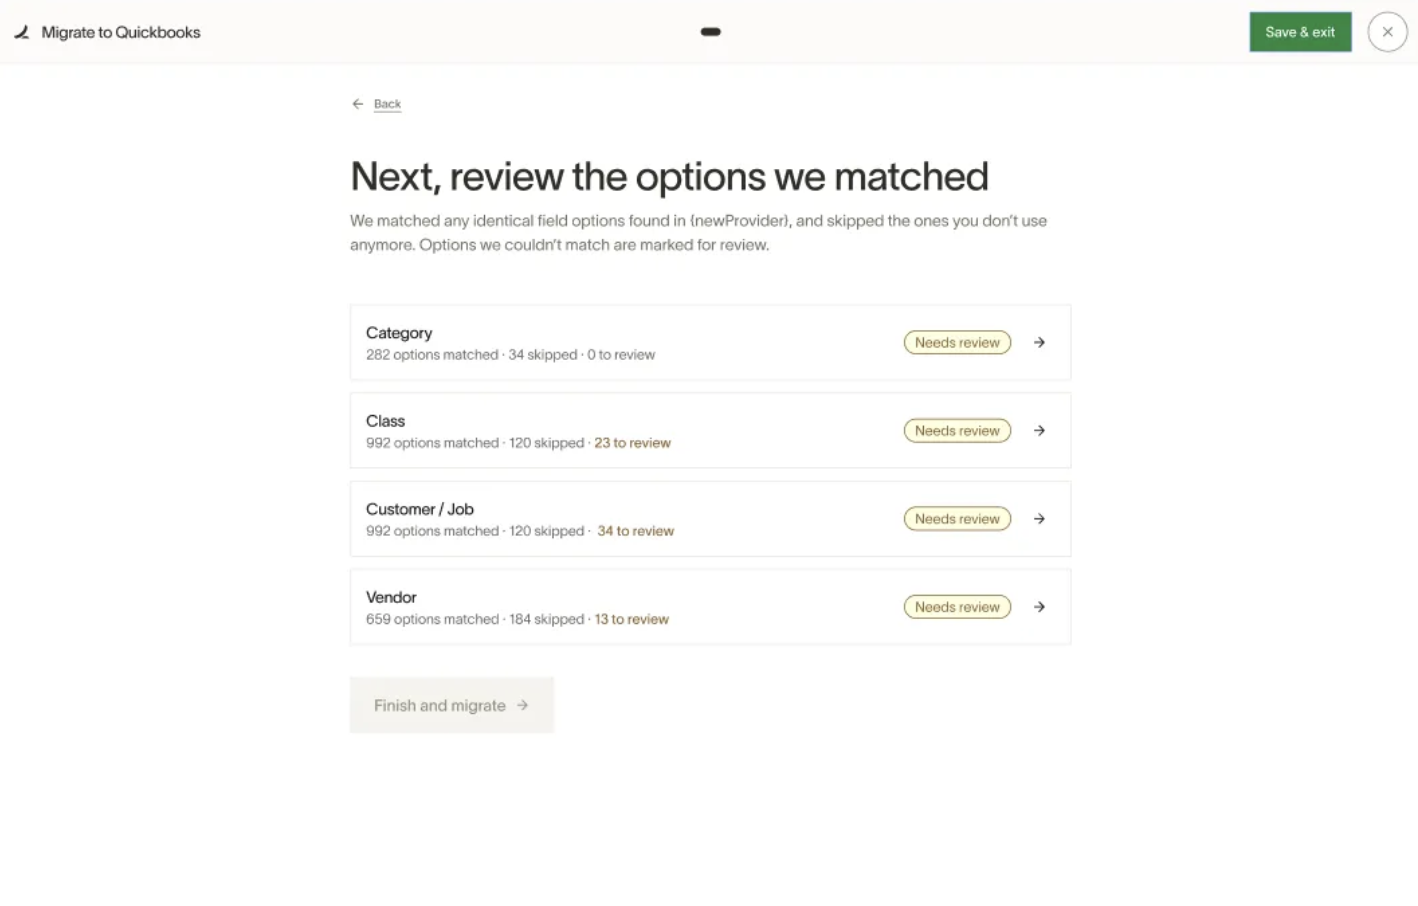
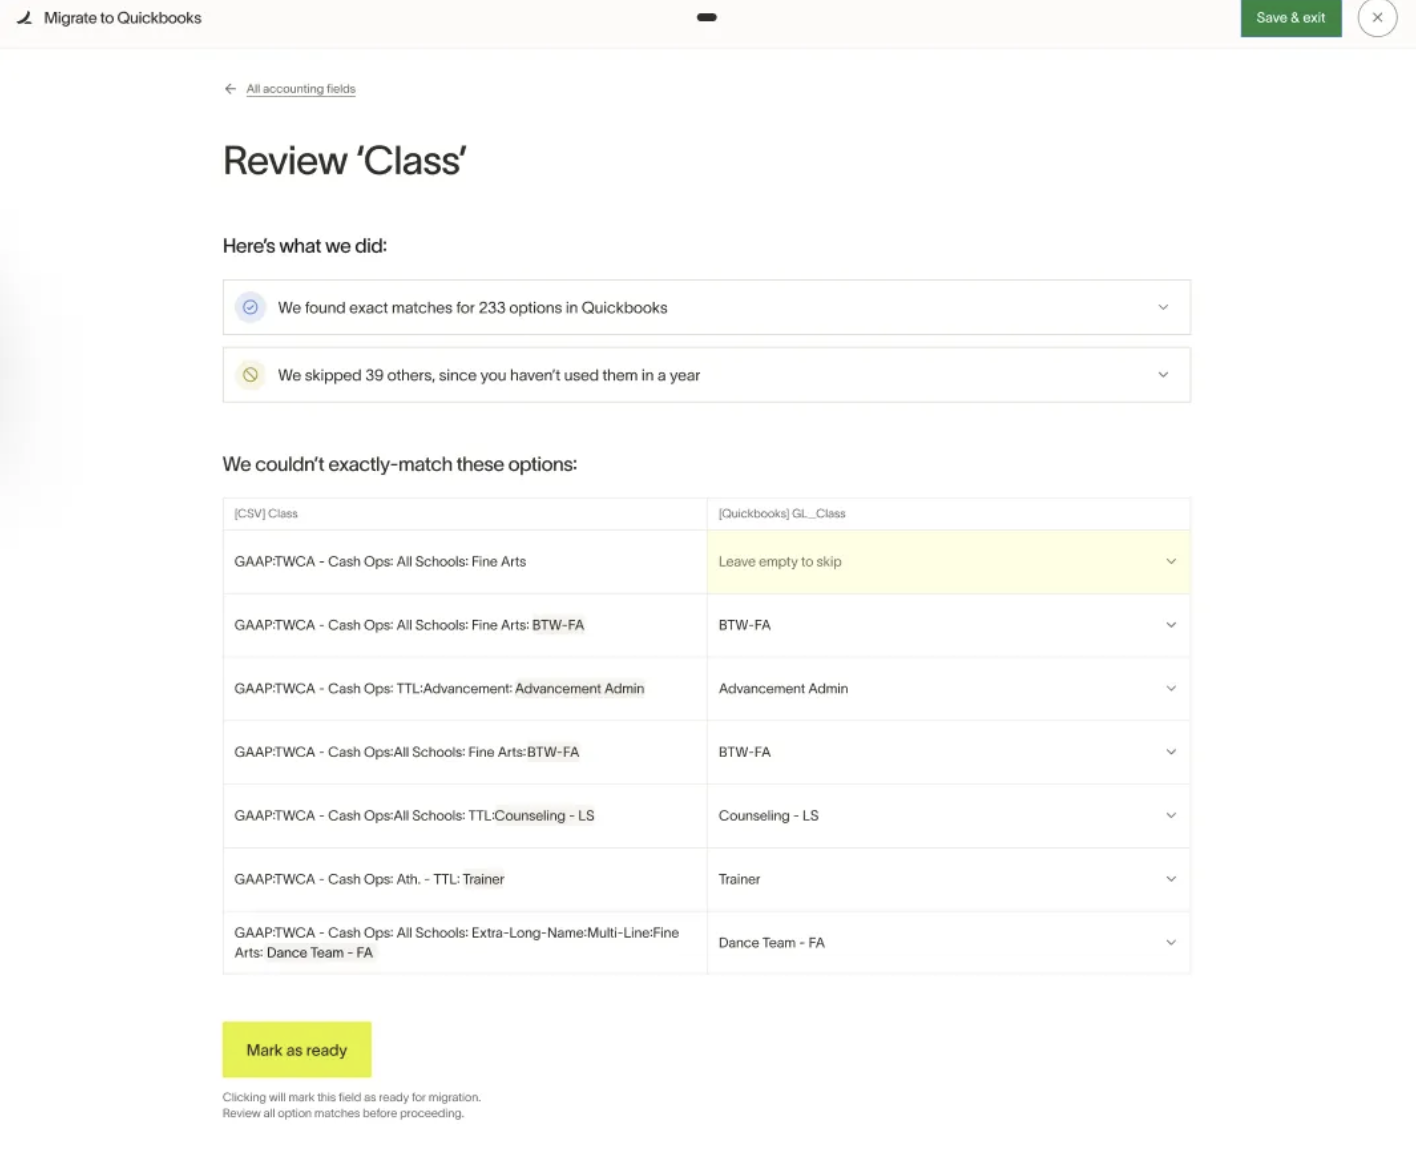
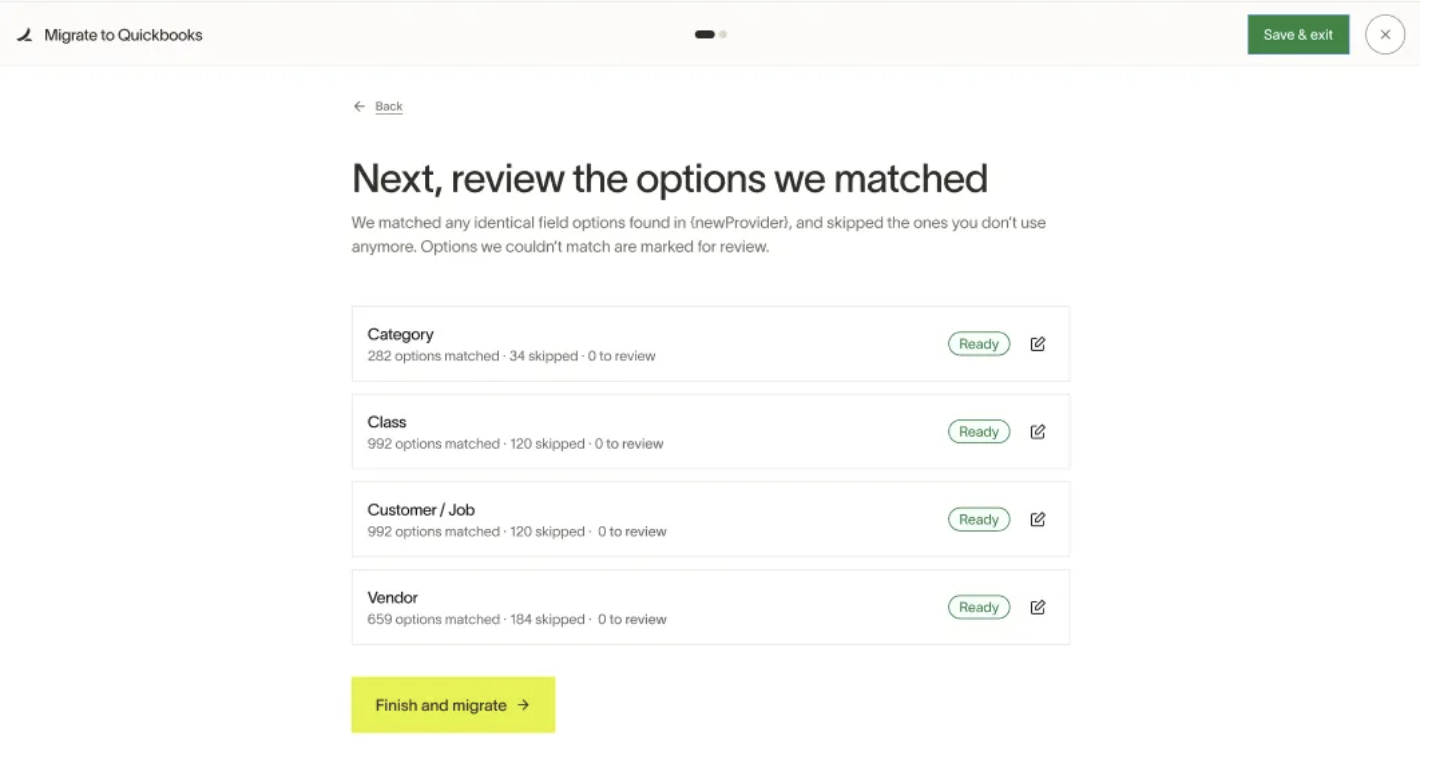
Step 5: Review matched values
Ramp highlights options that are:
- Matched automatically
- Skipped (if unused in the past year)
- Need review (if they couldn’t be auto-matched)
After verifying each group, click Mark as ready.
Step 6: Finalize the migration
Once all fields are marked “Ready,” click Finish and migrate to complete the switch.
Ramp will begin migrating your historical data and settings. This will take a few minutes.
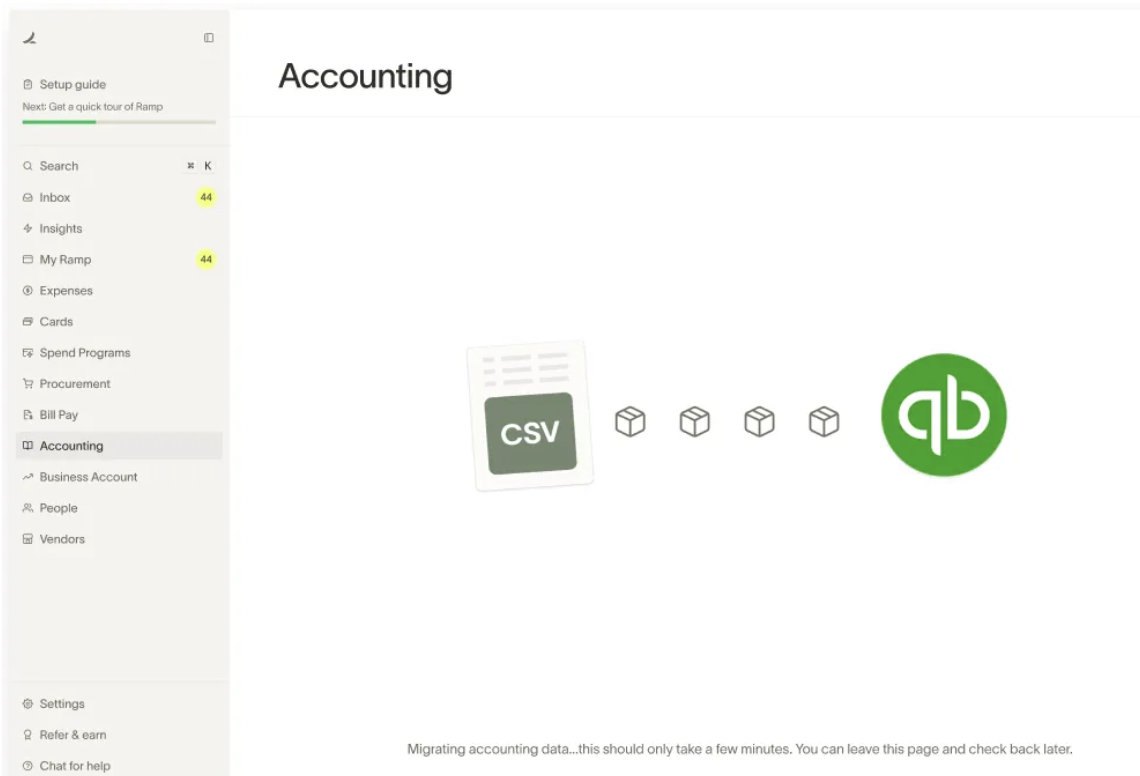
Post-Migration: keep working without disruption
Your accounting sync and workflows resume with your new provider — no need to reset rules, categories, or vendor links, etc.
ERP migration CSV export
What it does: Creates a backup of your historical accounting data before switching ERPs. This ensures you have a record of all coded transactions in case anything goes wrong during migration.
What's exported (3 separate CSVs, delivered in one email):
- Transactions CSV - Synced card expenses with GL accounts, memos, and tracking categories
- Reimbursements CSV - Synced employee reimbursements with accounting classifications
- Bills CSV - Synced vendor bills with vendor info, dates, amounts, and GL mappings
Key limitations:
- 50,000 records max per CSV (most recent records if you exceed this)
- Only synced data - Unsynced items won't appear (they often have incomplete data anyway)
- Processing time - Large exports can take up to 2 hours
- Download links expire after 24 hours
- One export at a time - Migration is blocked while export is in progress
How to use: Start the export from the ERP Migration page before disconnecting your old provider. You'll receive one email with download links for all 3 CSVs when complete.
Permission required: Accounting Setup access.
Frequently asked questions
What ERP migrations are supported?
- Customer is transitioning from UCSV to Direct Accounting Integration, ie UCSV -> NetSuite
- Customer is transitioning from Direct Accounting Integration to NEW Direct Accounting Integration, ie Sage Intacct -> NetSuite
Note: Customer who is transitioning from direct accounting integration to ucsv is not supported.
What should I know before kicking off the migration?
The flow will enable you to map all of your accounting fields and field options from your prior accounting provider to your new accounting provider. Ramp will then migrate all of your spend policies, rules, and any transaction codings where the transaction has not been synced to the old accounting provider. Transactions that were synced to the old provider will not be updated and no record will maintain in Ramp. Transactions that have not been synced to the old provider will be updated with the coding from the new accounting provider.
How does the ERP migration tool support in-flight bills?
In flight bills will not automatically be transferred to the new accounting provider. Therefore, you will have two options for inflight bills:
- Manually add the payments to their old ERP and remove the bills from Ramp by marking them as synced.
- Resync the inflight flight bills to their new ERP by clicking retry bill and bill payment sync.
Can I bulk-reset the sync status of previously synced transactions after migrating?
No. There is no way to bulk-reset or bulk-unsync transactions that were already synced to your old accounting provider. Those transactions remain marked as synced and do not re-appear in the Accounting queue for your new provider.
Instead, to get historical transaction data into your new system after migrating, use the ERP Migration CSV Export described above. It generates CSV files covering your synced transactions, reimbursements, and bills, which you can then import into your new accounting provider.
Transactions that were not synced to your old provider before the migration are automatically remapped to your new provider's accounting field mappings and appear in the Accounting queue ready to sync.
What happens if I need to reverse the migration?
If a customer experiences issues, then they can revert back to their old accounting provider connection and transaction codings and accounting rules will be restored. However, all workflows, bill codings, vendor codings, codings created by card rules will not be restored.